- Home
- Free Quilt Block Patterns
- Southern Belle Quilt Block
Southern Belle Quilt Block Tutorial
From our Free Quilt Block Patterns Library
This post contains affiliate links, for which I receive compensation.
Skill Level: Beginner
The Southern Belle quilt block is a close relative of the Whirlwind block in that both use nothing but quarter square triangles in their construction. The only difference is a third fabric is added.
This time, we'll use the paperpiecing technique to make the block instead of traditional piecing.
The results are perfection every time!

Quick and simple to construct, this block would be fun for a quick baby quilt.
On this page you'll find cutting instructions for 3 block sizes, a piecing tutorial, as well as, a number of other related blocks for color placement ideas. And finally there are free downloadable paperpiecing patterns for your use.
Let's get piecing the Southern Belle block!
General Instructions
All seam allowances (SA) are 1/4" unless otherwise indicated.
When you are instructed to press, first press the pieced unit flat to set the seam. Then open the patch, pressing from the front.
You may want to reduce or eliminate the use of steam for pressing these paper pieced blocks. Steam tends to curl the patterns.
Take a minute to review our favorite 'secret' technique to getting the flattest quilt blocks you'll ever see. It works even with the paper attached. Now THAT'S sweet!
Step 1: Download free paperpiecing patterns
The Southern Belle quilt block is made from 3-patch quarter square triangle units that are paperpieced.
You'll need Adobe Reader installed on your computer in order to open and print the patterns. You can get Adobe Reader here (a new window will open so you can download it without leaving this page) if you need it.
Choose your finished block size and print the pattern. After printing, measure the 1" square to confirm the page printed correctly.
Print the QST 3 Patch Units | ||
|---|---|---|
| Finished Block Size | # of copies | Link to PDF Download |
| 4" | 1 | 2" |
| 5" | 1 | 2-1/2" |
| 6" | 1 | 3" |

Not sure which paper to use?
Take a look at my review of several of the most popular brands available to us quilters on the market.
You want a super-easy paper to tear away—less stress on the stitches.
New quilt fabrics to tickle your fancy...
Click the images below to see the full collection. We share any commercial and/or free patterns that showcase them, too. (For inspiration, of course!)


Step 2: Cutting for the Southern Belle
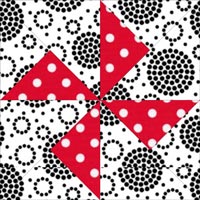
 Southern Belle design
Sample Block: 6" finished / 6½" unfinished
Grid: 2x2
Design Type: 4-patch, Pinwheel
Pre-cutting patches for paperpiecing instead of just using 'hunks' of fabrics guarantees that the outside edges of the finished unit are all on the straight of grain.
This adds stability to your finished Southern Belle quilt block.
These patches are generously sized so that placement is virtually fool-proof.
Make a few blocks.
Then with that experience decide if you need to increase or decrease the size of the patches according to your needs. Note those change on a separate copy of the pattern and save it for future reference.
 | Cutting Chart for a~ Paper Piecing ~ | |||||
|---|---|---|---|---|---|---|
| Patch | Fabric | Qty | Finished Block Size | Sub Cut | ||
| 4" | 5" | 6" | ||||
| 1 | Light | 1 | 3¾" x 3¾" | 4¼" x 4¼" | 4¾" x 4¾" | |
| 2 | Dark | 1 | 3¾" x 3¾" | 4¼" x 4¼" | 4¾" x 4¾" | |
| 3 | Med | 1 | 3⅜" x 3⅜" | 3⅞" x 3⅞" | 4⅜" x 4⅜" | |
| 4 | Dark | 1 | 3⅜" x 3⅜" | 3⅞" x 3⅞" | 4⅜" x 4⅜" | |
| Unfinished Block Size | 4½" | 5½" | 6½" | na | ||
| Grid Size | 2" | 2½" | 3" | na | ||
And these are the cut patches:

Step 3: Assemble the units
General Sewing Machine Setup for Paperpiecing
- Reduce your stitch length to 16–20 stitches per inch (1.3-1.6 mm). This perforates the paper and stabilizes the seam when you remove the pattern. [Learn more about stitch length here.]
- Reduce your machine's speed or just plain slow down. Sew only as fast as you can stay on the stitching lines.
- Install an open toe appliqué foot (sometimes called an 'embroidery' or 'satin stitch' foot) if you have one (it's easier to see where you're stitching with one installed).
- Use a larger needle (90/14) if you have problems removing the pattern.
- If your machine has a needle stop up, use it. The stitching goes faster when you don't have to lift the presser foot with every seam.
- As you stitch each seam, start and stop a generous 1/4” before and after the solid stitching lines. ALWAYS. Future lines of stitching secure the ends.
After adding each patch, press the unit as it was sewn to set the seam and then open. The SA is automatically pressed towards the last patch added.
Before adding the next patch, take a look to make sure the one you just added covers the space plus seam allowance that it is supposed to.
Steam is optional and usually curls the pattern.
If that bothers you, don't use steam. Sometimes I do. Sometimes I don't.
It truly depends on my mood.
Remember, as you follow this paper piecing tutorial, the printed and the fabric sides of this block are mirror-images of each other.
At last!
Let's sew!
With a light dab of Elmer's Glue Stick(goes on purple, dries clear), adhere Patch QST.1 in place to your pattern—wrong side of fabric to unprinted side of paper. When it is properly place the edges of the patch line up with the dotted lines surrounding #1 on your pattern.

With right sides together (RST), match the edges of a small dark QST.2 triangle with QST.1.

From the printed side of the pattern, sew the seam between QST.1 and QST.2, starting before and stopping after the solid line.

Press.
Next align the bias cut edge of a medium QST.3 triangle with the long edge of the unit, RST.

Stitch on the solid line between them, again starting before and stopping after the printed line.
Press.
Repeat for the remaining three units. Two will have dark QST.3 triangles; two will have medium ones.
After stitching, trim all the units to size by placing the quarter inch line of your ruler on the solid outside line of the block. I find it much easier to do this than try to line up the edge of my rotary ruler with the outside dotted line.
Remove the paper and give each block a final press.

The paper piecing is complete. From this point forward, return your stitch length to the one you regularly use for piecing and install your favorite 1/4" presser foot.
Step 4: Assemble the Southern Belle
Lay out the units into rows.

You Have a Choice
The order of the paper piecing dictates the direction in which SAs are pressed.
However, once the paper is removed you ARE ABLE to press the last SA away from the large triangle...if you choose..
You may find easier to stitch the units to each other because the seams nest then.
The choice is up to you. (In this example, I chose NOT to re-press them, but instead used a pin to hold things in place.)
Stitch the units into rows or columns.

Press with the SA towards either towards the dark or the light—just be consistent for both pairs so that the seams will nest.
Stitch the rows or columns together.
Press.
Congratulations! Your Southern Belle quilt block is complete.
 Our Southern Belle is ready for a quilt
Variations on the Southern Belle design
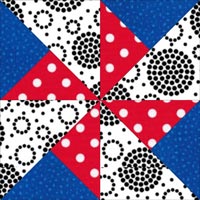
Several other blocks use this 3-patch quarter square triangle block pattern. They include:
Turnstile
A two fabric, 3-patch quarter square triangle.
Whirlwind
Simply the Turnstile above with an extra fabric.
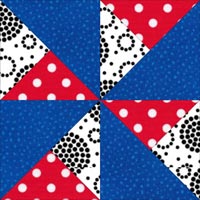
Whirligig
Swapping fabrics around.
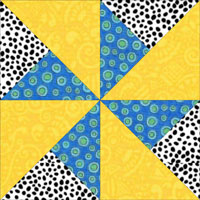
Double Pinwheel
Click here for instructions to make the Double Pinwheel quilt block using traditional methods.
Another Whirlwind variation
Just two patches away from a Southern Belle quilt block!
Click here for traditional piecing instructions (i.e. no paper piecing) to make this block.
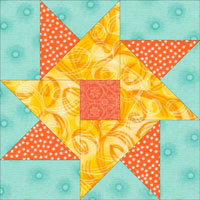
Double Star (aka Hope of Hartford)
Just add a center square and side rectangles.
Click here for instructions for this puzzle pieced Double Star quilt block.
I Do Declare, There's Even More Blocks!
Put down that Mint Julep!
There's quilt blocks to make.
Just check out our Free Quilt Block Pattern Library to find a beauty for your next quilting creation!
What about a different quilt block?
For a list of all the 260+ quilt block patterns on this site, start here.
If you know the name of the block, shorten your search by using these links:
Click here if you're looking for blocks with at least some paper piecing.
Click here if you're looking for the basic building blocks of quilting, i.e., Flying Geese, half square triangles, quarter square triangles, etc., along with several techniques to make each.
And finally, use these links to find blocks in these finished sizes:
For even more blocks to make...

For you, are quilt block designs like potato chips...
...you can't have just one?!!
Check the amazing resources I rely on for all the quilt block designs you see on this website.
To see if they're worthy of a spot in YOUR quilting library, CLICK HERE.


My
Favorite Paper
Piecing Tools
For a complete list of all the tools I personally use, click here to read 'The Right Tools Make Your Job Easier', part of my series called, "Essential Paper Piecing Skills".


The serrated edge on this short-bladed scissor make it easy to trim seam allowances—my all-time favorite scissor.

By Julie Baird
Copyright © 2008-2026 Generation Quilt Patterns, LLC
All Rights Reserved
Generations-quilt-patterns.com does not sell any personal information. (See Privacy Policy)