- Home
- Free Quilt Block Patterns
- Grandmothers Cross Quilt Block
Grandmother's Cross Quilt Block
From our Free Quilt Block Patterns Library
This post contains affiliate links, for which I receive compensation.
The Grandmother's Cross quilt block belongs to a family of blocks whose inner units are on-point. (One of the simplest blocks from this family is the Square in a Square. Another similarly constructed block is Mosaic #3.)
In this tutorial, you'll find both a some-cost and a no-cost alternative to make it using either a specialty ruler or templates.
Choose the method that most appeals to you.

Grandma's not cross, but she'd sure like you to get started with her block!
📋 General Instructions
All seam allowances are 1/4" and pressed towards the darker fabric unless otherwise indicated.
Because we'll be sewing a number of bias edges, starching your quilt fabric before you cut helps to minimize stretching during the stitching, pinning and pressing of the block.
I strongly urge you to take a Sewing Test with scraps from your block to check and fine-tune the accuracy of your 1/4" seam allowance. It's quick and easy.
New quilt fabrics to tickle your fancy...
Click the images below to see the full collection. We share any commercial and/or free patterns that showcase them, too. (For inspiration, of course!)


Step 1: Cut the patches for a Grandmother's Cross
As promised, two cutting options are presented for the Grandmother's Cross quilt block. The first uses the On-Point Ruler. The second uses templates.
On-Point Ruler (OPRuler)
 Grandmother's Cross
Sample Size: 8" finished / 8½" unfinished
Grid: 8x8
Attribution: KC Star
Design Type: On-Point
If you'll be using the On-Point ruler, use this first cutting chart. Use the OPRuler for Patches #3 and #4. Use your everyday quilting ruler for #1 and #2.
To make the chart easier to read (and so that I could include 4 different sizes) I've abbreviated 'Background' to 'Bac'.
When there's a single number, i.e. 1 7/8" for Patch #1 in a 4" finished block, that means to cut a 1 7/8" by 1 7/8" square.
 | Cutting Chart for a~Traditional Piecing~ | ||||||
|---|---|---|---|---|---|---|---|
| Patch | Fabric | Qty | Finished Block Size | Sub Cut | |||
| 4" | 6" | 8" | 10" | ||||
| 1 | Bac | 2 | 1⅞" | 2⅜" | 2⅞" | 3⅜" | |
| 2 | Bac | 1 | 3¼" | 4¼" | 5¼" | 6¼" | |
| 3** | Light | 1 | 1” x 19” | 1½" x 24” | 2” x 30” | 2½” x 36” | na |
| 4** | Dark | 1 | 1” x 19” | 1½" x 24” | 2” x 30” | 2½” x 36” | na |
| Unfinished Block Size | 4½" | 6½" | 8½" | 10½" | --- | ||
| Grid Size | 1" | 1½" | 2" | 2½" | --- | ||
**REMEMBER, these measurements for the #3/#4 patches are for an OPRuler. They are not the same as with your everyday quilting rulers. If you don't have this ruler, use the templates furnished below.
Template Cutting
Download the template page that corresponds to the finished size you need from the table. Use Adobe to download them.
I've included grainlines in the patches and they seem to only seem to show up or show up correctly when they're printed with Adobe.
If you don't have this program, you can freely download it here.
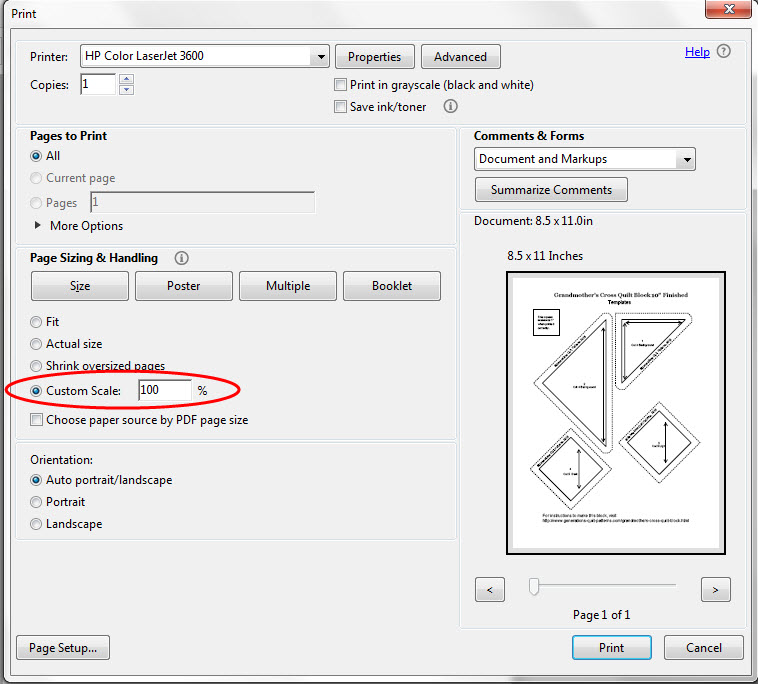
In the 'Page Size and Handling' section of Adobe's print menu, you MUST set 'Custom Scale' to 100% so that the they print at the correct size.
| PRINT the TEMPLATES for Grandmother's Cross |
|---|
| Finished Block Size |
| 4" |
| 6" |
| 8" |
| 10" |
There's a small square on each page that measures 1" when it's correct.
Click here to see where this is on the Print Menu page.
For more detailed instructions about downloading and printing, go to How to Use Quilting Templates.
Step 2: Make the four patches
 Four patch unit
The patches for these units were cut with either the OPRuler or a template. Follow the instructions for the appropriate method.
On-Point Ruler
Cut the #3 and #4 strips using the OPRuler.
Below, you can see the difference in the rulers when they're placed side by side on the same cut strips.
 Measuring the same strip with the two different quilting rulers.
The On-Point is the perfect tool for cutting squares, rectangles or half square triangles that are 'on-point' in a block. The orange and yellow squares in our Grandmother's Cross are just such units.
If you look closely at our cut strip when it's measured with a regular rotary ruler, the strip width is just shy of 2" wide.
Now that might not look like much, but if I'm going to go to the bother of perfecting my quarter inch seam allowance, it seems silly to me to then be willing to 'fudge' the measurement of these strips.
That's why I don't rotary cut these units with my standard rulers.
With right sides together (RST), stitch #3 and #4 strips together along the long edge with a 1/4" seam allowance.
Press unopened to set the seam and then open with the SA towards the darker fabric.
Again using the OPRuler, subcut the strip-set into units using the chart below.
| Finished Block Size | Width of StripSet after stitching | Subcut Width |
|---|---|---|
| 4" | 2” | 1” |
| 6" | 3” | 1 1/2” |
| 8" | 4” | 2” |
| 10" | 5” | 2 1/2” |
Align the subcut measurement (in this case 2" for this 8" finished sample block) with the straightened edge of the strip set (white arrow). Cut along the clear opposite edge (black arrow).
 Don't forget—we're still using the OPRuler for our subcutting. Here I'm subcutting 2" units for my 8" finished Grandmother's Cross.
Cut 10.
Templates
If you've used a template to cut your patches, sew 10 pairs of #3 and #4 patches, pressing to the darker fabric.
For either method of cutting, now arrange them into pairs alternating lights and darks.
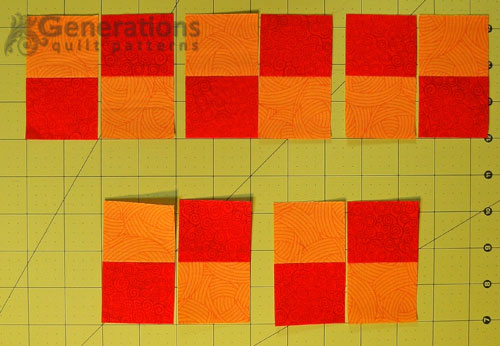
From this point forward, the instructions are the same for either cutting method.
With RST, stitch the pairs together.
In the center, pick out a few stitches to release the SA and twirl the seams as shown below. Press.
 Twirled seam allowances reduce bulk
Step 3: Stitch the Grandmother's Cross units into rows
Arrange the #1 and #2 triangles and the sewn four patches as shown below. The darker fabric is at the top and bottom of the four patches. The SA 'twirl around in a counterclockwise direction.
 The twirled SAs nest to make matching seams easier
Starting with the upper right four-patch, with RST align a shorter edge of a #2 triangle with the edge of the four-patch. Since the tail on the triangle is so long, I prefer to pin to hold things in place.
Stitch, starting from the even side.
 If that triangle point wants to move, use a stilleto to hold it in place. If you don't have a stiletto, use the point of your seam ripper.
Stitch the second #2 to the opposite side of the four-patch.
Press with SA toward the #2s.
If you stitched with an accurate 1/4" SA, the triangle will extend a smidge past the bottom of the 4-patch. (white arrows below)
 You can just make out the fingerpressed crease in the #1 HST.
To find the center of the #1 triangle, fold it in half and fingerpress a crease. You can just make it out above.
With RST, match this crease with the seam in the 4-patch. Pin.
This time, your 1/4" seam should begin and end in the valley created by the patches. (white arrow below).
Use a stiletto (the point of your seam ripper or a bamboo skewer will do in a pinch) to hold the long points of the #1 in place during sewing.
 The seam begins in the valley created by the two units
Press with the SA toward #1. Create another unit like this starting with the lower right 4-patch.
To make the center row, with RST stitch the three 4-patches together paying careful attention to the direction of the SAs. Stitch a #1 to each short end, folding and fingerpressing the #1's in half to find their centers.
With RST, add the #1s to each end of this center unit in the same way as the corners.
Step 4: Assembling the Grandmother's Cross quilt block
Arrange the units into diagonal rows. Trim the dog ears away either now or later, it doesn't make any difference unless they are in your way now.

With RST, match and pin a corner to one side of the center. Again, your 1/4" SA starts and ends in the valley created by the two units.
 Yes, I use pins--especially because of the triangle points that stick out at the beginning and end of the seam. I'll use my seam ripper as a stiletto to guide those points thru the machine.
Add the second corner unit to the opposite side.
Press with the SA away from the center.
This is the finished Grandmother's Cross quilt block.
 Our Grandmother's Cross is ready to be pieced into a quilt!
For even MORE blocks to make… 🧩🎨

...visit our Free Quilt Block Pattern Library, with over 260+ blocks to choose from in multiple sizes.
Free downloads are included in all sizes for any blocks require paper piecing patterns or templates.
- Home
- Free Quilt Block Patterns
- Grandmothers Cross Quilt Block


Yummy fabrics
to drool over
Click any image below to see the full collection and find pricing and ordering information.


By Julie Baird
Copyright © 2008-2026 Generation Quilt Patterns, LLC
All Rights Reserved
Generations-quilt-patterns.com does not sell any personal information. (See Privacy Policy)