- Home
- Free Paper Piecing Patterns
- Evas Garden Quilt Block
Eva's Garden Quilt Block
From our Free Quilt Block Patterns Library
This post contains affiliate links, for which I receive compensation.
Skill Level: Confident Beginner
An Eva's Garden quilt block is a grab bag of a beginning quilter's basic building blocks—half square triangles, Flying Geese and four patches surrounding an Economy Block.
It might seem complicated—and I SERIOUSLY questioned whether I was a glutton for punishment making a 4-1/2" finished sample block—but with paper piecing all you need to do is stitch on a line. (There's a wee bit of traditional piecing thrown in to finish those four-patches!)
Cut generously and you're well on your way to perfect points without the 'throw-the-sewing-machine-out-the-window' frustration.
Your Eva's Garden is a walk in the park!

📋 General Instructions


I prefer to paper piece using an open toe applique foot. There's nothing to obstruct the view of the needle. You'll see me switch back to my favorite 1/4" foot with a guide for sewing the units together.
Reduce your sewing machine's speed if you can. Sewing slower is actually faster in the long run.
Staying on the line is critical to a block that's easy to assemble. It's much simpler to do this when you sew at something less than 'as fast as a jack rabbit'! And ripping, is time consuming and frustrating. Something to be avoided if possible. So reduce your sewing machine's speed.
After I prewash my fabric, I give it a generous dose of spray starch so that I can do some fingerpressing instead of jumping up to the iron after stitching every seam.
I prefer Elmer's Washable Glue stick—the one that goes on purple and dries clear. It washes out easily.
Step 1: Download and print pattern
To download the free patterns, you must have Adobe installed on your computer. You can get it here if you don't already have it.
WHY ADOBE?
It's simple. My patterns have dashed placement guides to make positioning the first patch virtually foolproof.
With Adobe, those lines print exactly as intended—DASHED. In other programs they render as solid lines. That can make the pattern confusing, especially for the beginning quilter.
Now choose your finished size from the table below and print the corresponding page(s) and number of copies.
| PRINT the Paper Piecing Patterns | ||
|---|---|---|
| Finished Block Size | # of copies to print | Link to PDF Pattern |
| 4-1/2” | 1 | 4-1/2" |
| 6” | 1 | 6" |
| 9” | 1 | 9" |
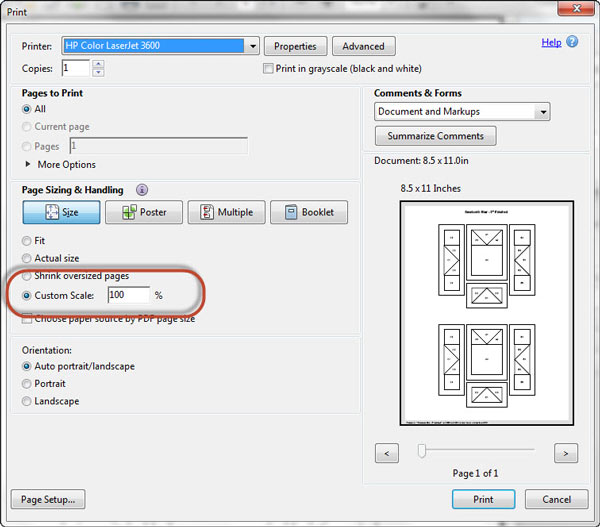
To print patterns at the correct size, under 'Page Sizing and
Handling' in Adobe's print menu, set 'Custom Scale' to 100%. Click here to see where it's at on the Print Menu page.
If you use something other than Adobe, you'll need to set 'Page Scaling' to 'None' to print at '100%'. Printing at 'Actual Size' tends to print at weird sizes. (Don't know why, it just does.) Use the 1" square graphic to confirm that you've printed correctly before sewing.
Cut out one large center and four side units just outside the dashed outside line.
Step 2: Cut the Eva's Garden patches
 Eva's Garden design
Sample Size: 4½" finished / 5" finished
Grid: 12x12
Design Type: Uneven 9-patch, large center, Blocks that form chains
With all the points in this patchwork design, to keep them really pointy choose fabrics with very good contrast.
For the smaller sizes, especially the 4-1/2" one, you'll want fabric that read closer to a solid. My red and white worked okay because of the stark contrast with the black. However, if there'd been black in it, too, I believe some of the points would've been lost where black touched black.
If you're not sure if there's enough contrast, make a sample before making the final fabric choices for your quilt...you can always use it later for a label or a scrappy quilt.
And finally, don't forget to subcut #2-7 (fourth column in from the left—#4 is cut twice on the diagonal; the rest are cut once diagonally to form the necessary triangles for the sides units).
 |
Cutting Chart for an~ Paper Piecing ~ | |||||
|---|---|---|---|---|---|---|
| Patch | Fabric | Qty | Sub Cut |
Finished Block Size | ||
| 4-1/2” | 6”` | 9” | ||||
| 1 | Bac | 1 | na | 2” x 2” | 2-1/2” x 2-1/2” | 3-1/2” x 3-1/2” |
| 2 | A | 2 | | 2-3/8” x 2-3/8' | 2-3/4” x 2-3/4” | 3-1/2” x 3-1/2” |
| 3 | Bac | 2 | | 2-7/8” x 2-7/8” | 3-3/8” x 3-3/8” | 4-3/8” x 4-3/8” |
| 4 | A | 1 | | 3-1/8” x 3-1/8” | 3-5/8” x 3-5/8” | 4-5/8” x 4-5/8” |
| 5, 7 | Bac | 8 | | 2-1/8” x 2-1/8” | 2-3/8” x 2-3/8” | 2-7/8” x 2-7/8” |
| 6 | A | 4 | | 2-1/8” x 2-1/8” | 2-3/8” x 2-3/8” | 2-7/8” x 2-7/8” |
| 8 | Bac | 1 | na | 7/8” x 8” | 1” x 9” | 1-1/4” x 11” |
| 9 | A | 1 | na | 7/8” x 8” | 1” x 9” | 1-1/4” x 11” |
| Unfinished Block Size | 5” | 6-1/2” | 9-1/2” | |||
| Grid Size | 3/4” | 1” | 1-1/2” | |||

Step 3: Assemble the units for Eva's Garden
Install an open toe applique foot if you have one. Reduce your stitch length to 15-18 stitches per inch. This makes more perforations in the Eva's Garden paper patterns and reduces the stress on each individual stitch. Both benefits make it easier to remove the paper at the end.

Economy Block
Make 1
I chose a black background fabric for this Eva's Garden. The choice is always up to you!
Use a bit of glue stick to adhere the wrong side of #1 to the unmarked side of the paper.
 Use the placements guides (arrows) to easily position #1
With right sides together (RST), match the long edge of a #2 to #1.
 The point of #2 should be directly opposite the corner on the pattern.
Stitch, starting approximately 1/4" before and ending a 1/4" after the solid line between #1 and #2. If you're starched your fabric, fingerpress this seam open. Otherwise use your iron.
Repeat for the remaining #2s.
 Use a scissor to trim away the dog ears (arrows) and reduce bulk.
Trim the SAs to 1/4" with your rotary cutter and ruler.
 The first five patches after trimming...
With RST, match the long edge of #3 to #2.
 For easy positioning line up the corner of the patch with the corner of the sewn #1.
Stitch as before, starting and stopping a 1/4" from the line. Press.
Repeat for the remaining three #3.
Trim the block by placing the 1/4" line of your rotary ruler on the solid black outline of this Economy block. Trim with a rotary cutter. Repeat for the other three sides.
For more detailed instructions to make the Economy block, click here.
Side Units

Make 4
Position #4 on the unprinted side of the pattern with a bit of gluestick.
 Use the dashed placement guides for easy positioning.
With RST, add a #5 matching the cut edges as shown below.

Stitch, starting and ending past dashed outline of the unit. Press. Repeat for the other #5.
Trim the excess from the #5s leaving behind a 1/4" seam.
 Trim away the excess past a 1/4" seam allowance.
With RST, match a short edge of a #6 to the #5 and match it's other short side to the bottom of the #1 patch. (arrows)

Stitch. After pressing, repeat of the second #6.
Trim the seam allowance between #6 and #7 to 1/4".
With RST, add a #7 to both sides, pressing after stitching.
Trim the unit to size.
 Untrimmed these units are a bit of a hot mess. But after trimming...perfection!
Repeat for the three remaining sides.
Four Patches

Make 4
We'll use a bit of strip piecing to make our four-patches.
Return your stitch length to normal and install your preferred quarter inch foot. All the seams from here on out are 1/4".
With RST, sew the long edge of #8 to #9.

Press with the SA to the darker fabric. For this sample, my background is darker than Fabric A.
At your cutting mat, straighten the short end of the strip set.
Using the table below, find your 'Finished Block Size' and the corresponding 'Cutting Width'. With your rotary ruler and cutter, subcut as indicated below.
| Finished Block Size | Width of Strip Set after stitching | Subcut 8 units this width |
|---|---|---|
| 4-1/2” | 1-1/4” | 7/8” |
| 6” | 1-1/2” | 1” |
| 9” | 2” | 1-1/4” |
They look like this...
 These look a little 'hinky' because they're not laying flat.
With RST, sew pairs together alternating light and dark patches. My sample block finishes at 4-1/2" so these four patches are tiny. I pressed the SA open to distribute the bulk. For larger ones, you can press either to the dark or twirl the SA.
These four patches complete all the pieces necessary to make our Eva's Garden quilt block.
 For the smallest block size, so that the patches are easier to handle, you may want to add 1/8" to the width of the cut strips, sew the unit and then trim it down to size.
Step 4: Assemble the Eva's Garden quilt block
Remove all the paper from the sewn patches.
Arrange them into rows. (Not quite sure why the colors in this photo are so 'off'—oops!) All the points point to the outside edge. A Fabric A square is in each corner.

Stitch the rows together, pressing the SAs away from the pointy side units.

Stitch the rows together.
As long as you've sewn directly on the lines there's not much to worry about matching within the side units. The only part I needed to rip and re-sew (because I seriously like everything to match up) is at the corner where the point of the HST meets the four patch.

And that's all there is to making our Eva's Garden quilt block!
You can pick a 'bouquet' of blocks...
...from our Free Quilt Block Patterns Library.There's more than a hundred to choose from!
If you'd prefer paperpieced blocks instead, those are sorted out for your convenience here.
How will you plant your quilt block garden?
What about a different quilt block?
For a list of all the 260+ quilt block patterns on this site, start here.
If you know the name of the block, shorten your search by using these links:
Click here if you're looking for blocks with at least some paper piecing.
Click here if you're looking for the basic building blocks of quilting, i.e., Flying Geese, half square triangles, quarter square triangles, etc., along with several techniques to make each.
And finally, use these links to find blocks in these finished sizes:


My
Favorite Paper
Piecing Tools
For a complete list of all the tools I personally use, click here to read 'The Right Tools Make Your Job Easier', part of my series called, "Essential Paper Piecing Skills".


The serrated edge on this short-bladed scissor make it easy to trim seam allowances—my all-time favorite scissor.

By Julie Baird
Copyright © 2008-2026 Generation Quilt Patterns, LLC
All Rights Reserved
Generations-quilt-patterns.com does not sell any personal information. (See Privacy Policy)