- Home
- Free Quilt Block Patterns
- Whirling Pinwheel Quilt Block
Whirling Pinwheel Quilt Block Pattern
From our Free Quilt Block Patterns Library
This post contains affiliate links, for which I receive compensation.
Skill Level: Confident Beginner
Our Whirling Pinwheel quilt block instructions will keep you from spinning out of control with a combination of techniques.
We'll paper piece the center with the same pattern used for our Virginia Reel block.
With its 8 half square triangles (HST) the Whirling Pinwheel is the perfect block to practice a new technique. Perfect units every time. Stitched up in a jiffy!
You may know this design by another name—possibly Rolling Pinwheel, Pinwheel Star, Rolling Pin or plain old Wheel.

Now it's time for us to get a move on.
Grab two fabrics and let's roll!
General Instructions
These abbreviations are used in this tutorial:
- SA - seam allowance
- RST - right sides together
- HST - half square triangle
Pieced units should first be pressed flat. (This sets the seam, melding the thread into the cotton fibers.) Then open it, pressing from the front to minimize tucks at the seam allowance (SA).
This finished block can be a bit lumpy, so take a minute to review our 'secret' trick for the hands-down flattest blocks you'll ever see. It works even with paper attached. Now THAT'S sweet!
All seam allowances are 1/4" unless otherwise instructed.
Step 1: Download and print the paperpiecing pattern
You'll need to print two Virginia Reel units (VRU) per block.
To open and print the paper piecing pattern, you need Adobe Reader installed
on your computer. You can get it here (a new window opens
so you can download without leaving this page). Follow their download instructions.
To start, choose a Finished Block Size from the chart below.
Select the underlined number in the far right column. Click to open it in Adobe.
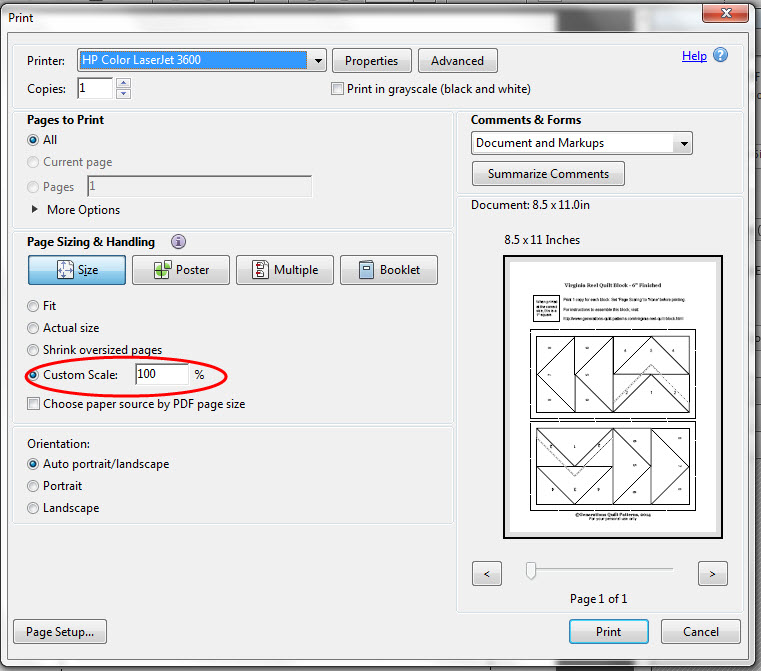
To print the patterns at the correct dimension, under 'Page Sizing and Handling' in the Adobe print menu, you MUST set 'Custom Scale' to 100%. (Here you can see what it looks like on the Adobe Print Menu page).
Measure the 1" square to confirm the pattern is printed at the correct size.
Print Whirling Pinwheel Paperpiecing Pattern | ||
|---|---|---|
| Finished Block Size | # of copies | Link to PDF Download |
| 6" | 1 | 4" |
| 9" | 1 | 6" |
New quilt fabrics to tickle your fancy...
Click the images below to see the full collection. We share any commercial and/or free patterns that showcase them, too. (For inspiration, of course!)


Step 2: Cut the patches for your Whirling Pinwheel
 Whirling Pinwheel design
Sample Size: 9" finished / 9½" unfinished
Grid: 6x6
Attribution: Nancy Cabot
AKA: Pinwheel Star, Whirling Pinwheel (KC Star)
Design Type: Pinwheel, Dutchman's Puzzle, Uneven 9-patch
All that's needed is a light and a dark fabric.
For good definition in the design choose fabrics with enough contrast. Large prints generally won't give good results.
NOTE ABOUT DIRECTIONAL PRINTS
In the sample block I've used a directional background fabric. If you do the same, cut two of the #12 patches on the lengthwise grain and two on the crosswise.
When you subcut the #4/#8 squares lay them out with the fabric design going in one direction. On two, cut the diagonal from NW to SE and two from NE to SW.
If your Fabric A is directional, then cut the #2/#6 patches as above. The rest will take care of itself.
Patches #1-#8 are all subcut. Check the last column of the chart for that information.
Time to cut your patches!
 |
Cutting Chart for a~ Paper Piecing ~ | ||||
|---|---|---|---|---|---|
| Patch | Fabric | Qty | Finished Block Size | Sub Cut | |
| 6” | 9” | ||||
| 1, 5 | Bac | 1 | 3⅝" x3⅝" | 4⅝" x 4⅝" | |
| 2, 6 | A | 4 | 2⅜" x 2⅜" | 2⅞"x 2⅞" | |
| 3, 7 | A | 1 | 3⅝ "x 3⅝" | 4⅝" x 4⅝" | |
| 4, 8 | Bac | 4 | 2⅜" x 2⅜" | 2⅞" x 2⅞" | |
| 9 | Bac | 1 | 4¼" x 4¼" | 5¼" x 5¼" | -- |
| 10 | A | 1 | 4¼" x4¼" | 5¼" x 5¼" | -- |
| 11 | Bac | 4 | 1½" x 1½" | 2”x2” | -- |
| 12 | Bac | 4 | 1½" x 2½" | 2”x3½" | -- |
| Unfinished Block Size | 6½" sq | 9½"sq | -- | ||
| Trim VRUs after stitching to... | 2½" x 4½" | 3½”x6½” | -- | ||
| Midpoint/Center | 2⅛" | 2⅝" | -- | ||
| Trim HST to... | 1½" x 1½" | 2”x2” | -- | ||
| Grid Size | 1” | 1½" | -- | ||

Step 3: Assemble the Whirling Pinwheel quilt block

For this paper pieced unit, an open toe applique foot makes seeing the sewing lines much easier. Install one if you've got it. Reduce your stitch length to 15-18 stitches per inch to make removing the paper easier at the end.
This unit is a Virginia Reel quilt block which is already in our Free Quilt Block Patterns Library.
Click here for the detailed and illustrated instructions to complete both units for our block. (This link opens in a new window to make it easier to come back to this spot in the tutorial.) Complete Steps 2 and 3 on that page.
After the sewing is complete, your center looks like this.


The paper piecing is complete. From this point forward, return your stitch length to the one you regularly use for piecing and install your favorite 1/4" presser foot.
HSTs
Make 8
On the back of the #9 square draw two diagonal lines from corner to corner. I use a mechanical pencil because it makes a fine line from end to end.
Sew a 1/4" away from both sides of both lines. Press flat to set the seams.
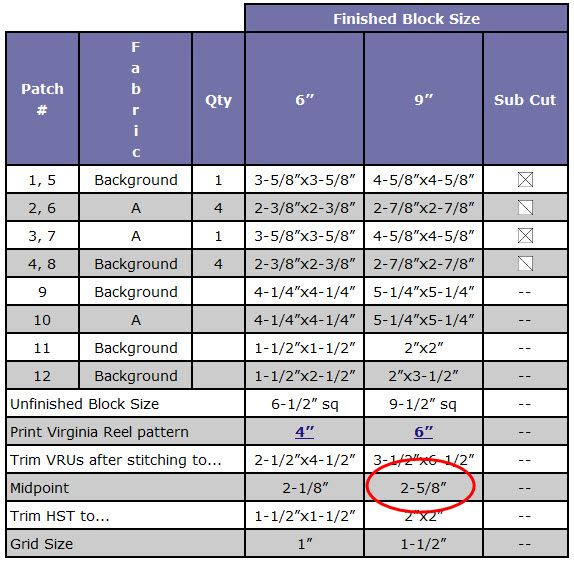
Find the Midpoint/Center measurement from the cutting chart. (For this 9" sample, it is 2-5/8".)
Align that mark on your ruler with the edge of the sewn unit. Cut the unit in half. Turn your cutting mat a quarter turn and repeat. At this point, you have four squares. Cut each apart on the drawn diagonal line.
Press and trim to the measurement found in the chart above.
If you need more detailed instructions for this technique, visit Technique #4: Make 8 Triangle Squares in a Jiffy. Use the back arrow on your computer's browser bar to return here.
Make the side units
Sew the background side of a HST to each short side of a #12 rectangle. Press with SA toward #12. Repeat for the 3 remaining sets.
 Make 4
Add a #11 square to each end of two of these units. Press with SA toward
 Make 2
Lay out the pieced patches into rows to create the Whirling Pinwheel design.

Sew the side units to the center. Press SA so that they will nest with the top and bottom rows.

Stitch the rows together. After one last session at the ironing board, your Whirling Pinwheel quilt block is finished!

Ready for more quilting fun!
All sorts of ideas whirling about in your head. Looking for more quilt blocks to make? Then...

What about a different quilt block?
For a list of all the 260+ quilt block patterns on this site, start here.
If you know the name of the block, shorten your search by using these links:
Click here if you're looking for blocks with at least some paper piecing.
Click here if you're looking for the basic building blocks of quilting, i.e., Flying Geese, half square triangles, quarter square triangles, etc., along with several techniques to make each.
And finally, use these links to find blocks in these finished sizes:
For even more blocks to make...

For you, are quilt block designs like potato chips...
...you can't have just one?!!
Check the amazing resources I rely on for all the quilt block designs you see on this website.
To see if they're worthy of a spot in YOUR quilting library, CLICK HERE.


Yummy fabrics
to drool over
Click any image below to see the full collection and find pricing and ordering information.


By Julie Baird
Copyright © 2008-2026 Generation Quilt Patterns, LLC
All Rights Reserved
Generations-quilt-patterns.com does not sell any personal information. (See Privacy Policy)