- Home
- Free Quilt Block Patterns
- Union Square Quilt Block
A Point-Perfect Guide to the Union Square Quilt Block
Point-perfect precision, paper-piecing style! ✨
This post contains affiliate links, for which I receive compensation.
Skill Level: Confident Beginner
The Union Square quilt block is all about the points!
Points in the Economy block that forms the center.
Points on the Half Square Triangles and Flying Geese that form the borders.
To insure the best result possible for you, we're paper piecing this little beauty.
There's another benefit with this technique. If you make oversized HST and FG and then trim them down, there's 12 units to trim BEFORE you assemble the Union Square.
With paper piecing, there's only 5—which saves you time and provides accurate results.
🧭Getting to the point?
Jump straight to the section you need with these handy links. Because sometimes the shortest distance between you and a perfect Union Square block is a well-placed click!
- A cutting chart in 4 sizes with a download of the chart and block design
- A download of the paper piecing patterns for each size
- A coloring/fabric planning page to download and print
Cut. Sew. Press. For points on point, peace of mind.
📋 General Instructions
When instructed to press, first press the unit in the closed position to set the seam and then open the patch, pressing again.
I prefer my open toe applique foot for paperpiecing and use a stitch length of 15-18 stitches per inch.

When assembling the Union Square
block, I switch back to my standard quarter inch foot with a guide.
Quarter inch seam allowances (SA) are used to sew the units together.
New quilt fabrics to tickle your fancy...
Click the images below to see the full collection. We share any commercial and/or free patterns that showcase them, too. (For inspiration, of course!)


📥 Download and print the paper piecing pattern
To download any of our free paperpiecing patterns, YOU NEED Adobe installed on your computer. Get it here.
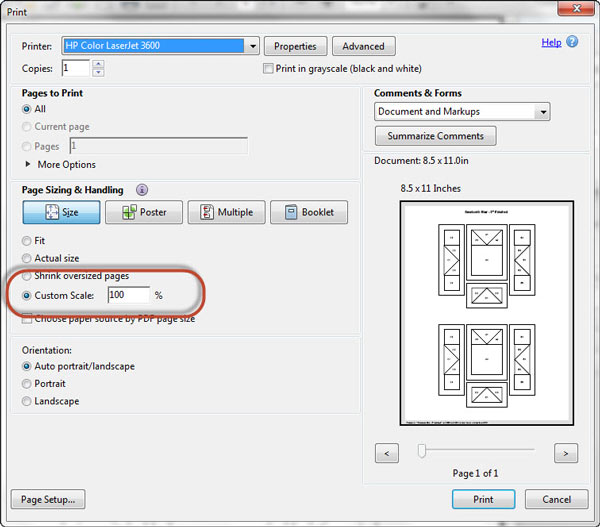
To print blocks at the correct size, under 'Page Sizing and
Handling' in the Adobe print menu, set 'Custom Scale' to 100%. Click here to see where it's at on that page.
Choose the finished size of your Union Square. Click the link below to print.
Cut out the patterns just beyond the dashed lines. There's no extra points for being neat—units are trimmed at the end.

Not sure which paper to use?
Take a look at my review of several of the most popular brands available to us quilters on the market.
You want a super-easy paper to tear away—less stress on the stitches.
✂️ Cut patches for the Union Square

Sample Size: 9" finished / 9½" unfinished
Grid: 6x6
Attributed to: Carry Hall, Rose Kretzinger
AKA: An Effective Square (Ladies Home Journal), Four Crowns (KC Star), Union (Ladies Art Company), and Union Block (Nancy Cabot)
Brackman ID: 2056
Design type: Uneven 9-patch large center | Paper Piecing
Except for #1, all patches are oversized which makes positioning them virtually foolproof. (Ripping out stitches isn't my idea of a good time!)
And finally, don't forget to subcut #2-7 (far right column—#4 is cut twice on the diagonal; the rest are cut once diagonally to form the necessary triangles for the sides units).
Make a couple of blocks. Then tweak the patch-sizes if it makes piecing easier FOR YOU.
Success starts with organization. Label your patches now for smooth sailing later.
 | Cutting Chart for a~ Includes Paper Piecing ~ | |||||
|---|---|---|---|---|---|---|
| Patch | Fabric | Qty | Finished Block Size | Sub Cut | ||
| 4½'' | 6" | 9" | ||||
| 1 | Dark | 1 | 2" x 2" | 2½'' x 2½'' | 3½'' x 3½'' | --- |
| 2 | Bac | 2 | 2½'' x 2½'' | 2¾'' x 2¾'' | 3½'' x 3½'' | |
| 3 | Med | 2 | 2⅞'' x 2⅞'' | 3⅜'' x 3⅜'' | 4⅜'' x 4⅜'' | |
| 4 | Bac | 1 | 3¼'' x 3¼'' | 3¾'' x 3¾'' | 4¾'' x 4¾'' | |
| 5, 7 | Dark | 8 | 2⅛'' x 2⅛'' | 2⅜'' x 2⅜'' | 2⅞'' x 2⅞'' | |
| 6 | Bac | 4 | 2⅛'' x 2⅛'' | 2⅜'' x 2⅜'' | 2⅞'' x 2⅞'' | |
| 8 | Bac | 4 | 1¾'' x 1¾'' | 2" x 2" | 2½'' x 2½'' | --- |
| Unfinished Block Size | 5 | 6½'' | 9½'' | na | ||
| Grid Size | ¾" | 1 | 1½'' | na | ||
🪡 Assemble the Union Square units
We need to make a few adjustments to our sewing machine settings to paper piece.
- Reduce your stitch length to 16–20 stitches per inch (1.3-1.6 mm). This perforates the paper and stabilizes the seam when you remove the pattern. [Learn more about stitch length here.]
- Reduce your machine's speed or just plain slow down. Sew only as fast as you can AND stay on the solid stitching line.
- Install an open toe appliqué foot (sometimes called an 'embroidery' or 'satin stitch' foot) if you have one (it makes it easier to see where you're stitching).
- Use a larger needle (90/14) IF you have problems removing the pattern. Personally, I use an 80/12 Microtex Sharp for paper piecing without any issues.
Borders (B)
Make 2 short, 2 long
 Short border
 Long border
The borders for our Union Square quilt block are the same, except the two long borders need a #8 patch stitched to both sides.
Use a dab of your glue stick (Elmer's Washable Glue Stick is my go-to for this) to hold the wrong side of #4 to the unprinted side of all four of the border patterns.
Use the dashed lines around #4 to quickly position it with accuracy.
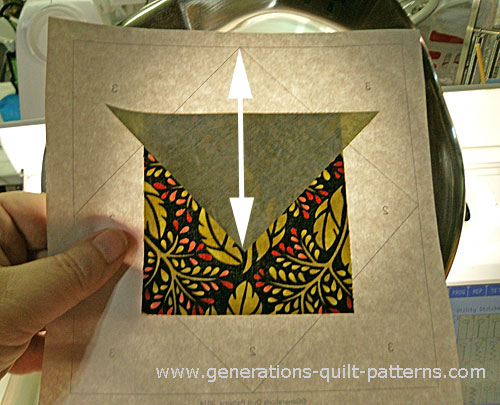
 Arrows point to the placement guides
With right sides together (RST), position a #5.
Line-up the point of the triangle with the corner of the pattern (white arrow).
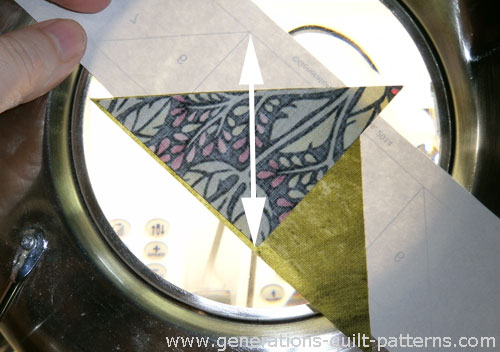
Stitch, both starting and stopping past the outside dashed line surrounding the border unit. (see arrows)
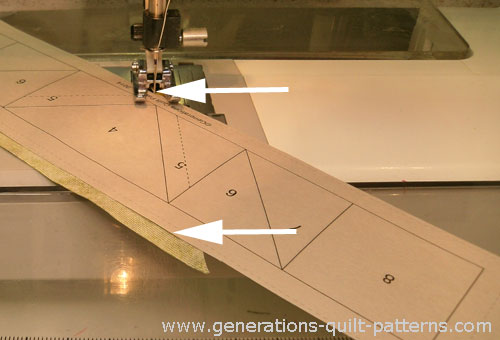
Repeat for the second #5. (For the 4-1/2" block you may need to add one #5, pressing it out of the way, and then add the second one to each border unit.)
Now it's time to do a little trimming. You can see where the #5 patch extends more than 1/4" past the line between #5 and #6 on both sides.
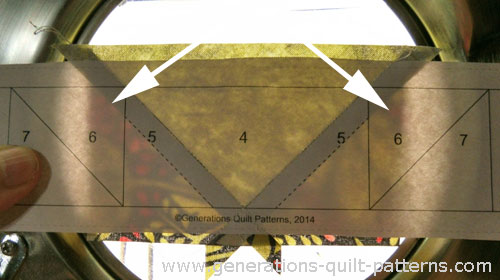
You could trim the seam allowance down to 1/4" with scissors by just eyeballing it. However, I prefer to trim with my rotary cutter for the accuracy.
To do so, put the edge of your ruler (arrow) right on the seam line between #5 and #6.
Crease the pattern with your fingernail along the ruler. Remove the ruler and fold the paper back on the solid line. You will need to pull the paper away from some of the stitching to do this. (arrow)
 Here you can see the folded pattern and where I've pulled the paper away from some of the stitches.
If you accidentally make a big mess out of the pattern (I've done it, everyone does at some point!), use a piece of Scotch Brand Magic Tape® to fix up the paper side. Just don't iron directly on the tape. It'll melt.
Position the 1/4" line of the ruler on the folded edge of the paper (white arrow). Trim away the excess fabric with your rotary cutter.
 The arrow points to the folded edge of the paper.
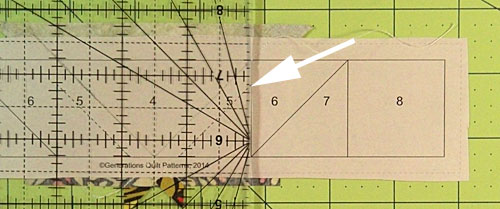
When you unfold the pattern to its original position, you'll be able to see that the seam allowance extends a 1/4" into the #6 space.
Use this technique every time you need to 'trim the seam allowance'.
Continue adding the #6 and #7 patches, trimming SAs and pressing after each is added.
Finally, add a #8 to each short side of two of these border units.
The borders look something like this after the stitching is complete—pretty messy, right?
Not to worry!
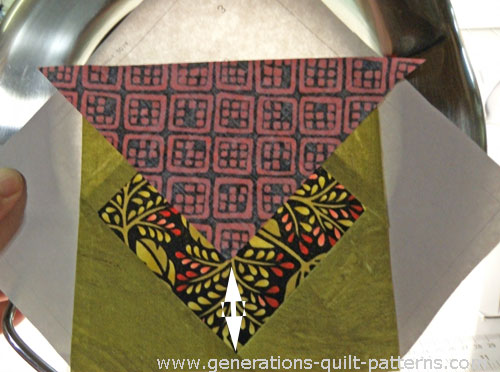
 A long and short untrimmed border, make 2 each
We'll just trim each Union Square border. With the pieced border paper-side up on your cutting mat, lay the 1/4" mark on the ruler on top of the solid black outline of the pattern. Trim away the excess paper and fabric with your rotary cutter.
Repeat for all four sides of each border unit—short or long.
Pointy, pieced perfection!
 Make two of each for our Union Square quilt block
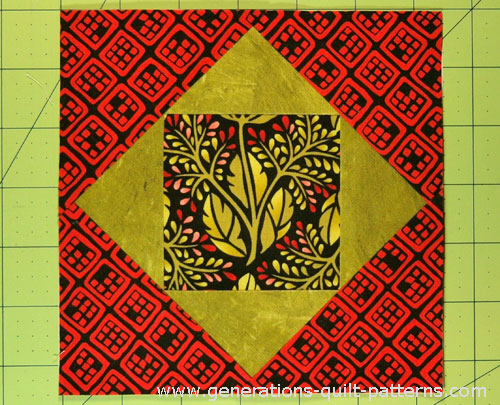
Center
Make 1

NOTE: For more detailed instructions to make this unit, click here and review the piecing and trimming instructions for the Economy quilt block. (The link opens in a new window.)
With a dot of Elmer's Washable Glue Stick (goes on purple, dries clear), stick the back of a #1 to the unprinted side of the pattern. Use the placement guides for easy positioning.
 Arrows point to the dashed placement guides
With (RST) match the diagonal edge of a #2 to #1. It helps to align the point on #2 with the corner on the pattern (see arrow).
Stitch on the line between #1 and #2, starting before and ending after the outside dashed line. (see arrows).
 Stitch, starting and stopping at the arrows.
Repeat for the opposite #2. Press both patches. (For the 4-1/2" block, you may need to press after the addition of each #2 to get it out of the way for the next one.)
Add the two remaining #2 patches in the same manner.
Trim the SA around the #2s to 1/4" using the same technique we used for the border units. You will need to pull the paper away from the stitching at the corners to fold it back.
Add the first #3, lining up the long diagonal with the trimmed edges of the #2s. The point of #3 lines up with the corner of #1 (see arrow)
Repeat for the opposite #3. Press.
Add the remaining #3s in the same manner.
Finally, trim off the excess fabric. Lay the 1/4" line of your ruler on the outside solid line and trim the excess fabric and paper away with your rotary cutter.
 The arrow points to the solid line that surrounds the block.
Trim away any stray threads from the back. The center unit for our Union Square looks like this.
Everything is perfectly pointy here, too!
All the paper piecing is done! Time to reinstall your favorite 1/4" presser foot.
It's also time to remove the paper from the units. The patches you cut were calculated so that all the outside edges of every patch are on the straight of grain—just like they'd be if we'd used traditional piecing methods.
Since the paper no longer serves a purpose, and quite frankly, is a pain in the derrière if it's stitched into a 1/4" seam allowance, remove it now to prevent frustration later.
🧩 Assemble your Union Square quilt block
Install your standard quarter inch foot. Reset your stitch length for normal piecing.
At this point, you have a choice to make—to remove the paper or not. It's no trouble to stitch through all the layers of the paper, but it's much easier to pin without the paper. (I have removed it before assembling this sample block.)
Arrange all the pieces as shown below.

Stitch a short borders to both the left and right side of the center unit.
SA are pressed toward the center.
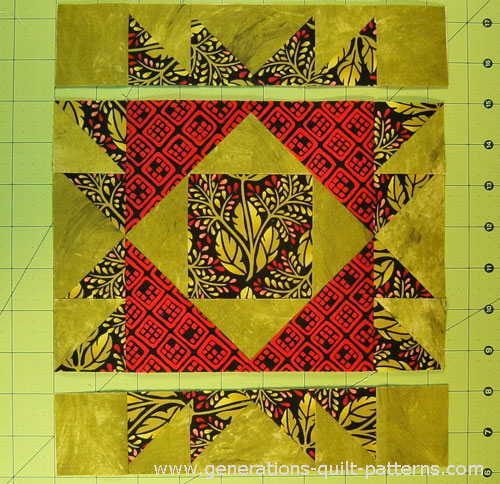
With RST, stitch the top and bottom borders to the middle row. Use pins to help match the SAs.
 Our Union Square is finished!
The sewing is complete on our Union Square quilt block. If you haven't removed the paper, now's the time to do it!
The only thing left is a good final press. Why not try our best pressing technique for the flattest block you ever saw! (and without having to buy an expensive clapper!)
Point Made: You've Got This! 🎯
You did it! Point by point, piece by piece, you've mastered the Union Square block! 🎯 Keep this guide handy—your next one will be even more amazing! ✨
Until we meet again 🪡, may your points be sharp ⚡️ and your quilting confidence sharper! 💫
📌 Sharp points ahead!
Pin now, perfect later! ✨

For even MORE blocks to make… 🧩🎨

...visit our Free Quilt Block Pattern Library, with over 260+ blocks to choose from in multiple sizes.
Free downloads are included in all sizes for any blocks require paper piecing patterns or templates.
- Home
- Free Quilt Block Patterns
- Union Square Quilt Block


Yummy fabrics
to drool over
Click any image below to see the full collection and find pricing and ordering information.


By Julie Baird
Copyright © 2008-2026 Generation Quilt Patterns, LLC
All Rights Reserved
Generations-quilt-patterns.com does not sell any personal information. (See Privacy Policy)