- Home
- Beginner Quilt Blocks
- Half Square Triangle Block
Make a
Half Square Triangle Block
The No-Math Way: Technique #5 - Use a specialty ruler
This post contains affiliate links, for which I receive compensation.
To make a half square triangle block in Technique #1, we used our everyday ruler and had to remember to add 7/8" or more to the finished size of the block to cut our initial squares.
With a specialty ruler, like the Fons and Porter Half and Quarter Square Triangle ruler (that we use in this example) or the Easy Angle Triangle Ruler, the only thing you need to remember is the size of your unfinished block.
The ruler has a special feature that allows you to cut narrower strips and saves fabric.
This feature also means there's only one dog ear to trim saving you time.

If you frequently work with Jelly Rolls or Honey Buns (2-1/2" or 1-1/2" wide precut fabric packs), these specialty rulers are PERFECT for you. That's because the ruler is designed so you can cut half square triangles from the same strips as your squares and rectangles.
Pros:
- No magic number to remember
- No paper to remove
- Less waste—blocks are cut from the same size strip as other block components
- Only one dog ear to trim
- Perfect for use with precut strips because you can use the same strip for cutting several shapes.
Cons:
- Yet another ruler to buy and store
- Size is limited by the size of the specialty ruler
The Rulers
For this technique you need a ruler marked especially for making half square triangles. These are two that I use and own.
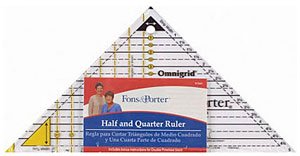
The Fons and Porter Half and Quarter Ruler can be used for both half (4" finished) and quarter square triangles.
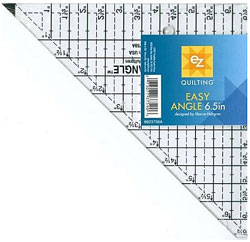
The Easy Angle comes in three sizes:
Up to 6" finished(Shown to the left)
Which do I prefer?
If you are thinking about purchasing this ruler, my advice is to buy the Fons and Porter Half and Quarter Ruler.
It's two—well actually three—rulers in one. You can use it for cutting half and quarter square triangle units AND Flying Geese patches.
Less to buy.
Less to store.
The only thing you have to watch out for, is because of the dual use, there are more markings on it.
Each technique is illustrated and diagrammed right on the ruler to make it easy.
The Technique
For this example we are making a 3" finished (3-1/2" unfinished) half square triangle unit with the Fons and Porter Half and Quarter ruler.
For HSTs, as you look at this ruler with the yellow triangle pointing up, the numbers in the yellow circles that sit on black and yellow lines indicate the finished size of the HSTs. Cut your strips equal to the the black number just above the black/yellow line at the left edge of the ruler.
No 7/8" to remember, just nice easy numbers!
Step 1
Cut a strip of fabric from each of two contrasting fabrics whose width is equal to the unfinished size of the block. Our strips are 3-1/2" wide (from fat quarters).
Helpful Hint
While the two strips are shown separate in the photo below, to save time, layer the two fabrics right sides together AND THEN cut your strips. They are then ready for sub-cutting into half square triangle patches without having to line up the edges.
Sweet!

Step 2
Align the '3' line (see the red circle) of the ruler along the bottom edge of the strip. The bottom edge of the top yellow triangle should be even with the top edge of the strip.
It's the positioning of this yellow triangle that saves the fabric--using traditional techniques we'd be cutting strips that are 3-7/8" wide...a nice fabric savings if you're making lots of blocks or using pre-cut strips cut to standard widths.

Step 3
Cut along both the left and right edges of the ruler to create your first pair of HSTs.
NOTE: In this photo I had previously squared up the ends of my strips so you see the ruler aligned with the left edge, too.
Flip the ruler and align the edges to position it to cut your next pair.

Step 4
Continue flipping and cutting until you have as many pairs as you need.

Step 5
Sew the pairs with a scant quarter inch seam allowance.
I recommend taking a Sewing Test before stitching to check for accuracy.
 The arrow points to my anchor cloth. Stitching on it first prevents my machine from 'eating' the points
Step 6
Press the unit flat with the dark fabric up to set the seam.

Press the unit open. By starting with the dark patch on top, the seam allowance will automatically be to the dark side.

Step 7
Now trim the one dog ear to complete the block. Before trimming it looks like this with the dog ear in the lower left corner.

After trimming your finished half square triangle block looks like this and is ready to be pieced into another block or your quilt.

And that's all there is to making a half square triangle block using a specialty ruler to cut the patches.


By Julie Baird
Copyright © 2008-2026 Generation Quilt Patterns, LLC
All Rights Reserved
Generations-quilt-patterns.com does not sell any personal information. (See Privacy Policy)