- Home
- Quilting Tools/Supplies
- Triangle Paper
Triangle Paper Options
For all your half square triangles needs
This post contains affiliate links, for which I receive compensation.
The choice is yours! With several pre-printed triangle paper products on the market you're sure to find one that fits your needs.
Most are printed on paper—one you print on your home computer (Triangulations™) and two are pre-printed (Thangles™ and Triangles on a Roll™).
Something to meet every quilter's needs.
The instructions and tips shared on the 'Half Square Triangle Paper' techniques page generally apply to these products, too.
If you've never used this technique and would like to try before you buy, click here for free sheets to download.

Triangle Paper Options
If you're printing your own triangle paper on your home computer, my preferred paper is Carol Doak's Foundation Paper.

It's a light-weight, plain newsprint that easily tears away from your stitches. Two sizes are available: 8-1/2"x11" and 8-1/2"x14". I keep both on hand.
Paper for Foundation Piecing by That Patchwork Place runs a close second.
I've tried other cheaper versions of newsprint (like from the Dollar Store) and have not had good luck feeding them through my HP Laserjet printer.
I'll also tried the reams of 8-1/2"x11" newsprint with no better results.
Other quilters have reported success with these cheaper alternatives. If they are within your budget it's worth a try to test them for yourself.
But because of my own testing, I stick with Carol Doak's product.
It works every time.
In a pinch regular printer paper will do. The cheaper the better because it's thinner. Thinner is easier to tear away.
Triangulations™ 4.0
If you liked using the free triangle paper from this site, you'll love Triangulations™ 4.0 by Brenda Henning.
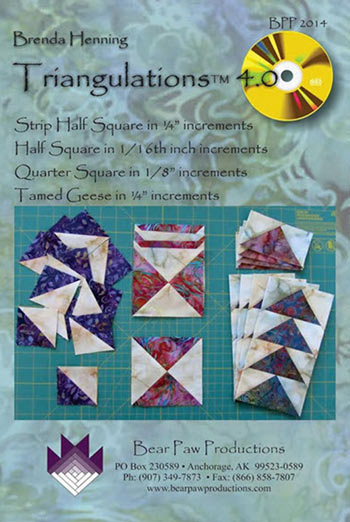
It's a computer CD that allows you to print a wide variety of 'triangle' based units—right on your home printer—virtually eliminating the need to ever buy ANY triangle paper products again—except for the paper to print them on! :)
The CD works for both PC and Mac computers because it is not dependent on your computer's operating system.
You do need the latest version of Adobe to print the pages. (If you've printed the half square triangle paper offered earlier on this page, you've already got it installed. And it is free.)
The CD lets you print the following
- HST From 1/2" to 7-1/2" in 1/16" increments
- QST from 3/4" to 7-1/2" in 1/8" increments
- Tamed Geese Foundations from 1/2"x1" to 3-3/4" x 7-1/2"
The newest version, 4.0, also lets you print STRIP HST foundations (much like Thangles™—see below) for units from 1/2" to 4-1/2" in 1/4" increments
The CD provides four bonus quilt patterns to practice on. The units printed are formatted to fit on standard 8-1/2"x11" computer paper.
Thangles™
This pre-printed triangle paper is printed on strips that are one unit wide.
 Thangles™ come in short sheets, one unit wide.
Two strips of fabric are layered RST. I use strips a wee bit longer than the paper. Pin to hold things together avoiding the dashed sewing lines.
The beauty of Thangles™ is that the width of the fabric strips is precisely cut to the width of the paper.
 Ready to stitch
This
is particularly helpful if you have a stash of pre-cut strips like
Jelly Rolls or if you use Bonnie Hunter's method of organizing your
scraps by pre-cutting them into standard sizes.
The math is easy, too. There's no 'seven eighths' rule to remember. Just cut strips 1/2" wider than the finished unit measures.
 I like to start my stitching on a scrap of fabric—I believe I get a better first stitch that way. The red scrap is my starter patch.
Use a shorter, 1.2-1.5mm (18-20 stitches/inch). The extra stitching helps the HST stand up to the strain of pulling off the paper.
After stitching, press to set the seam.
Rotary cut on all the solid lines.
Pay attention to the thicker solid line between the pairs of HST. There's a fine white line down the center of it. That is your cutting line.
 You can just barely make out the thin white cutting lines (purple arrows)
Finally, tear away the paper.
Give your HST a final press.
Like magic, the HST unit is the same width as the strip it was cut from.
That means you can cut your squares and rectangles from the same strips, saving fabric and time. Sweet!
Packs are available for finished HST sizes:1", 1-1/4", 1-1/2", 1-3/4", 2", 2-1/4", 2-1/2", 3", 3-1/2", 4", 4-1/2", 5", 5-1/2" and 6".
They also come in a Mini-Pack that is a combo pack that includes both 1/2" and 3/4" finished units.
Below are some of the different sizes available directly from Amazon.com. If you're on the fence about this product, take a minute and read the customer reviews.
Triangles on a Roll™
Much like Thangles, Triangles on a Roll™ let you easily choose smaller numbers of the same sized HST to make because you cut only as many as you need.
 You'll notice the cut edge is a bit wonky. No problem. I used it in the example. When cutting just measure out from the next solid line.
Cut out the desired number of units. Cut your two HST fabrics a bit larger than the paper. I generally add 1/2" to both dimensions.
Layer the two fabrics RST. Lay the Triangles on a Roll™printed side up on top. Pin the layers together, avoiding the dashed lines.
 Keep the pins away from the dotted lines for uninterrupted sewing.
Because we're stitching through paper, use a smaller stitch length, 18-20 stitches per inch (1.2-1.5mm).
Sew slow enough that you stay on the line.
 Sew on the dashed lines in the direction of the arrows.
Press after all the lines are sewn to set the seams.
Rotary cut on all the solid lines.
Remove the paper and press again.
Triangles on a Roll™ are available in the following sizes: 1-1/4", 1-1/2", 2", 2-1/2", 3", 4", 4-1/2", 5" and 6" finished.
Quarter Square Triangles on a Roll™ and Flying Geese and Flying Geese Braids (1-1/2"x3", 2-1/2"x5" and 3"x6") are also available and use the same stitching technique.
Triangles on a Roll™ are available from the Fat Quarter Shop and Amazon.com.


By Julie Baird
Copyright © 2008-2026 Generation Quilt Patterns, LLC
All Rights Reserved
Generations-quilt-patterns.com does not sell any personal information. (See Privacy Policy)