- Home
- Free Quilt Block Patterns
- Cupid's Arrowpoint Quilt Block
Cupid's Arrowpoint Quilt Block: Bulls-Eye Beautiful Points Every Time! 🎯❤️
Hit the mark every time—your seam ripper can take the day off! 🎯🛌
This post contains affiliate links, for which I receive compensation.
This Cupid's Arrowpoint quilt block isn't flashy, but don't underestimate it! 🏹
It may look simple, but that center square is prime real estate for your machine or hand quilting or appliqué talents.
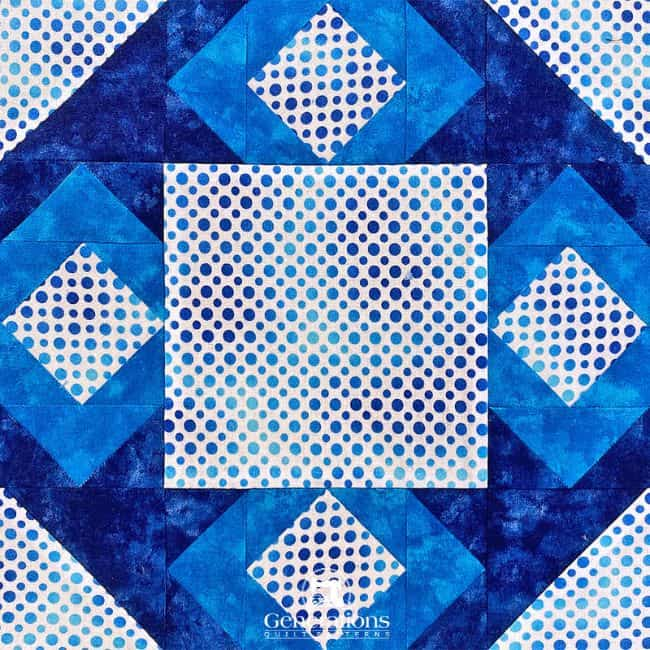
Our paper piecing approach means perfect points without the usual headaches—no wrestling with fussy units or endless trimming.
Because, let's be honest. We all have more quilt ideas swirling in our head than time to make them! ⏱️
This tutorial is for quilters who want to skip straight to the good stuff. Because when efficiency meets accuracy, you'll have more time for what really matters: starting that next quilt that's been winking at you from your inspiration board!
🧭 Finding Your Target
Aim straight for what you need! This quick navigation helps you hit exactly the section you're looking for without wading through the entire tutorial.
- A cutting chart in 4 sizes, with downloads of the chart and block design
📋 General Instructions
⚡ PRINTING TIP: Need help printing this tutorial? Click here for easy instructions!
Several abbreviations are used on this page. They are:
- SA - seam allowance
- RST - right sides together
- HST - Half Square Triangle
- QST - Quarter Square Triangle
- SiaS - Square in a Square
- FG - Flying Geese
A 1/4" SA is used in this tutorial.
✅ KEY TECHNIQUE: PRESSING PAPER PIECED PATCHES
To streamline the instructions, it is assumed that you ALWAYS press with your iron after adding each patch.
First press it in the closed position as it came off your sewing machine. This sets the seam, melding the fibers of the threads into the fabric. Then press the patch open. In paper piecing, all SAs are pressed toward the last patch added.
Double check ✅✅to make sure you haven't inadvertently pressed a tuck in along the SA. Once you've sewn across both ends of a seam, it's virtually impossible to get that tuck out.
If we're pressing to simply keep something out of the way, you'll be instructed specifically to fingerpress.
📥 Download and print the paper piecing pattern
To download the pattern, use the most current version of Adobe.
For accurate results, on Adobe's Print Menu page, under 'Page Size and Handling' set 'Custom Scale' to 100%. Then print.
Click here to see what it looks like on the Print Menu page.
Find your finished block size from the chart below. For each block you make, print one copy for a total of:
- 2 long borders
- 2 short borders
Cupid's Arrowpoint Paper Piecing Patterns | |
|---|---|
| Finished Block Size | Download Link |
| 6'' | 6" |
| 8'' | 8" |
| 10" | 10" |
| 12"** | 12" |

**If you choose the 12" finished block, you need to use paper that's 8½" x 14". Carol Doak's is the one I prefer for this size.
All the other block sizes should be printed on 8½" x 11".
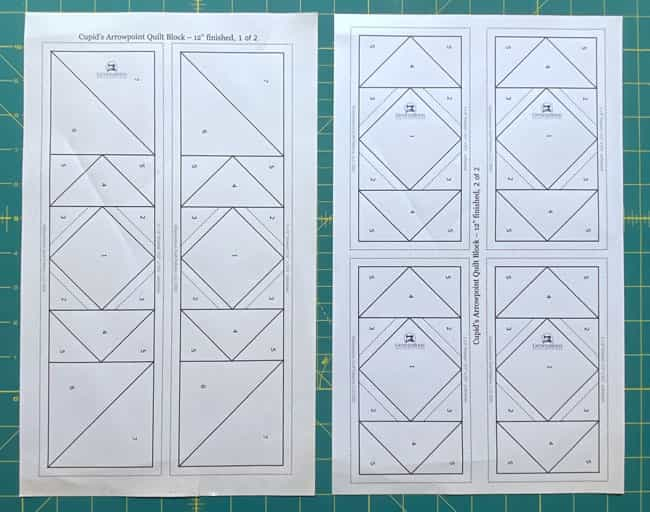 The 12" finished block pattern printed on 8½" x 14" paper piecing paper
After printing, use the 1" square graphic on the printed page(s) to double check that your patterns printed at the correct size.
Then cut out the required number of patterns from your copies. A rough cut is good enough—an 1/8"-1/4"-ish away from the outside dashed square.

Not sure which paper to use?
Take a look at my review of several of the most popular brands available to us quilters on the market.
You want a super-easy paper to tear away—less stress on the stitches.
New quilt fabrics to tickle your fancy...
Click the images below to see the full collection. We share any commercial and/or free patterns that showcase them, too. (For inspiration, of course!)
✂️ Cutting patches for a block
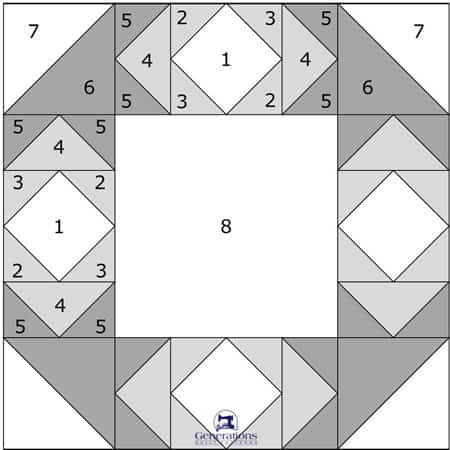
Sample Block Size: 10" finished / 10½" unfinished
Grid: 8x8
Design Type: Paper piecing | Plain block w/pieced sashing
Please label all your patches. We use their numbers throughout this tutorial.
 | Cutting Chart for a~ Includes Paper Piecing ~ | ||||||
|---|---|---|---|---|---|---|---|
| Patch | Fabric | Qty | Finished Block Size | Sub Cut | |||
| 6'' | 8'' | 10'' | 12'' | ||||
| 1 | Bac | 4 | 1⅝'' x 1⅝'' | 1⅞'' x 1⅞'' | 2¼'' x 2¼'' | 2⅝'' x 2⅝'' | --- |
| 2, 3 | Med | 8 | 2⅛'' x 2⅛'' | 2⅜'' x 2⅜'' | 2⅝'' x 2⅝'' | 2⅞'' x 2⅞'' | |
| 4 | Med | 2 | 3¼'' x 3¼'' | 3¾'' x 3¾'' | 4¼'' x 4¼'' | 4¾'' x 4¾'' | |
| 5 | Dark | 8 | 2⅛'' x 2⅛'' | 2⅜'' x 2⅜'' | 2⅝'' x 2⅝'' | 2⅞'' x 2⅞'' | |
| 6 | Dark | 2 | 2⅞'' x 2⅞'' | 3⅜'' x 3⅜'' | 3⅞'' x 3⅞'' | 4⅜'' x 4⅜'' | |
| 7 | Bac | 2 | 2⅞'' x 2⅞'' | 3⅜'' x 3⅜'' | 3⅞'' x 3⅞'' | 4⅜'' x 4⅜'' | |
| 8 | Bac | 1 | 3½'' x 3½'' | 4½'' x 4½'' | 5½'' x 5½'' | 6½'' x 6½'' | --- |
| Unfinished Block Size | 6½'' | 8½'' | 10½'' | 12½'' | na | ||
| Grid Size | ¾'' | 1'' | 1¼'' | 1½'' | na | ||
✂️✂️ Subcutting
Patches 2, 3, 5, 6 and 7 are all cut once on the diagonal to create HST shapes.
Patch 4 is cut twice on the diagonal to make QST shapes.
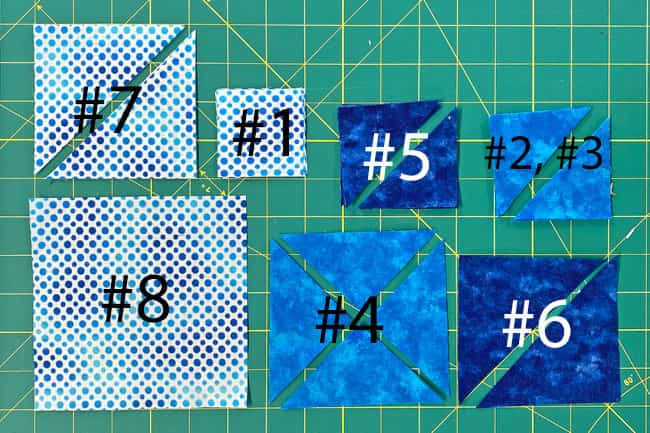
🧵 Create the Border units for your Cupid's Arrowpoint block
Make 2 each
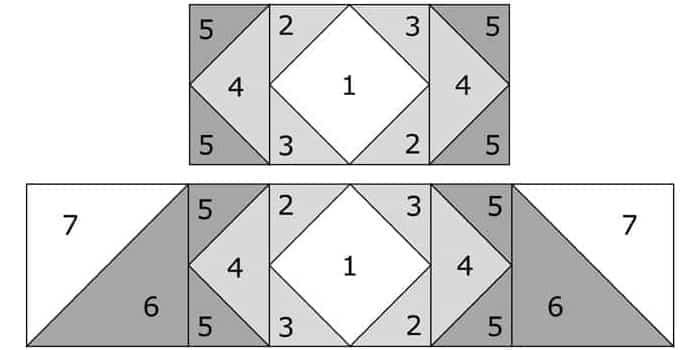 The short Border (top) and long border (bottom)
Our long and short border units are the same for Patches 1 through 5. 6&7 are added just to the longer border.
Use a tiny dab of Elmer's Washable Glue Stick® to hold #1 in position on all four borders.
'Tiny' is the word of the day. It's only got to hold until the #2s are stitched in place.
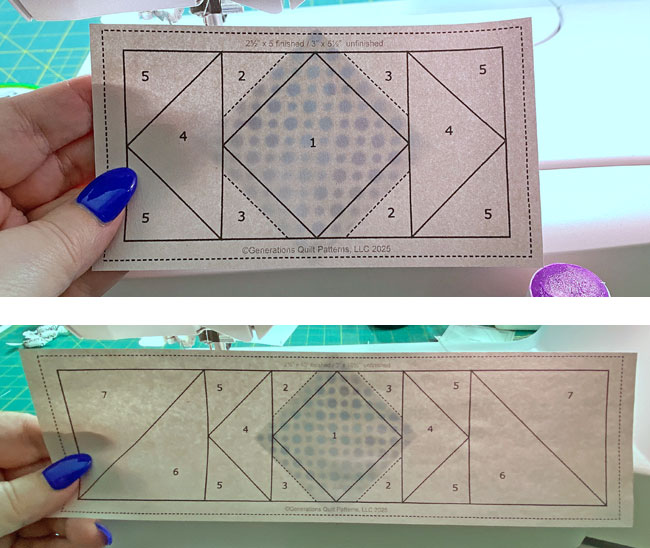
Usually, we'd put the glue stick away now, but keep it handy. You may want to use it a bit later on.
We need to make a few adjustments to our sewing machine settings to paper piece.
- Reduce your stitch length to 16–20 stitches per inch (1.3-1.6 mm). This perforates the paper and stabilizes the seam when you remove the pattern. [Learn more about stitch length here.]
- Reduce your machine's speed or just plain slow down. Sew only as fast as you can AND stay on the solid stitching line.
- Install an open toe appliqué foot (sometimes called an 'embroidery' or 'satin stitch' foot) if you have one (it makes it easier to see where you're stitching).
- Use a larger needle (90/14) IF you have problems removing the pattern. Personally, I use an 80/12 Microtex Sharp for paper piecing without any issues.
With RST, match the long bias edge of a #2 with one side of #1.
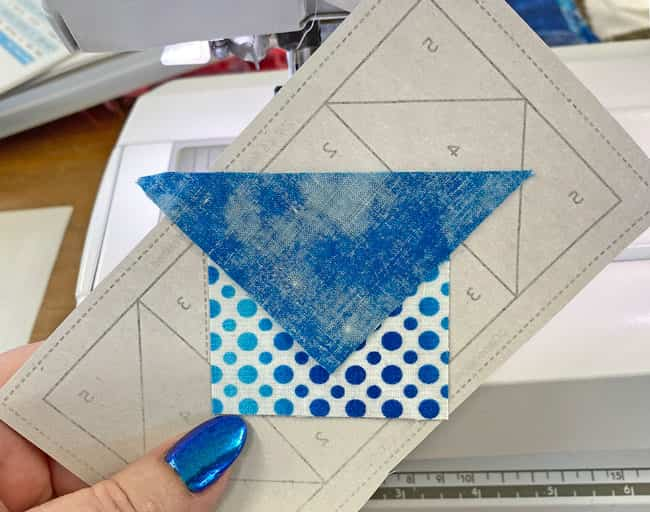
Sew the seam.
✅ KEY TECHNIQUE: ALL PAPER PIECED SEAMS
ALL the seams in paper piecing are stitched by starting a generous 1/4" before the solid line between patches and ending a generous 1/4" after that line ends. The next line of stitches that cross this seam secures the ends—just like in traditional piecing.
If the seam begins/ends at the outside edge of the block, start and stop your stitches past the outside dashed line surrounding the block.
Use this technique every time you sew a seam.
The only time I might use backstitches is at the outside edges, but never inside the block or unit. I find the shorter stitch length with good thread tension holds my stitches quite well.
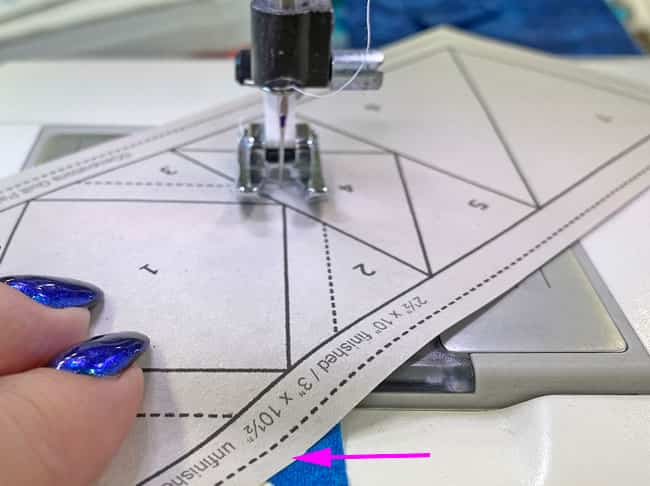 Your stitches should around the point of the pink aroow
Fingerpress #2 open and out of the way.
Repeat the process for the second #2.
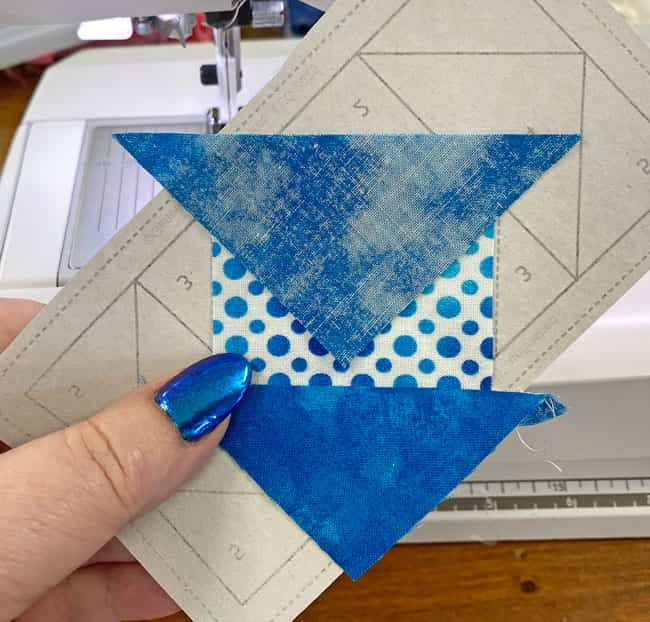
Repeat for the two #3 triangles.
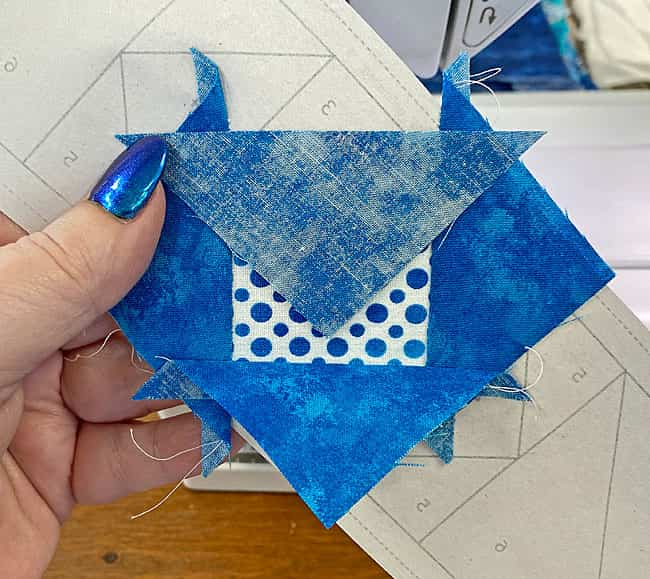
It's time to trim the seams on both sides to establish the exact placement for the #4s,
✅ KEY TECHNIQUE: Establish the placement line for the next patch
At your cutting mat, pull the paper away from the stitches where your stitches crossed the line between #4 and #2/#3. If your paper tears more than you like, use a bit of Magic Tape® to repair the pattern from the paper side.
Position the edge of your ruler with the solid line between #2/#3 and #4. Use your thumbnail to crease the pattern on that line.
Fold the pattern back on itself on the line.
Match the 1/4" mark on your ruler with the folded edge and trim away the excess fabric, leaving behind an exact 1/4" SA.
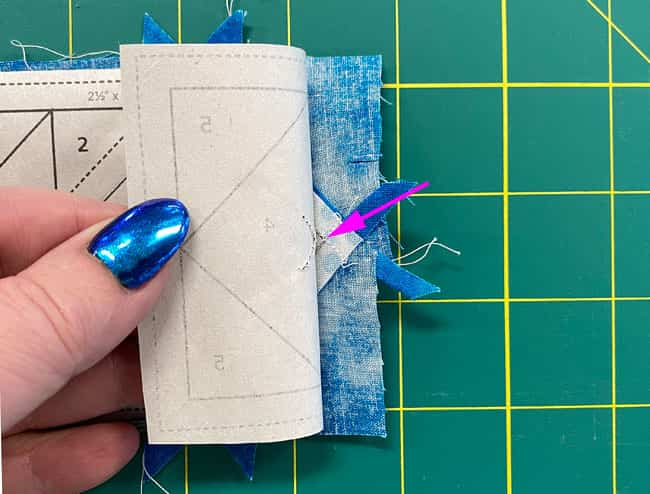 Pull the stitches away from the pattern so you can fold it back on the line.
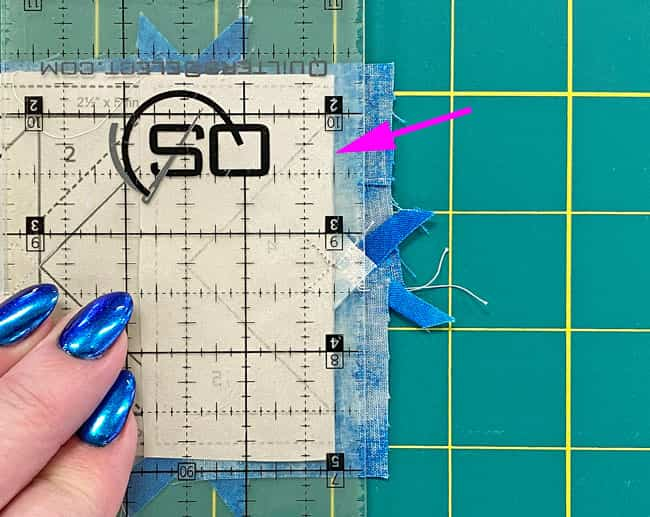 Position the 1/4" mark on your ruler on the fold.
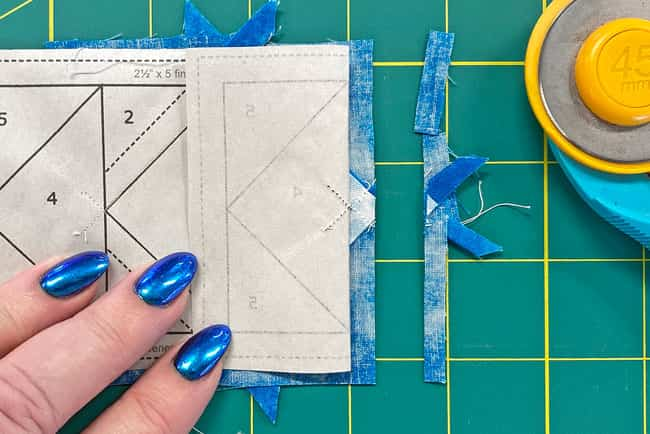 Now we have a perfect 1/4" SA and place to match the long edge of #4 to
Trim all four of the Borders, short and long, before adding #4.
With RST, position #4 with this fresh-cut edge, using the opposite corner of #1 (dotted fabric) to center the point of the triangle.
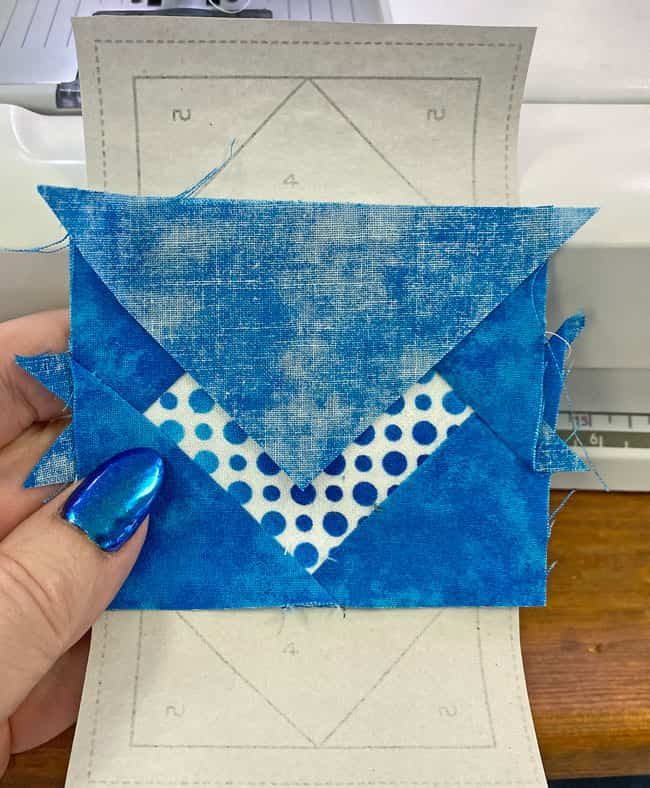
Stitch.
Repeat for all eight #4 patches.
Use the same trimming process for patch placement for the two exposed sides of the #4:
- Pull the stitches away from the pattern
- Use your ruler's edge to fold the pattern on a line between #4 and a #5
- Place 1/4" ruler markings on the folded edge
- Trim away the excess.
Repeat for the other side.
Repeat for all eight #4s.
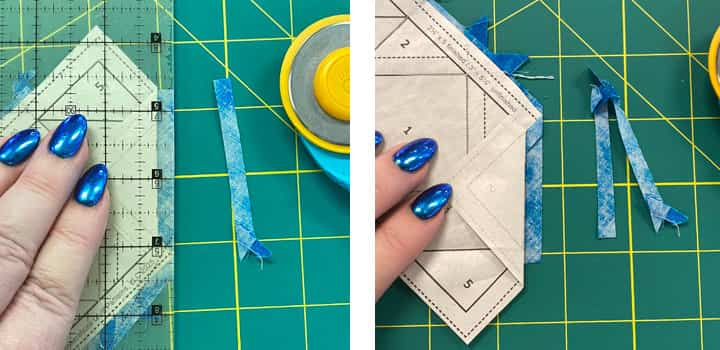 Trim one side of a #4 and then the other to create the placement lines for the #5s
Add the #5s, one to each opposite corner.
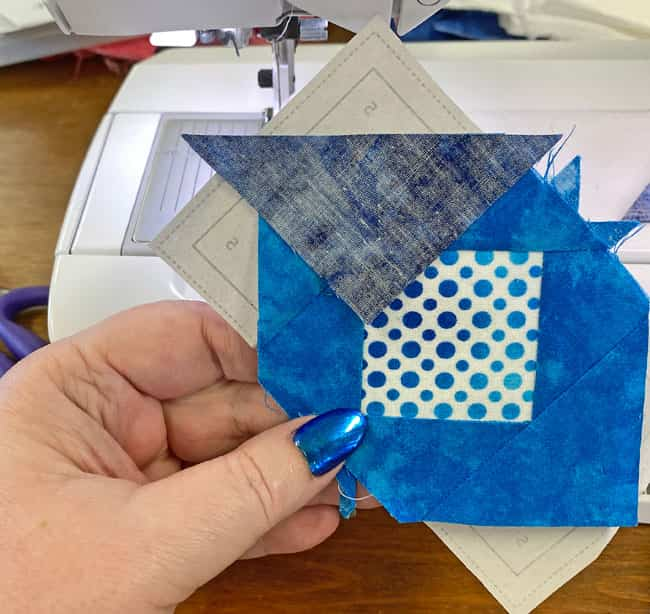 Positioning the first #5
Press with your iron to prevent tucks at the SA.
Add the second #5 to each #4.
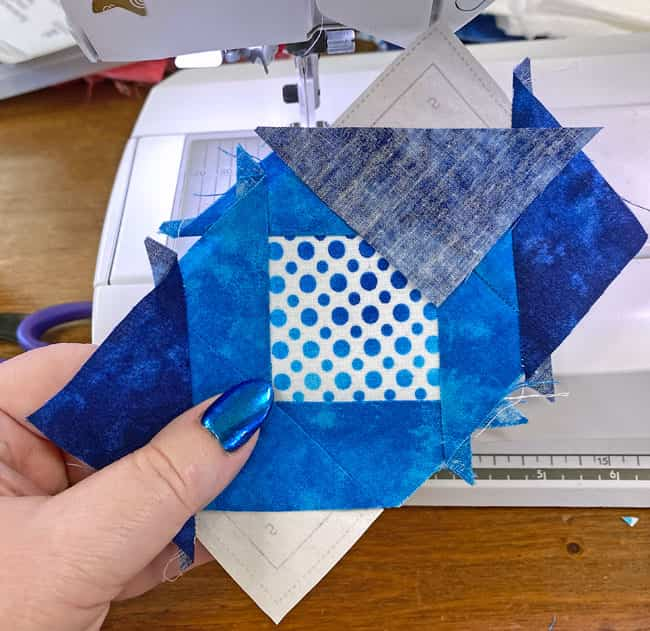 Here you can see how #5s were added to opposite corners before adding the 3rd #5
The two short borders are completely pieced. Set them aside for now. There's a bit more to finish the longer borders.
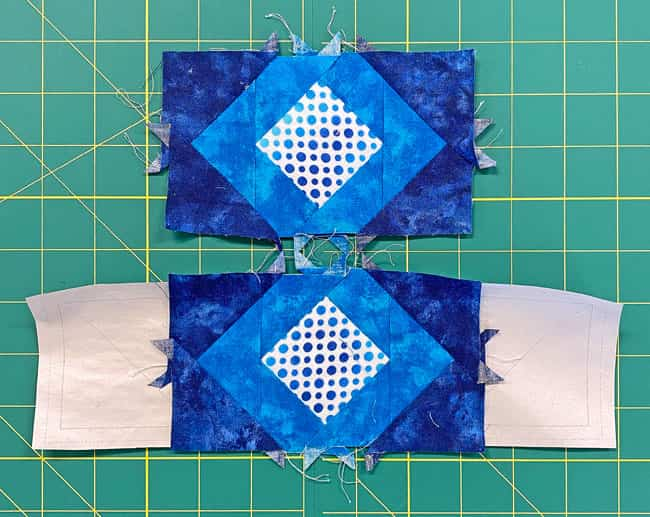 The sewing for the short Border is complete. On to the HST shapes for the Long one (bottom).
Trim the #5s to create the exact placement for #6: fold the pattern back on the line between the #5s and #6, match the 1/4" ruler mark to the fold and trim away the excess fabric.
With RST, position #6 matching the cut edge.
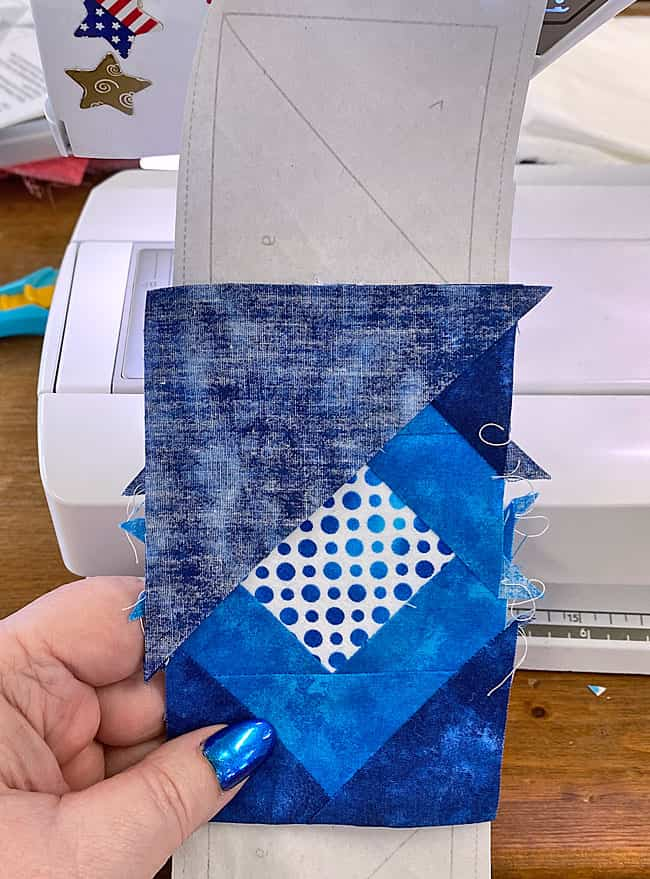
It's worth the effort to take a sec to hold the patch at the edge and flip it open to check the outside point ends up in the correct place. It's much too easy to get into a rhythm with the piecing up to this point and then mess this one up. Ask me how I know?!!
Stitch the seam.
Trim #6 to prepare for #7.
If that point on #6 is too floppy for you (and it definitely was for me on this 12" sample block), use your glue stick to stick the pointed end of #6 to the paper pattern.
Finally, with RST, match the long bias edges of #6 and #7 and stitch.
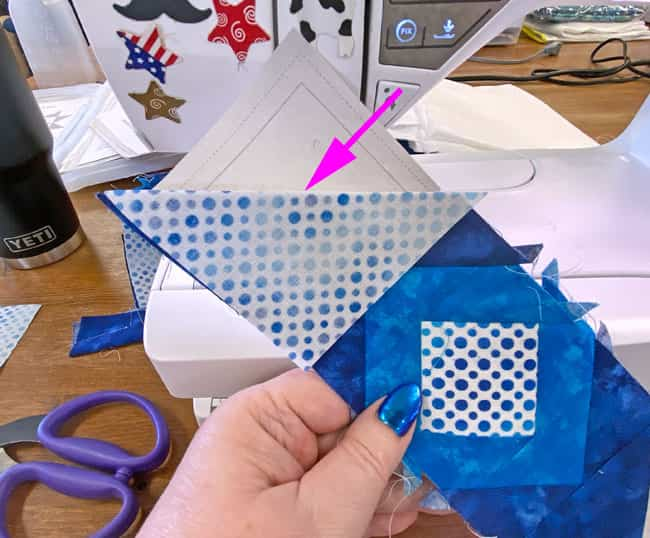
Trimming to perfection
I love this part of paper piecing. Our units look like such a hot mess once the stitching is complete, but 4 cuts with a rotary cutter 'pretty' them up instantly,
On your mat, pattern side up, match the 1/4" mark on your ruler with one side of the solid rectangle that surrounds your block. (pink arrow)
With your rotary cutter, trim away the excess.
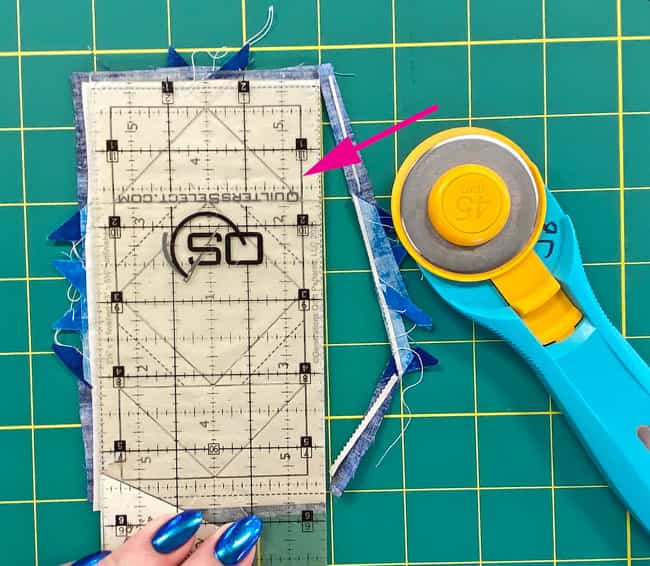
Repeat this simple step for each side of all 4 borders.
Here's the shorter border after its trim job.
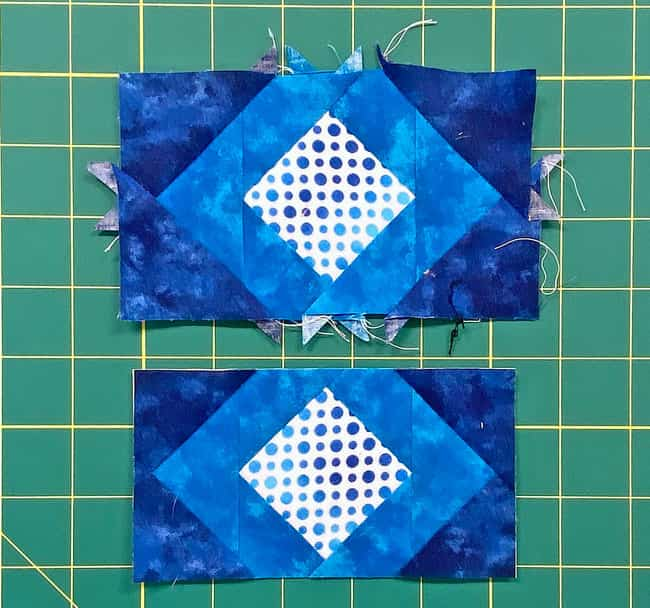 Untrimmed on top, trimmed on bottom
And now the long border.
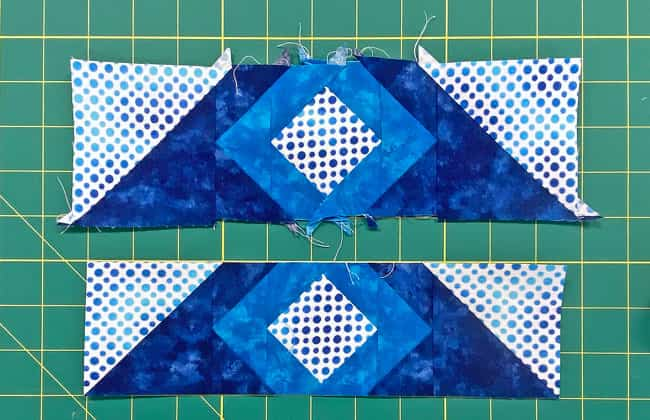 Untrimmed on top, trimmed on bottom
If you stitched on the line, the points are exactly 1/4" in from the edge. Each HST seam cuts into the corner at exactly 45°.
Remove the paper now. Our outside edges are purposefully cut on the straight of grain, just like any traditionally pieced block.

The paper piecing is complete. From this point forward, return your stitch length to the one you regularly use for piecing and install your favorite 1/4" presser foot.
🧩 Final Assembly of our Cupid's Arrowpoint quilt block
Arrange your patches with the short borders on the left and right, the long borders on the top and bottom with the background fabric HSTs in all four corners.
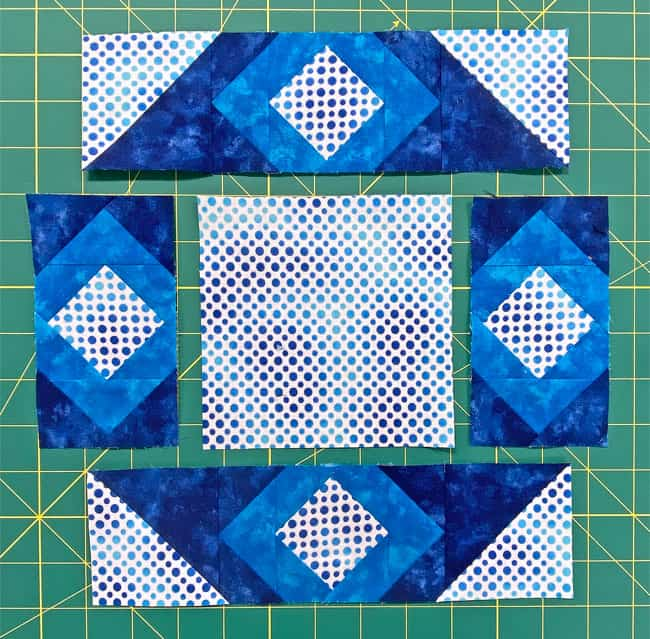
With RST, sew a short border onto each side of #7. Press these SAs toward the center.
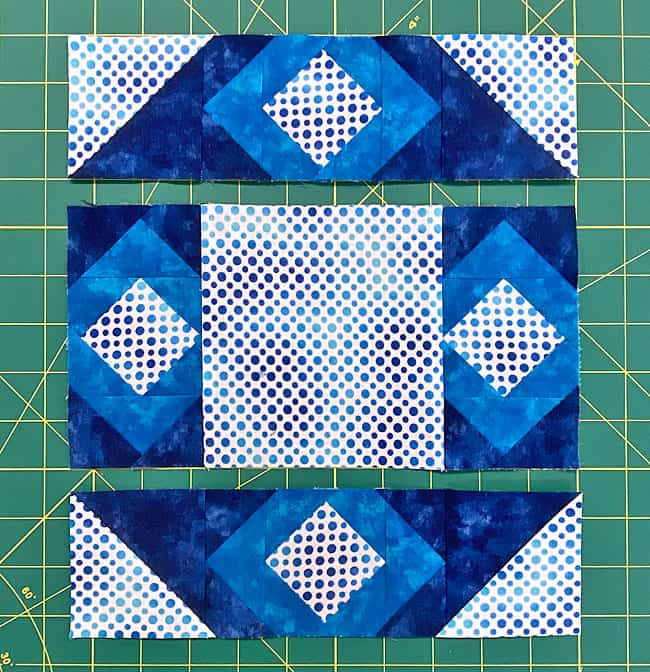
Now sew the rows together, pinning as needed to hold the edges even and the seams matched in the corners. (Those seams nest to make our matching easier.)
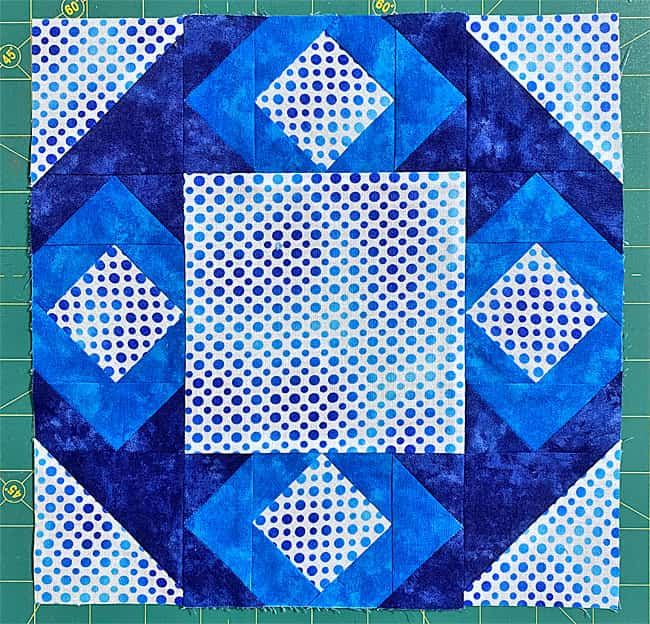
These final seams are pressed towards the center.
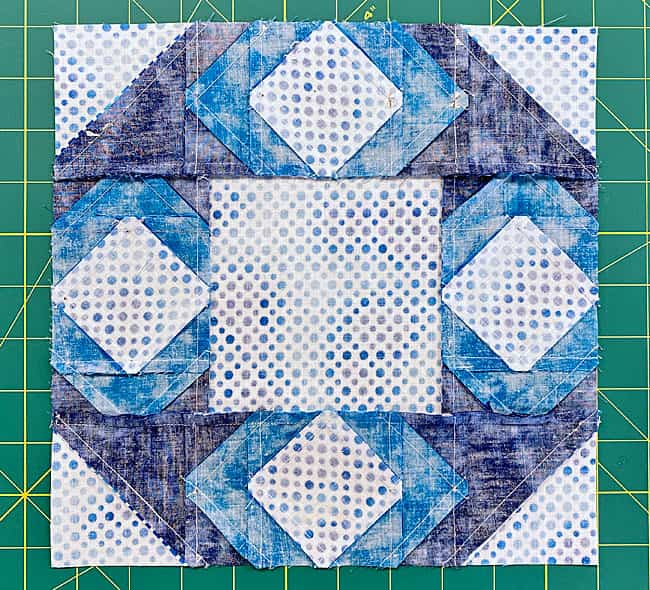
Until next time, may your seams be straight and your bobbins be full!
Set your Cupid's Arrowpoint blocks in a quilt
30 Cupid's Arrowpoint blocks are set in a quilt with a simple sashing and cornerstone and a solid background fabric instead of the dots I used in the sample block.
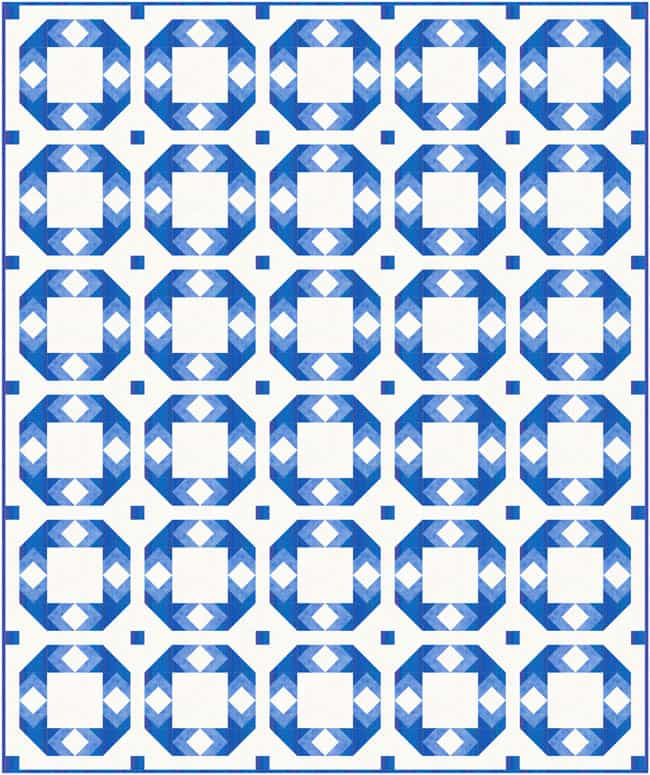 The outlines of the patches and the blocks are removed to give you a better idea of how your finished quilt will look.
📌 Take a Shot at This Later! 🏹📌
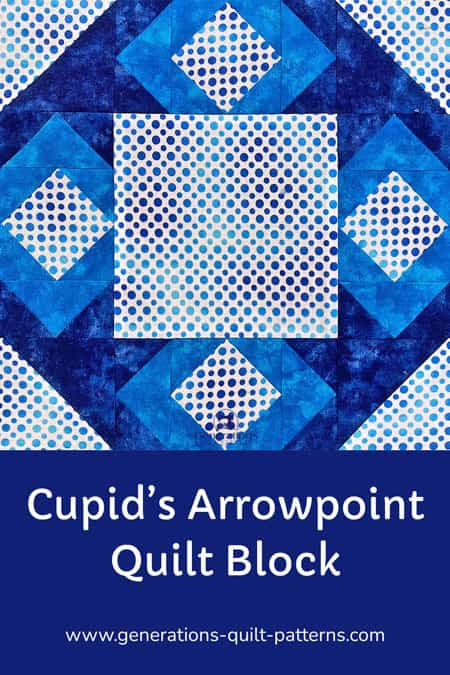
Juggling too many quilt projects already? Pin this Cupid's Arrowpoint block to your "Someday Soon" board and give yourself something to look forward to!
Those perfect points will be waiting whenever you're ready to take aim.
For even MORE blocks to make… 🧩🎨

...visit our Free Quilt Block Pattern Library, with over 260+ blocks to choose from in multiple sizes.
Free downloads are included in all sizes for any blocks require paper piecing patterns or templates.
- Home
- Free Quilt Block Patterns
- Cupid's Arrowpoint Quilt Block
