- Home
- Free Quilt Block Patterns
- Aunt Sukeys Choice Quilt Block
Aunt Sukey's Choice Quilt Block
From our Free Quilt Block Patterns Library
This post contains affiliate links for which I receive compensation
Skill Level: Beginner
The Aunt Sukey's Choice quilt block is much easier to put together than it looks at first glance. Those little arrow-looking shapes are nothing more than pairs of Flying Geese.
We'll paperpiece those to get really sharp, pointy-points.
The corners are simply the start of a corner Log Cabin block. We'll use traditional piecing methods for that. Easy Peasy!
 Pin It for later!
Even if you're a beginning quilter, you CAN make this block!
All it takes are two fabrics and you're ready to begin your own Aunt Sukey's Choice.
📋 General Instructions
Several abbreviations are used on this page:
- SA - seam allowance
- RST - right sides together
- Bac - background fabric
- FG - Flying Geese unit
All seam allowances are 1/4".
You'll love the results when you try our favorite pressing technique.
Ultra-flat quilt blocks are achievable with this simple process. No special tools. Fast. Quick. And easy. It doesn't get better than that!
New quilt fabrics to tickle your fancy...
Click the images below to see the full collection. We share any commercial and/or free patterns that showcase them, too. (For inspiration, of course!)


📥 Download and print the paper piecing patterns
You'll need the most current version of Adobe installed on your computer to download the pattern.
On the Adobe Print Menu page, under 'Page Size and Handling' set 'Custom Scale' to 100% before printing for accurate results. Click here to see what it looks like on the Print Menu page.
After printing, use the 1" square graphic on the printed pages to confirm they are printed accurately.
Print the '# of copies' to have enough units for each block.
Print the Flying Geese Pairs Units | ||
|---|---|---|
| Finished Block Size | # of copies | Link to PDF Download |
| 4½" | 1 | 1½" |
| 6" | 1 | 2" |
| 7½" | 1 | 2½" |
| 9" | 1 | 3" |
| 12" | 2 | 4" |
✂️ Cut patches for your Aunt Sukey's Choice

Sample Size: 6" finished / 6½" unfinished
Grid: 6x6
Attribution: Ladies Art Company
Design Type: Even 9-patch
From the same 'Finished Size' column, cut the patches listed in it in the dimensions and fabrics indicated.
For well-defined points, you'll want fabrics with good contrast.

 | Cutting Chart for an~ Includes Paper Piecing ~ | |||||||
|---|---|---|---|---|---|---|---|---|
| Patch | Fabric | Qty | Finished Block Size | Sub Cut | ||||
| 4½'' | 6'' | 7½'' | 9'' | 12'' | ||||
| Goose.1 | Bac | 1 | 3⅛'' x 3⅛'' | 3⅝'' x 3⅝'' | 4⅛'' x 4⅛'' | 4⅝'' x 4⅝'' | 5⅝'' x 5⅝'' | |
| Sky.1 | A | 4 | 2⅛'' x 2⅛'' | 2⅜'' x 2⅜'' | 2⅝'' x 2⅝'' | 2⅞'' x 2⅞'' | 3⅜'' x 3⅜'' | |
| Goose.2 | A | 1 | 3⅛'' x 3⅛'' | 3⅝'' x 3⅝'' | 4⅛'' x 4⅛'' | 4⅝'' x 4⅝'' | 5⅝'' x 5⅝'' | |
| Sky.2 | Bac | 4 | 2⅛'' x 2⅛'' | 2⅜'' x 2⅜'' | 2⅝'' x 2⅝'' | 2⅞'' x 2⅞'' | 3⅜'' x 3⅜'' | |
| 5 | A | 4 | 1¼'' x 1¼'' | 1½'' x 1½'' | 1¾'' x 1¾'' | 2'' x 2'' | 2½'' x 2½'' | --- |
| 6 | Bac | 4 | 1¼'' x 1¼'' | 1½'' x 1½'' | 1¾'' x 1¾'' | 2'' x 2'' | 2½'' x 2½'' | --- |
| 7 | Bac | 4 | 1¼'' x 2'' | 1½'' x 2½'' | 1¾'' x 3'' | 2'' x 3½'' | 2½'' x 4½'' | --- |
| 8 | A | 1 | 2'' x 2'' | 2½'' x 2½'' | 3'' x 3'' | 3½'' 3½'' | 4½'' x 4½'' | --- |
| Unfinished Block Size | 5'' | 6½'' | 8'' | 9½'' | 12½'' | na | ||
| Grid Size | 3/4'' | 1'' | 1¼'' | 1½'' | 2'' | na | ||
🪡 Assembling the units for Aunt Sukey's Choice
Corners
Make 2 each
The corners are mirror images of each other.

With right sides together (RST) stitch a #5 to a #6. Make 4.

Press, SA to the dark.
Make two units each with #5 to the left and two with #5 to the right as shown below.
 Lay out the patches so that you have two pairs of mirror image units
With RST, stitch along the long side.

Press with SA toward #7 so the seams of this corner patch and the adjacent FGU nest. That makes matching the seams easier.
 Make two of each.
Your corners are finished.
Flying Geese Units (FG)
Make 4

Increase your stitch length to 15-18 stitches/inch. Use an open toe applique foot for the best view of your needle.
Cut out the four pattern units. Don't bother being neat—a rough cut just past the outside dashed lines will do.
Position the back side of Goose.1 to the unprinted side of the pattern using the dashed guidelines for quick and easy positioning. A dot of Elmer's Washable glue stick does a great job holding this patch in place.
 I've recently updated the paper piecing patterns for this FG unit. In the photos, you'll see #1-4. On your pattern you'll see Goose.1, Sky.1, Goose.2, Sky.2.
With RST, align the long edge of a Sky.1 with Goose.1. Stitch starting before and ending after the line. No need to backstitch. Future stitching crosses and secures these stitches.
Press. Repeat for the second Sky.1.
Press.
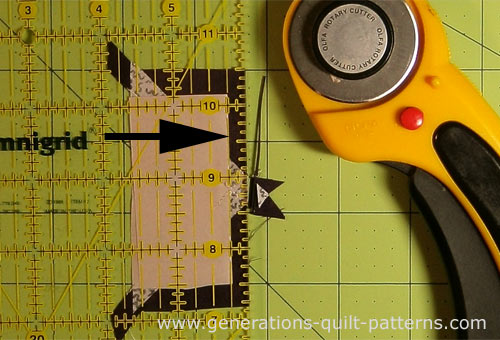
To establish the next seamline, lay the unit paper side up on your mat. Position your ruler so its edge matches the stitching between Goose.2 and the rest of the block (black arrow).

Crease the paper along the ruler and fold it back on itself.
Reposition the ruler so the 1/4" mark lines up with the folded edge (black arrow). Cut off the excess fabric with your cutter.
With RST align the edges of a Goose.2 with the cut edge. For accurate positioning, the point of the Goose.2 patch (bottom arrow) should be directly below the backwards Goose.2 point on the pattern.
 The numbers are backwards in this photo because we add fabric to the unprinted side.
Stitch on the line, starting and stopping past the dashed lines.
Press. Add the Sky.2 patches.
Press.
Trim the FG to size.
🧩 Assembling your Aunt Sukey's Choice quilt block
Return to your normal piecing stitch length. Install your quarter inch foot.
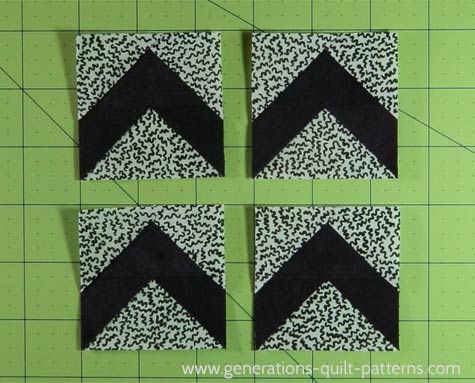
Arrange the units into rows. For the Aunt Sukey's Choice quilt block the geese all point out. Bottom corners are a mirror image to the top corners.
 Check to make sure all your Geese point out from the center.
Stitch the rows together.
Press SA away from the FGUs.

Stitch the rows together.
After one final press, your Aunt Sukey's Choice is finished!
For even MORE blocks to make… 🧩🎨

...visit our Free Quilt Block Pattern Library, with over 260+ blocks to choose from in multiple sizes.
Free downloads are included in all sizes for any blocks require paper piecing patterns or templates.
- Home
- Free Quilt Block Patterns
- Aunt Sukeys Choice Quilt Block


Yummy fabrics
to drool over
Click any image below to see the full collection and find pricing and ordering information.


By Julie Baird
Copyright © 2008-2026 Generation Quilt Patterns, LLC
All Rights Reserved
Generations-quilt-patterns.com does not sell any personal information. (See Privacy Policy)