- Home
- Free Quilt Block Patterns
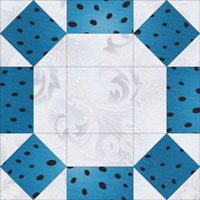
- Rolling Square Quilt Block
Rolling Square Quilt Block: Rock & Roll Your Way to Perfect Points
Piece out the perfect points, roll in the compliments! 💫
This post contains affiliate links, for which I receive compensation.
Skill Level: Beginner
The Rolling Square quilt block is made from 2 fabrics. It's quite similar to the Broken Wheel block—only the grid it's drawn on is different.
Its 5x5 grid is sometimes referred to as an uneven nine patch and is made with Square in a Square and strip pieced units.
🧭 Jump to any section of this tutorial
We've got your journey mapped out! Find what you need: 🎯
- A cutting chart in 4 sizes with a download of the chart and block design
- A download of the paper piecing patterns and templates for each size
- 🎨 A coloring/fabric planning page to download and print
- Step-by-step illustrated instructions
- Related blocks based on the same 9-patch grid
Cut. Sew. Press. Your fabric's about to take center stage!
📋 General Instructions
These abbreviations are used on this page:
- SA - seam allowance
- RST - right sides together
- SiaS - square in a square unit
SA are 1/4" unless otherwise indicated.
When you are instructed to press, first press the pieced unit flat to set the seam. Then open the patch, pressing from the front. Seam allowances are pressed to the dark fabric unless otherwise noted.
📥 Download and print paper piecing pattern
You'll need the most current version of Adobe installed on your computer to download the pattern.
On the Adobe Print Menu page, under 'Page Size and Handling' set 'Custom Scale' to 100% before printing for accurate results. Click here to see what it looks like on the Print Menu page.
Print your chosen block size from the table below.
Print the SiaS Units | ||
|---|---|---|
| Finished Block Size | # of copies | Link to PDF Download |
| 5" | 1 | 2" |
| 7-1/2" | 1 | 3" |
| 10" | 2 | 4" |
| 12½" | 4 | 5" |
| 15" | 4 | 6" |
Measure the patterns to confirm they printed at the correct size.

Not sure which paper to use?
Take a look at my review of several of the most popular brands available to us quilters on the market.
You want a super-easy paper to tear away—less stress on the stitches.
New quilt fabrics to tickle your fancy...
Click the images below to see the full collection. We share any commercial and/or free patterns that showcase them, too. (For inspiration, of course!)


✂️ Cut patches for a Rolling Square

Sample Size: 5" finished / 5½" unfinished
Grid: 5x5
Attribution: Mrs. Danner
AKA: Home Circle, Mrs. Anderson's Quilt (Mrs. Danner), Garden of Eden (Mrs. Danner), Rolling Squares (Nancy Cabot)
Design Type: Uneven 9-patch
Patches C.2 thru C.5 are generously cut to make placement foolproof.
After making a couple of blocks, make any needed adjustments to the measurements and note for future reference.
The strip piecing strips are cut a bit longer than needed to allow for some straightening cuts.
Patch labels are your quilting roadmap. Stick with them through this tutorial for a smooth ride.
 | Cutting Chart for a~ Includes Paper Piecing ~ | |||||||
|---|---|---|---|---|---|---|---|---|
| Patch | Fabric | Qty | Finished Block Size | Sub Cut | ||||
| 5'' | 7½'' | 10'' | 12½'' | 15" | ||||
| 1 | A | 1 | 1½'' x 7'' | 2'' x 9'' | 2½'' x 11'' | 3'' x 13'' | 3½'' x 15'' | --- |
| 2 | Bac | 1 | 1½'' x 7'' | 2'' x 9'' | 2½'' x 11'' | 3'' x 13'' | 3½'' x 15'' | --- |
| 3 | A | 1 | 1½'' x 1½'' | 2'' x 2'' | 2½'' x 2½'' | 3'' x 3'' | 3½'' x 3½'' | --- |
| Center.1 | A | 4 | 1⅞'' x 1⅞'' | 2⅝'' x 2⅝'' | 3⅜'' x 3⅜'' | 4⅛'' x 4⅛'' | 4¾'' x 4¾'' | --- |
| C2., C.3, C.4, C.5 | Bac | 8 | 2⅜'' x 2⅜'' | 2⅞'' x 2⅞'' | 3⅜'' x 3⅜'' | 3⅞'' x 3⅞'' | 4⅜'' x 4⅜'' | |
| Unfinished Block Size | 5½'' | 8'' | 10½'' | 13'' | 15½" | |||
| Grid Size | 1'' | 1½'' | 2'' | 2½'' | 3" | |||

🪡 Assemble the patches for your Rolling Square
📢Updated Tutorial Note
Since originally creating this tutorial, I've updatd the SiaS paper piecing patterns.
- I've added the prefix 'C' to patches #2-4. They're easier to recognize as belonging to the SiaS unit in the cutting chart.
- The Finished/Unfinished size is now in the seam allowance. This makes storing any leftovers faster and easier.
In this tutorial, you'll still see the old numbering system. The order of piecing has not changed.
Enjoy!
SiaS
Make 4

Cut four patterns from the downloaded pattern sheet. A rough cut is good enough; no need to spend time cutting on the dotted line.
Reduce your stitch length to 15–20 stitches per inch for paper piecing.
With a dab of Elmer's Glue Stick—the kind that goes on purple and dries clear—stick the wrong side of a Patch Center.1 to the unprinted side of the pattern, centering it as shown below.

The center square is quite dark with much lighter corners.
To prevent the darker fabric from 'shadowing through' to the top of the block, position your C.2-5 so that their edge extends just a wee bit past that of the Center.1.
That way you won't need to go back and trim the darker seam allowance.

Stitch a light C.2 and C.3 to two opposite sides of Center.1, starting before and stopping after the solid stitching line.
Press.
Stitch the C.4 and C.5 to the two remaining sides. Remember to start before and stop after the black stitching line for secure seams.

To reduce unnecessary bulk trim away any dog ears and then press.
Repeat for the three remaining SiaSs.
In this pre-trim photo notice that the outside thread tails are still intact. There was no need to cut them off during construction because they'll be addressed when the blocks are trimmed to size.
No duplication of effort!

Trim the patches with your rotary cutter and ruler.

For a more detailed description of paper piecing this Square in a Square unit, click here.
Strip Pieced Sides
Make 4
With right sides together, sew the light and dark 7" x 1-1/2" strips together along the long side.

Press with the SA toward the darker fabric. This stripset for the sample Rolling Square is 2-1/2" wide. Use the chart below to check your stripset for accuracy.
StripSet Widths | ||
|---|---|---|
| Finished Block Size | Stripset Width after stitching | SubCut Width |
| 5" | 2½" | 1½" |
| 7½" | 3½" | 2" |
| 10" | 4½" | 2½" |
| 12½" | 5½" | 3" |
| 15" | 6½" | 3½" |
Straighten one short edge with your rotary cutter and ruler.
Subcut as directed.

🧩 Time to Roll Out Your Block!
Remove the paper from the SiaS units. Arrange the cut and pieced units into the Rolling Square design.

Row by row, stitch your units together. Press those seam allowances in the direction of the arrows shown below—this little detail will make your block sing!

Ready to join those rows? This is where the magic happens! The SAs nest together like they were made for each other. Pop a few pins where the SiaS points meet the strip-pieced seams—your points will thank you later.
Give those final seams a press, directing them away from the SiaS units to keep everything smooth and flat.
And just like that, you've done it! Take a moment to admire your finished Rolling Square block. It's absolutely stunning! ✨
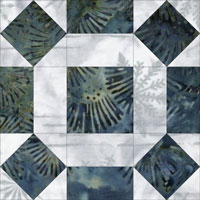
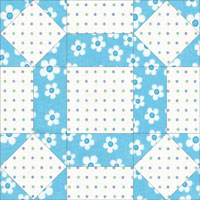
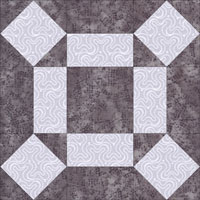
 Our Rolling Square quilt block—ready for a quilt!
You're On a Roll Now! 🎵
High-fives and happy dances—you've rolled out a beauty! 💃
Your Rolling Square block is proof that you've got moves that would make any quilter proud. Sure, there might have been a few 'creative moments' along the way, but hey—even rock stars have to practice!
Until we meet again, may your blocks be bold, and your seam ripper be unemployed! Rock your new fabric runway! 🎵🌟
📌 Don't let this tutorial roll away
Pin it for your next quilting gig! 🎵

Common Variations
More often you'll see the Rolling Square quilt block design drawn on a 6x6 (aka Nine Patch) grid like the patchwork designs below.
Broken Wheel
A two fabric block. Notice that the dark center is gone. This version is drawn on a 6x6 grid.
Other names include: Block Circle, Johnnie Round the Corner, Single Wedding Ring, Squirrel in a Cage and plain ol' Wheel
Click here for instructions to make this block.
Squirrel in a Cage
The dark center is back!
Mrs. Miller's Favorite
All color placement is reversed.
This variation is also know as Broken Wheel.
Rolling Stone
Different fabric placement really changes the look.
Other names include: Letter O and Wedding Ring
Click here for instructions to make this block.
For even MORE blocks to make… 🧩🎨

...visit our Free Quilt Block Pattern Library, with over 260+ blocks to choose from in multiple sizes.
Free downloads are included in all sizes for any blocks require paper piecing patterns or templates.
- Home
- Free Quilt Block Patterns
- Rolling Square Quilt Block


Yummy fabrics
to drool over
Click any image below to see the full collection and find pricing and ordering information.


By Julie Baird
Copyright © 2008-2026 Generation Quilt Patterns, LLC
All Rights Reserved
Generations-quilt-patterns.com does not sell any personal information. (See Privacy Policy)