- Home
- Free Quilt Block Patterns
- Liberty Star Quilt Block
Freedom-Loving Liberty Star Quilt Block: Paper Piecing Liberation in 5 Sizes!🗽
Your declaration of independence from expensive tools and frustrating results! 🗽💫
This post contains affiliate links, for which I receive compensation.
This Liberty Star quilt block tutorial solves three quilting problems at once! 🌟 Wonky points, excessive trimming, and the need for expensive specialty tools? Consider them officially conquered with this fresh-off-the-press tutorial that's about to become your new quilting game-changer!
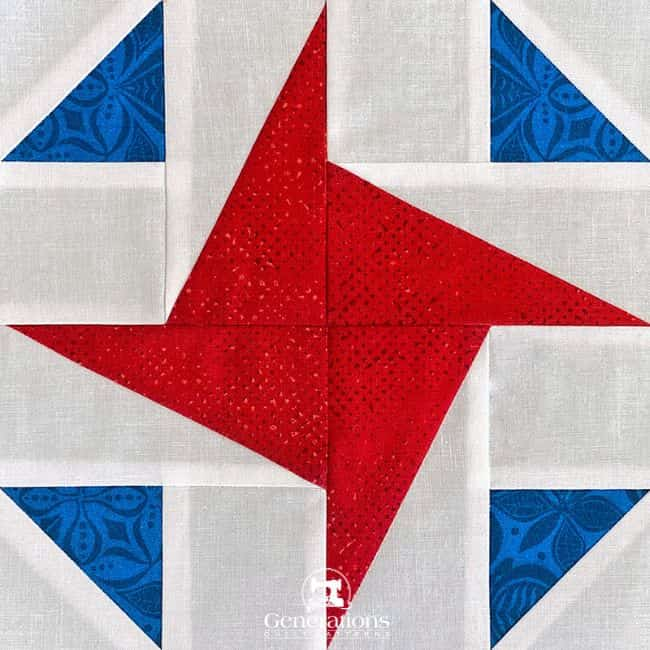
Here's what makes this tutorial different.
While traditional methods have you piecing 8 separate triangles and then trimming them all to the perfect size (time-consuming much?), our paper piecing approach delivers more accurate blocks with no cut-off points AND significantly less trimming. It's efficiency and accuracy wrapped up in one gorgeous star-shaped package, if I do say so myself!
⚡ Fast Track to Liberty: Jump to What You Need Most
We hold these truths to be self-evident: that all quilters deserve easy access to the info they need! Click below to exercise your right to efficient tutorial navigation. ✊
Ready to experience true quilting freedom? Let's break some chains and make some magic! ✨⭐
📋 General Instructions
⚡ PRINTING TIP: Need help printing this tutorial? Click here for easy instructions!
Several abbreviations are used on this page. They are:
- SA - seam allowance
- RST - right sides together
- HST - Half Square Triangles
- HRT - Half Rectangle Triangles
A 1/4" SA is used through this tutorial.
✅ KEY TECHNIQUE: PRESSING PAPER PIECED PATCHES
To streamline the instructions, it is assumed that you ALWAYS press with your iron after adding each patch.
First press it in the closed position as it came off your sewing machine. This sets the seam, melding the fibers of the threads into the fabric. Then press the patch open. In paper piecing, all SAs are pressed toward the last patch added.
Double check ✅✅to make sure you haven't inadvertently pressed a tuck in along the SA. Once you've sewn across both ends of a seam, it's virtually impossible to get that tuck out.
If we're pressing to simply keep something out of the way, you'll be instructed specifically to fingerpress.
📥 Download and print paper piecing pattern
To download the pattern, use the most current version of Adobe.
For accurate results, on Adobe's Print Menu page, under 'Page Size and Handling' set 'Custom Scale' to 100%. Then print.
Click here to see what it looks like on the Print Menu page.
Find your finished block size from the chart below. Print the corresponding number of pages for a total of 4 Liberty Star units.
Print the Liberty Star Units | ||
|---|---|---|
| Finished Block Size | # of copies | Link to PDF Download |
| 4" | 1 | 4" |
| 5" | 1 | 5" |
| 6" | 1 | 6" |
| 8" | 2 | 8" |
| 12" | 4 | 12" |
After printing, use the 1" square graphic on the printed page(s) to double check that your patterns printed at the correct size.
My must-have tools for paper piecing
Most of the tools you'll need for paper piecing, you likely already have. (Whew!!!!)
Compare your current inventory with the recommendations in 'Essential Paper Piecing Skills: The right tools for the job'.
In the meantime, these are the three must-haves in my paper piecing toolbox.
✂️ Cutting patches for your Liberty Star quilt block
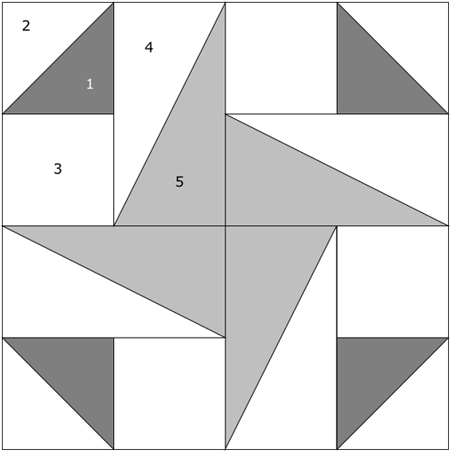 Liberty Star patchwork design
Sample Block Size: 8" finished / 8½" unfinished
Grid: 4×4
Attribution: Quilt World
Brackman ID: None
Maggie Malone: #1534, pg 116
Design Type: Star | Pinwheel | Paper Piecing
Label your patches station, all aboard! 🚂 We refer to these patches by number throughout the tutorial, so no skipping this step!
 | Cutting Chart for a~ Paper PLUS Traditional Piecing ~ | ||||||
|---|---|---|---|---|---|---|---|
| Patch | Fabric | Qty | Finished Block Size | ||||
| 4'' | 6'' | 8'' | 10'' | 12'' | |||
| 1 | Dark | 2 | 1⅞'' x 1⅞'' | 2⅜'' x 2⅜'' | 2⅞'' x 2⅞'' | 3⅜'' x 3⅜'' | 3⅞'' x 3⅞'' |
| 2 | Bac | 2 | 1⅞'' x 1⅞'' | 2⅜'' x 2⅜'' | 2⅞'' x 2⅞'' | 3⅜'' x 3⅜'' | 3⅞'' x 3⅞'' |
| 3 | Bac | 4 | 1¾'' x 1¾'' | 2¼'' x 2¼'' | 2¾'' x 2¾'' | 3¼'' x 3¼'' | 3¾'' x 3¾'' |
| 4 | Bac | 2 | 3'' x 2¾'' | 4'' x 3¼'' | 5'' x 3¾'' | 6'' x 4¼'' | 7'' x 4¾'' |
| 5 | Medium | 2 | 3'' x 2¾'' | 4'' x 3¼'' | 5'' x 3¾'' | 6'' x 4¼'' | 7'' x 4¾'' |
| Unfinished Block Size | 4½'' | 6½'' | 8½'' | 10½'' | 12½'' | ||
| Grid Size | 1'' | 1½'' | 2'' | 2½'' | 3'' | ||
✂️✂️ Subcutting
Before we start piecing, there's a bit of subcutting to do.
Stack your #4 and #5 rectangles into separate piles, all must be right side up.
With a mechanical pencil, make a mark 5/8" in from the right on the top edge, and 5/8" in from the left on the bottom edge. (blue arrows).
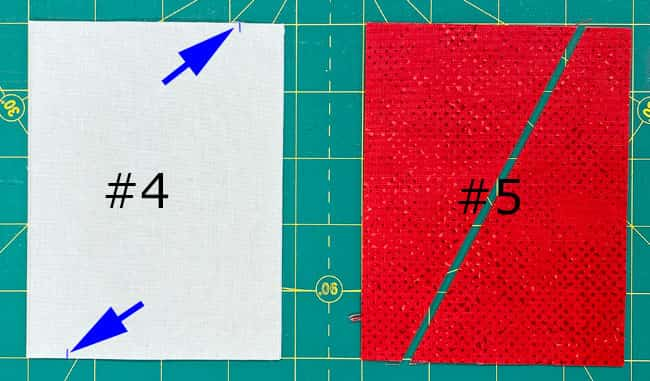
Line up your ruler with these marks at the top and bottom edges. Slice in half with your rotary cutter. You've just made your long skinny triangles for your HRTs.
Cut #1 and #2 squares in half once on the diagonal to create HST shapes.
Our patches are ready for stitching.
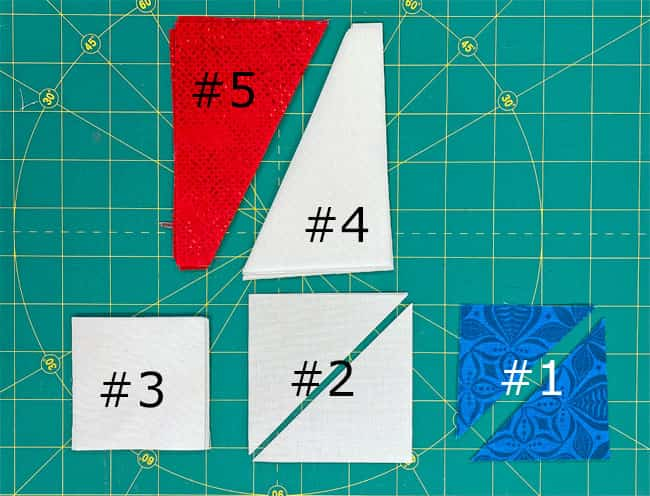
🪡 Assemble the paper pieced Liberty Star units
Liberty Star Unit
Make 4
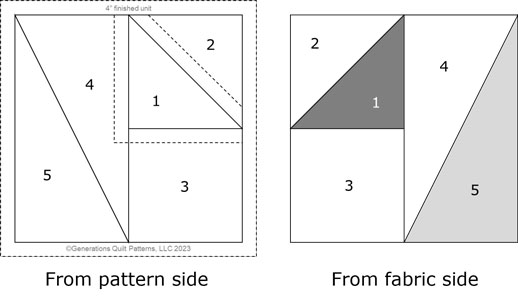
Notice that the finished unit is the mirror image of the paper piecing pattern. This is because it's an asymmetrical design. So if you thought the pattern is backwards...you're RIGHT! And it's precisely how it's supposed to be!
We need to make a few adjustments to our sewing machine settings to paper piece.
- Reduce your stitch length to 16–20 stitches per inch (1.3-1.6 mm). This perforates the paper and stabilizes the seam when you remove the pattern. [Learn more about stitch length here.]
- Reduce your machine's speed or just plain slow down. Sew only as fast as you can AND stay on the solid stitching line.
- Install an open toe appliqué foot (sometimes called an 'embroidery' or 'satin stitch' foot) if you have one (it makes it easier to see where you're stitching).
- Use a larger needle (90/14) IF you have problems removing the pattern. Personally, I use an 80/12 Microtex Sharp for paper piecing without any issues.
With the wrong side of #1 towards the unprinted side of the pattern, use a tiny bit of Elmer's Washable Glue Stick® to hold the patch in place. Use the dashed guidelines for quick placement.
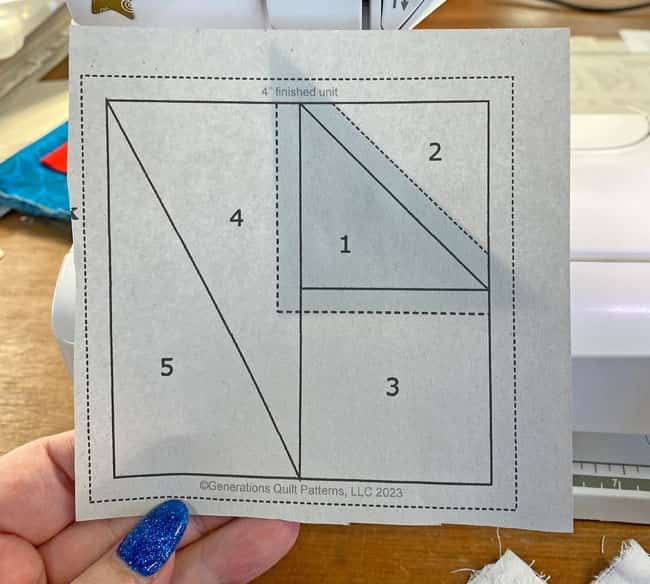 The dark #1 should fit nicely between the dashed guidelines.
With RST, layer the long bias edge of #2 with the long bias edge of #1. (blue arrow)
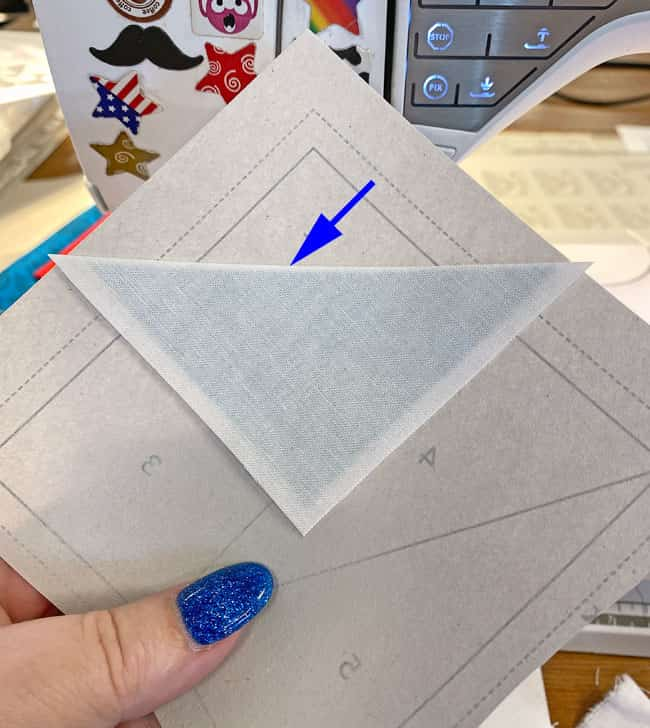
✅ KEY TECHNIQUE: Avoid dark fabrics shadowing through lighter ones
In our sample, the background fabric is much lighter than the dark #1. To keep the darker print from shadowing through the light background in the finished block, nudge the edge of the lighter patch a couple of threads past that of the print. (blue arrow)
A simple technique to prevent a lot of frustration later.
From the printed side, sew the seam between #1 and #2. Start and end a good 1/4" before and after the solid lines. The next lines of stitching that cross these stitches will secure them—just like traditional piecing.
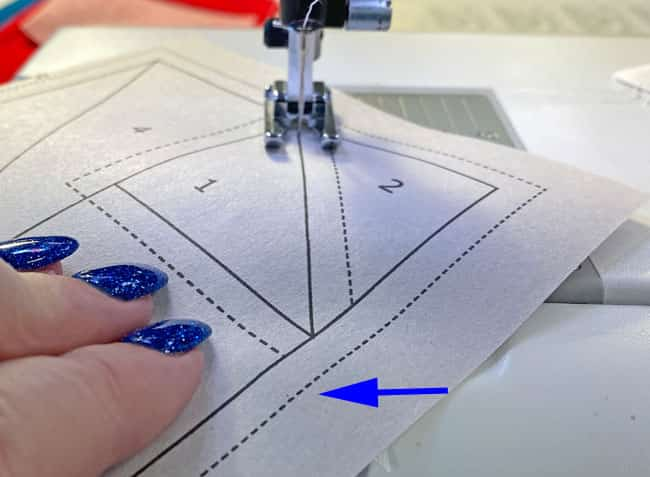 Your stitches should end past the outside dashed lines at roughly the blue arrow
Press.
With RST, line up #3 with #1. Nudge the edge (blue arrow) that is in the seam between #1 and #3 a few threads to prevent shadowing.
Keep the edge that extends into #4 (red arrow) even with the #1 patch.
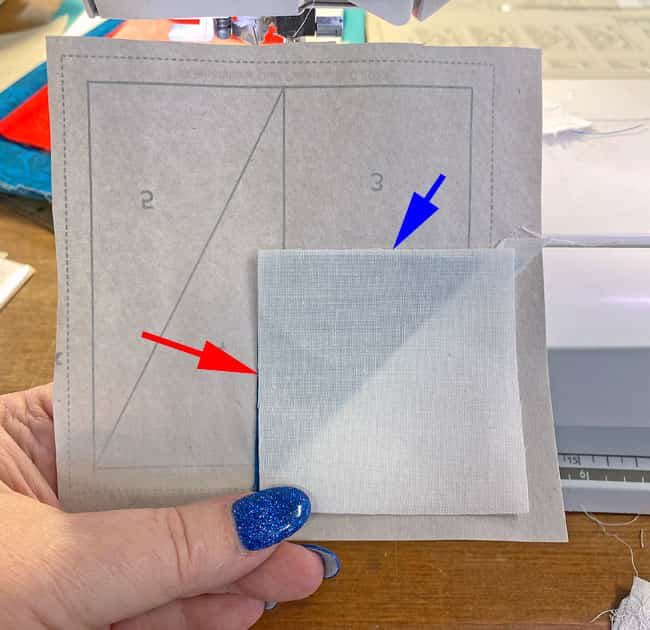
Press.
If all the patches are even with the inside edge of #1, then there's no need to trim here.
If the edges are uneven, trim away the excess leaving behind a 1/4" SA.
Align the long straight edge of #4 with the even or trimmed patches #1/#3, RST, of course.
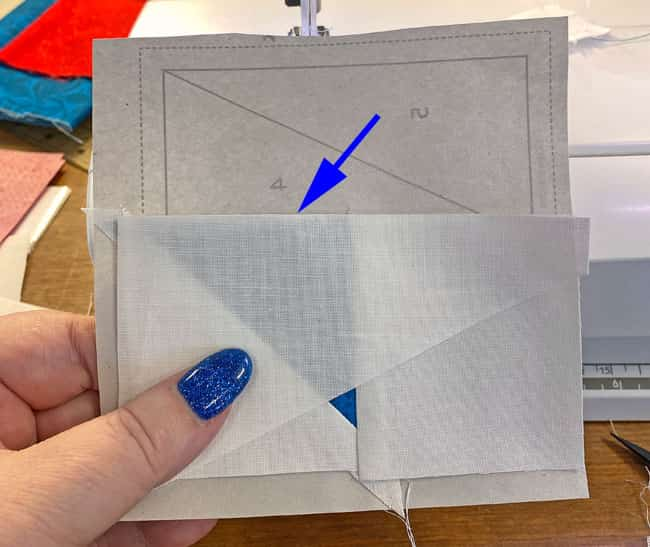 Scoot #4 over a couple of threads to prevent the dark #1 from showing through on the right side
Since this seam extends from one outside edge to the other in this unit, this seam can be chain pieced if you are working on all four units at one time.
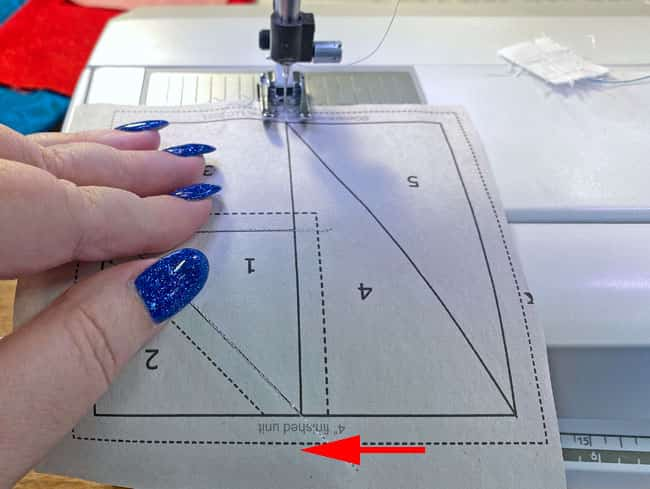
Press.
At your cutting mat, fold the pattern back on itself on the solid line between #4 and #5.
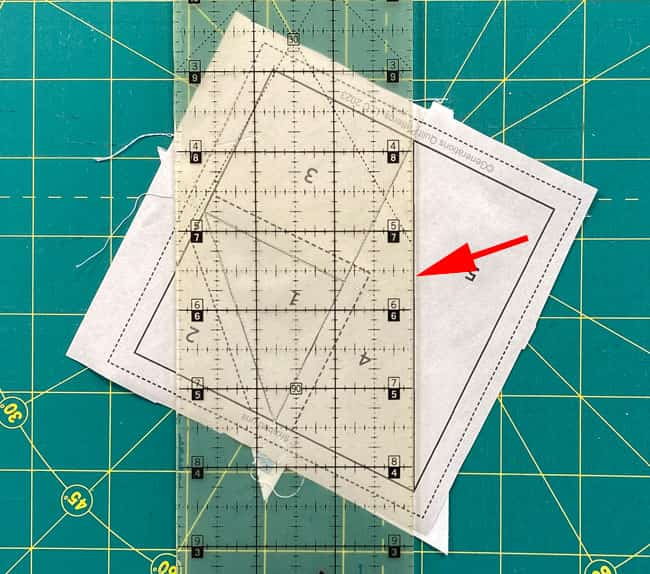 Make it easy on yourself. Put the edge of your ruler on the line between #4 and #5 (red arrow) and crease the paper with your thumbnail. That crease makes it much easier to fold the pattern back on itself.
With the pattern folded, lay the 1/4" line of your ruler directly over the fold, and trim away the excess fabric.
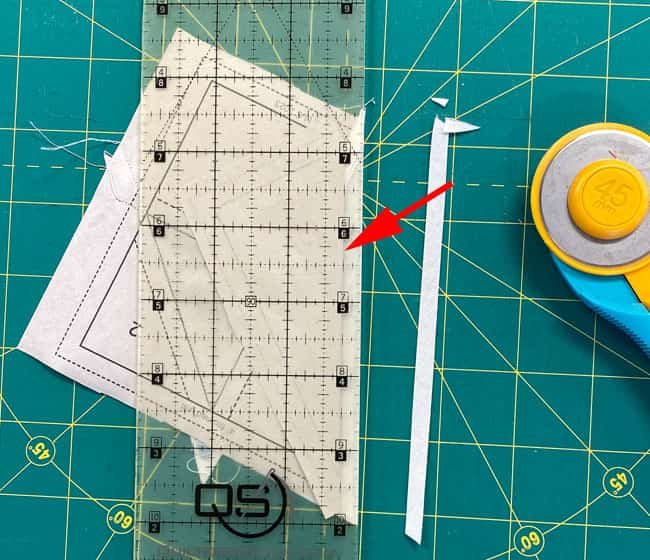
With RST, align the long bias edges of #4 and #5. This seam also runs from edge to edge. It can be chain pieced, too.
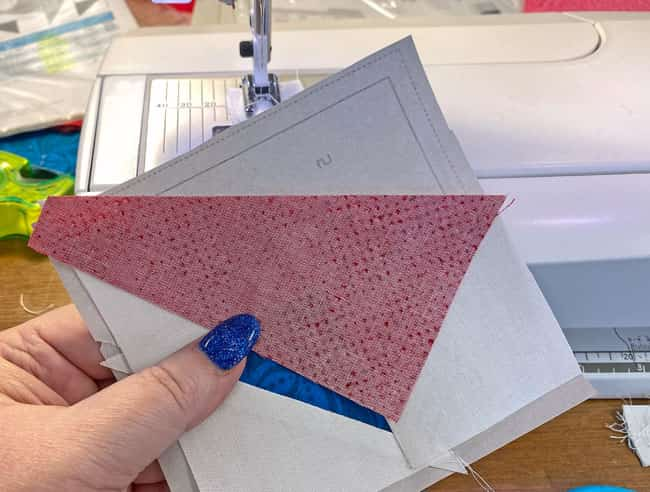
A final turn at the ironing board and your unit is finished.
All that's left is to trim to the correct size.
Match the 1/4" line on your ruler with one side of the solid square. Trim away the excess fabric.
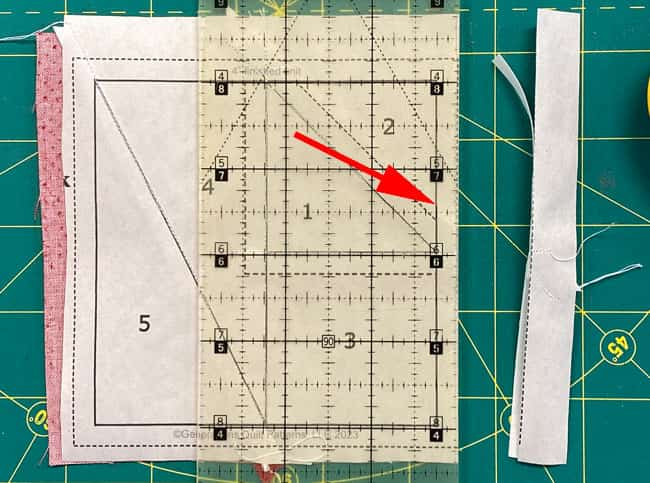
Repeat for the remaining three sides. This simple trim takes our sewn Liberty Star unit from a hot mess to perfection.
All that pointy goodness for just a wee bit of extra fabric.
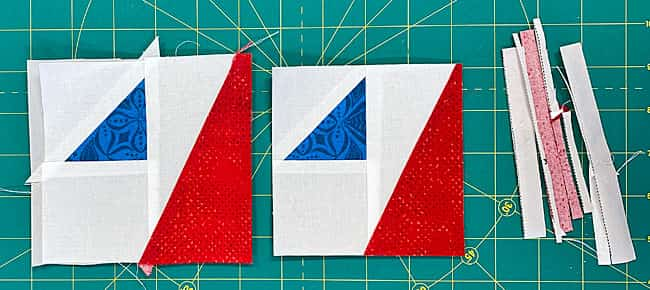
Repeat for each remaining unit.

The paper piecing is complete. From this point forward, return your stitch length to the one you regularly use for piecing and install your favorite 1/4" presser foot.
Before sewing the pieced squares together, remove the paper. We cut our patches deliberately to have straight of grain on all the outside edges.
The paper no longer serves a purpose, so we remove it now.
🧩 Assemble your Liberty star quilt block
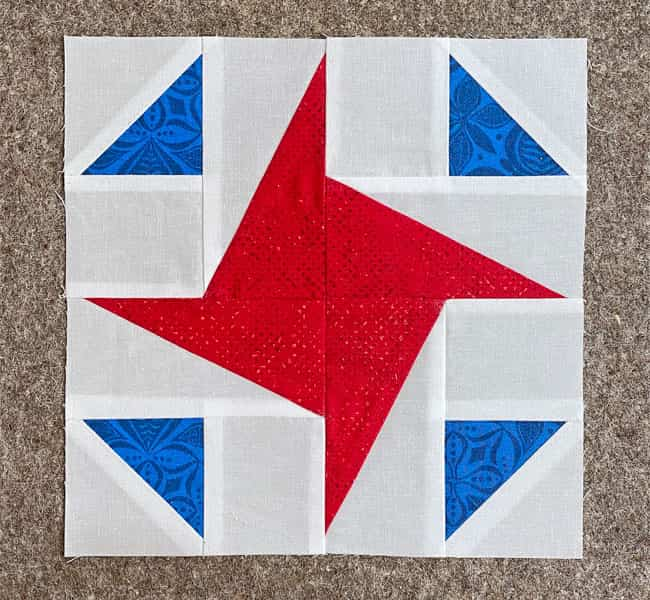
Arrange the patches into the Liberty Star block design. The HRTs are in the center forming a pinwheel-like star.
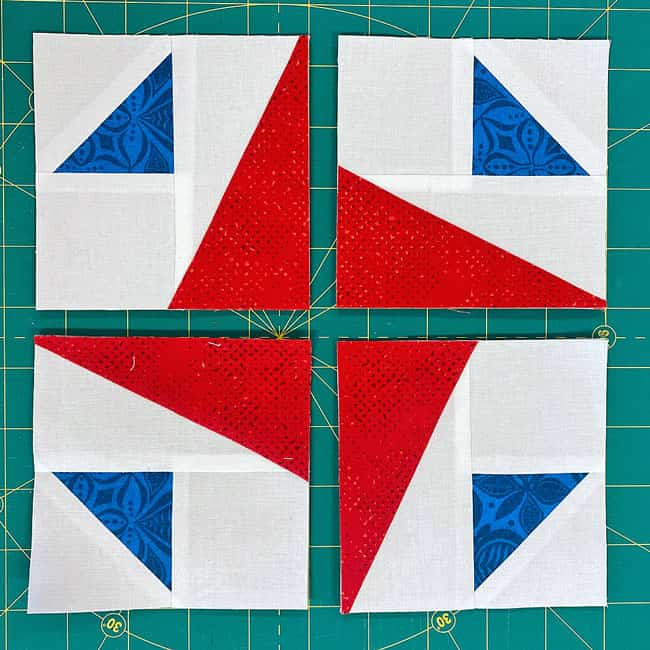
With RST stitch the pairs together. The only thing we concern ourselves with is that the ends match.
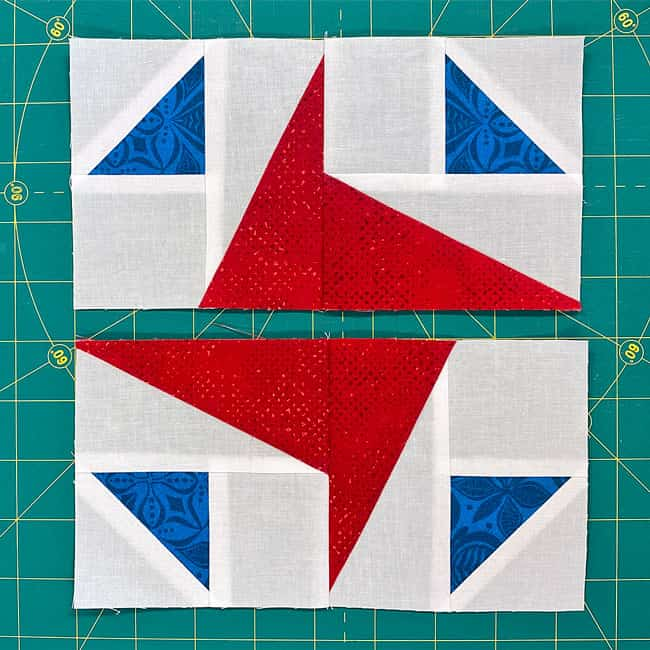
You can press the SA in whichever direction you prefer. Just do both Liberty Star units the same so that the SA in the center nests to make matching a piece o'cake.
With RST, join the two rows.
As always, if pins help you, use them...I do. ;)
Our Liberty Star as seen from the front side.
Here it is from the backside.
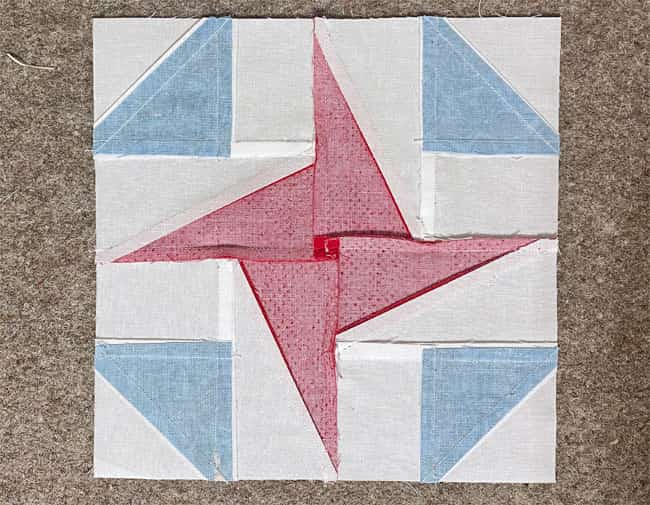 Our Liberty Star sample block from the backside.
I choose to twirl or fan the SA in the center to reduce bulk.
To accomplish this, simply loosen a couple of stitches in the center. DO NOT CUT THEM, they are needed for block stability.
With your fingers, work the seam allowances so that they swirl around the center. Give them a good pressing to complete the job. (Yes, that's a wool pressing mat behind the block. I've bought several from 14" square to 18"x22" to 20"x60". I love them!)
And there you have it—quilting freedom achieved! 🙌
No more cut-off points, no more trimming drama, just beautiful Liberty Stars that actually look like stars (revolutionary concept, right?).
You've officially graduated from the school of "good enough" to the university of "absolutely gorgeous!" Time to show those blocks who's boss! 🌟💪
📍 Bookmark Your Quilting Liberation!
Pin this tutorial now because perfect Liberty Stars should always be just a click away! Don't let this quilting freedom slip through your fingers—save it to Pinterest and share the liberation! 📌✨
More playful and dynamic pinwheel quilt blocks!
Your pinwheel-inspired quilt block is done. But you're not!
Our pinwheel quilt blocks are a delightful blend of playful interlocking patterns and vivid, eye-catching color. The interlocking patterns dazzle your eyes and inspire your creativity, while our step-by-step instruction ensures that you can create these stunning blocks with ease.
🔭 Looking for something truly stellar?
You've finished your star quilt block, and you're ready for more!
Browse our collection of 70 stellar star quilt block patterns. All have instructions and cutting charts in multiple sizes. If templates or paper piecing is used in the tutorial, there's a free download for you of those materials.

Eeny. Meenie. Miney. Moe.
Which star quilt block will you sew?
For a star-studded quilting experience, choose from 100+ bedazzling star quilt patterns—for beginners and beyond—click here.
For even MORE blocks to make… 🧩🎨

...visit our Free Quilt Block Pattern Library, with over 260+ blocks to choose from in multiple sizes.
Free downloads are included in all sizes for any blocks require paper piecing patterns or templates.
- Home
- Free Quilt Block Patterns
- Liberty Star Quilt Block

