- Home
- Free Quilt Block Patterns
- Lasting Blossom Quilt Block
Lasting Blossom Quilt Block Tutorial: 5", 7½", 10", and 15" finished
From our Free Quilt Block Patterns Library
This post contains affiliate links, for which I receive compensation.
Every so often I'm pleasantly surprised when I try out a new quilt block, and Lasting Blossom is one of those times.
The block was surprisingly easy to make, using simple patchwork shapes like the Corner Beam and the Diamond Rectangle.
While these aren't your usual every-day quilt units, the stitching—and seam matching—was much simpler than I anticipated.
 Pin It to enjoy later!
The secret sauce?
You guessed it.
Paper piecing!
By cutting oversized patches and having an accurate line to sew on, you'll be whipping up a bodacious bouquet for yourself in no time!
In this tutorial, you'll find:
- A cutting chart in four sizes with downloads of the chart and block design
- If quilting isn't on the calendar this week, Pin or bookmark this page for when you have more time.
It's time to cut up and sew—we'll stop to smell the flowers later!
General Instructions

I use several abbreviations on this page. They are:
- SA – seam allowance
- RST – right sides together
- CB – Corner Beam unit
- DR - Diamond Rectangle unit
A 1/4” SA is used in this tutorial.
I prefer a heavily starched fabric for paper piecing. IMHO, it cuts and sews more accurately. A 50/50 mixture of water to StaFlo Liquid Starch Concentrate is my go-t0 recipe.
Pressing instructions are highlighted in yellow to make them easy to spot.
As always, press the patches flat as they were sewn to set the seam, then to one side or the other as directed.
If you want to up your pressing game, then try my super-secret pressing technique for the flattest blocks.
Download and print paper piecing patterns and templates
You'll want the most current version of Adobe installed on your computer to download the pattern.
On the Adobe Print Menu page, under 'Page Size and Handling' set 'Custom Scale' to 100% before printing for accurate results.
Click here to see what it looks like on the Print Menu page.
Select your preferred block size from the chart and print the corresponding number of pages to create four CB and four DR units.
Print one template copy and the proper number of pattern copies for each unit.
It's that easy!
Print the Patterns and Templates
|
||||||
|---|---|---|---|---|---|---|
| Finished Block Size |
Diamond Rectangle | Corner Beam | ||||
| Copies to print |
DR Size | Templates | Copies to print |
CB Size | Templates | |
| 5" | 1 | 1"x2" | Print 1 | 1 | 2" | Print 1 |
| 7½" | 1 | 1½ x 3" | 1 | 3" | ||
| 10" | 1 | 2"x4" | 2 | 4" | Print 1 | |
| 15" | 2 | 3"x6" | 4 | 6" | Print 1 | |
After printing, use the 1" square graphic on the printed page(s) to double-check that your patterns printed at the correct size.

Not sure which paper to use?
Take a look at my review of several of the most popular brands available to us quilters on the market.
You want a super-easy paper to tear away—less stress on the stitches.
Step 1: Cut patches for a Lasting Blossom block
 Lasting Blossom design
Sample Block Size: 7½" finished / 8" unfinished
Grid: 5×5
Attribution: Ruth M. Swasey and Stitch 'n Sew Quilts
Design Type: Uneven 9-patch small center | Star | paper piecing
As you choose your fabrics, be mindful that those points in the four outside corners are super pointy. My fabric choices for the sample block come very close to camouflaging them, and obliterating the piecing work that went into them that pointy.
If YOUR fabric choices are close in value for the Medium and Dark fabrics, before committing to a whole quilt, make a sample block first. Give it a good look-see. Put it up on the wall and walk away for a while.—honestly if you can wait over night, that's even better!
Then come back to it to assess the contrast.
Trust your judgment. If you're not confident, it's not enough contrast.
Pick another fabric and try again. One block is a small sacrifice for a quilt you're happy with.
As always, please label your patches. We use their names and numbers throughout this tutorial.
To print a copy of the block design and cutting chart to use at your cutting table, click here.
 | Cutting Chart for a~ Paper PLUS Traditional Piecing ~ | ||||||
|---|---|---|---|---|---|---|---|
| Patch | Fabric | Qty | Finished Block Size | Sub Cut | |||
| 5'' | 7½'' | 10'' | 15'' | ||||
| Beam | Dark | 4 | 2¾'' x 2¾'' | 3¾'' x 3¾'' | 4¾'' x 4¾'' | 6¾'' x 6¾'' | yes |
| Corner, Corner.R | Medium | 4 | 2⅞'' x 3¼'' | 3⅜'' x 4¼'' | 3⅞'' x 5¼'' | 4⅞'' x 7¼'' | yes |
| Diamond | Light | 4 | 1½'' x 2½'' | 2'' x 3½'' | 2½'' x 4½'' | 3½'' x 6½'' | yes |
| 1, 3 | Dark | 4 | 2⅜'' x 2¼'' | 2⅝'' x 2¾'' | 2⅞'' x 3¼'' | 3⅜'' x 4¼'' | yes |
| 2, 4 | Medium | 4 | 2⅜'' x 2¼'' | 2⅝'' x 2¾'' | 2⅞'' x 3¼'' | 3⅜'' x 4¼'' | yes |
| 5 | Light | 1 | 1½'' x 1½'' | 2'' x 2'' | 2½'' x 2½'' | 3½'' x 3½'' | --- |
| Unfinished Block Size | 5½'' | 8'' | 10½'' | 15½'' | na | ||
| Grid Size | 1'' | 1½'' | 2'' | 3'' | na | ||

Subcutting Beam and Diamond patches
Use the templates provided to subcut both the Beam and Diamond patches.
Cut out the templates on the solid lines for both units. Be precise on the short flat edges of the Diamond and the two opposite corners of the Beams. The sides get a good trim when we cut the shapes.
 Prepped and ready to cut our patches for these units
It doesn't matter whether your precut fabric squares and rectangles are right or wrong sides up for the Diamond or the Beam unit. That's because the shape is symmetrical for our block.
For the CB, align the opposite corners with the cut edges of the four squares. Cut on the solid lines to remove the excess.
 It doesn't matter for the Beam unit of our CB if the fabric squares are right or wrong side up.
Unlike much of the cutting we do with templates on this site, this Diamond patch is cut exactly to size. That's because there's no need for its edges to extend past the outside dashed lines. Its SAs with the #1-#4 patches fill up that space on the unfinished edges of the stitched DR.
At your mat, match the short flat outside edges of the diamond with the edges of the cut rectangles and trim away the excess.
 Here I've trimmed a single Diamond shape. You can stack all four rectangles and trim them at the same time. Again, it makes no difference if these rectangles are layered right or wrong sides up.
Why don't we cut the patches from directly from your fabric with the templates?
You absolutely could cut these shapes directly from your fabric without cutting squares and rectangles first.
That's always an option.
And YOU are the boss.
However, there's two good reasons to take the extra step:
- By identifying the size needed, you can use that number to easily estimate how much fabric you'd need to make a quilt with 'X' number of Lasting Blossom blocks.
- You ensure that the outside edges of the finished units are on the straight of grain. Straight of grain is a more stable grain line. There's less distortion and stretching. Right-sized units make assembling right-sized blocks a breeze.
Subcutting Corner, Corner.R and 1-4
YOU MUST layer the two sets of patches (Corner and Corner.R and #1-#4) in pairs of like fabric RIGHT SIDES TOGETHER (RST).
At your cutting mat, the Width of the patches is on the top and bottom edges. The Height on the sides. Only with this layering do you get the required mirror-image patches.
NOTE: For the 5" finished block the Patches #1-#4 are wider on the Width than the Height. All the other patches are shorter on the Width.
Make a mark with a pencil 5/8" in from the top-left corner. Make another 5/8" in from the bottom-right corner.
 While it's hard to tell, the shorter Widths are positioned on the top and bottom before marking and subcutting these rectangles. In each stack, there are two pairs of identical squares layered RST. Dark fabric (left), medium (right).
Position the edge of your ruler on the patches at the top and bottom edges at these marks.
 Subcutting the larger rectangles for the Corner patches of the CB units
Helpful Hint
It doesn't matter what size block you're making or whether is the #1-#4 for the DR or the Corner and Corner.R patches, the marking is always 5/8" in from the corner.
After subcutting all the #1-#4 patches, you should be able to arrange your them as shown below:
 One pair of the teal rectangles (Medium) and one pair of the dark blue w/white dots (Dark) were layered RST, then subcut with a ruler to get enough patches for two of the needed DRs.
After subcutting, your Corner and Corner.R mirror image patches can be arranged like this.
 One pair of teal rectangles (medium) cut into Corner and Corner.R patches for two CBs
If you find that the patches are all the same (not mirror imaged) that means the original rectangles weren't layered in RST pairs of like fabric.
If that happened, you'll need to recut before you start piecing.
Step 2: Assemble the units for your Lasting Blossom
All the units in our Lasting Blossom quilt block are paper pieced for accuracy, which means...
...you don't need to buy any specialty rulers to make it. :)
Or for that matter, store them. Winner-winner-chicken dinner! :)
General Sewing Machine Setup for Paperpiecing
- Reduce your stitch length to 16–20 stitches per inch (1.3-1.6 mm). This perforates the paper and stabilizes the seam when you remove the pattern. [Learn more about stitch length here.]
- Reduce your machine's speed or just plain slow down. Sew only as fast as you can stay on the stitching lines.
- Install an open toe appliqué foot (sometimes called an 'embroidery' or 'satin stitch' foot) if you have one (it's easier to see where you're stitching with one installed).
- Use a larger needle (90/14) if you have problems removing the pattern.
- If your machine has a needle stop up, use it. The stitching goes faster when you don't have to lift the presser foot with every seam.
- As you stitch each seam, start and stop a generous 1/4” before and after the solid stitching lines. ALWAYS. Future lines of stitching secure the ends.
After adding each patch, press the unit as it was sewn to set the seam and then open. The SA is automatically pressed towards the last patch added.
Before adding the next patch, take a look to make sure the one you just added covers the space plus seam allowance that it is supposed to.
Steam is optional and usually curls the pattern.
If that bothers you, don't use steam. Sometimes I do. Sometimes I don't.
It truly depends on my mood.
Remember, as you follow this paper piecing tutorial, the printed and the fabric sides of this block are mirror-images of each other.
At last!
Let's sew!
Corner Beam Unit (CB)
Make 4
 This is from the fabric side of the CB
Use a tiny dab of Elmer's Washable Glue Stick to position the Beam patch on the unprinted side of the pattern between the dashed placement lines.
 The fabric patch shadows through to the front of our pattern, positioned between the dashed lines.
The wide end of the Beam shape sticks out past the edge of the pattern. Since we're going to trim to perfection at the end of piecing, it makes sense to have something to trim for a nice clean, straight cut.
With RST, align the long edge of either Corner patch with that of the Beam.
Helpful Hint
For a CB, the wide ends of both shapes are ALWAYS on the same side.
 Wide end to wide end
Start your stitching on the wide end past the outside edge of the block, and end past the edge of the block on the teeny point side.
Press.
Repeat for the second Corner patch. It's a reverse or mirror image of the first one.
 Again, wide end to wide end.
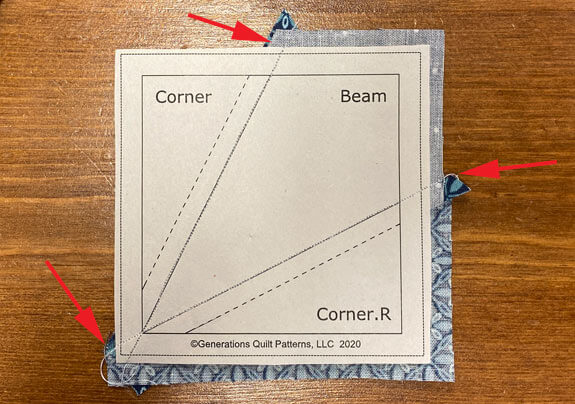
Below, you can see how our lines of stitching extend well-past the outside edges of the CB (red arrows).
Press.
At your cutting mat, position the 1/4” line on your ruler with the solid outline of the block (red arrow) and cut away the excess. I find it much easier to line up the ruler marks with those inside the block.
Maybe it's just my ol' far-sighted eyes.
 The 1/4" line on the ruler is directly over the solid outline of the block (red arrow)
Repeat for the remaining three sides. Below is an untrimmed CB on the left and trimmed to perfection in the center. The trimmings are on the right.
As long as it's stitched directly on the lines, that skinny point is always perfectly 1/4” in from the edges. Entirely worth the fabric waste to have the point land exactly where it needs to be.

Since all our edges are on the straight of grain and are stable, it's OK to remove the paper and set aside these units until Step 3.
Diamond Rectangle Unit (DR)
 Make 4
Make 4
Use a dab of your glue stick again to position the wrong side of the Diamond shape between the dashed placement guidelines on the unprinted side of the pattern.
I've been testing a new vellum for paper piecing. The numbering IS on the patterns you downloaded, so you'll be able to tell the printed from the unprinted side when constructing your block.
 Could have been a little neater cutting the diamond shape, but this'll do.
Helpful Hint
For a DR, ALWAYS align the narrow end of one patch to the wide end of the other—the opposite of the Corner Beam unit.
With RST, align the long cut edges of the Diamond and dark #1 patches, wide ends to narrow ones.
 Match cut long cut edges—narrow end to wide end
Stitch, starting and ending past the outside dashed line.
Press. Since I starched my fabrics before cutting, it's a cinch to fingerpress this patch out of the way, sew the second medium #2 corner and THEN go to the iron to press.
Add #2 in the same manner, diagonally opposite #1.
Press.
 Always add the corners on opposite diagonal sides to minimize jumping up to the ironing board.
Repeat for #3 and #4.
Press.
At your cutting mat, trim away the excess with your rotary cutter and ruler just like we did for the CBs—1/4" line on the ruler directly over one side of the solid rectangle on the pattern. Trim away the excess.
 Position the 1/4" marking on your ruler over the solid outline of the DR (red arrow)
After trimming all the DRs, you have units as shown below. If stitched directly on the line, each point is a perfect 1/4” from the edge.
Again. For a unit we don't make very often (unless a Storm at Sea is in our future), the excess fabric is a miniscule price to pay for this perfection.
 Beautiful! These will be easy to stitch into a block.
All the paper piecing is complete.
All the outside edges of these DR are on the straight of grain, so you can remove the paper pattern now.

The paper piecing is complete. From this point forward, return your stitch length to the one you regularly use for piecing and install your favorite 1/4" presser foot.
About the vellum paper piecing paper I was using for the DRs
I really like using vellum because you can see through it. However, if you're a steam-user like I am, be aware that the stuff curls like crazy when you give it a shot. I found that by rolling the vellum back on itself, I could control the curl enough for the simple 5-piece unit.
Click here to check out the kind I used, purchased from Amazon. (My experience is that it goes in and out of stock.)
Step 3: Assemble your Lasting Blossoms block
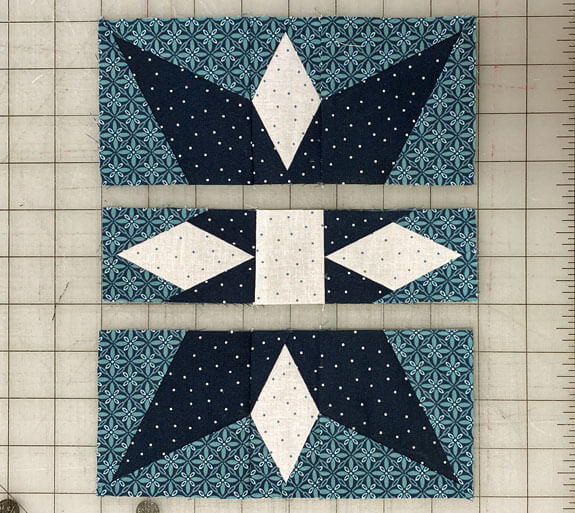
Arrange your patches as shown below to create the Lasting Blossom quilt block. Be sure to put the points of your CBs in the four corners, dark fabric towards the center of the block.

With RST, sew the units in each row together.
The seam line in the CB matches the side point of your DR. Use pins as needed to get a good match.
Refer to my article Pinning for Perfect Points for 'pointers' on how to get a good match.
If you've been diligent about stitching on the line, these points will practically match themselves.
Press SAs away from the DR to reduce bulk.
With RST, and pinning as needed, join the rows together.
Press these last two seams.
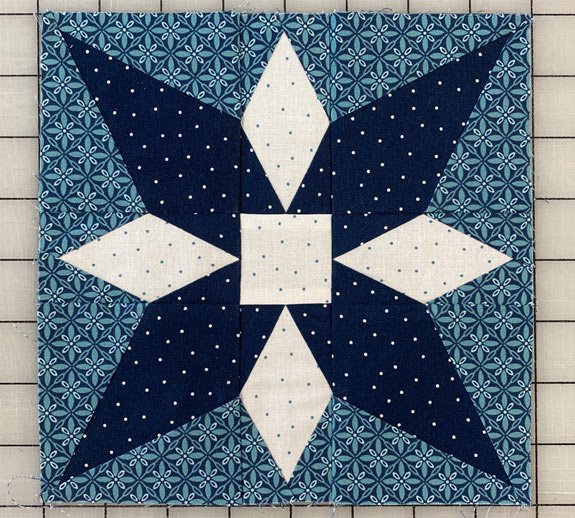
Now doesn't that look a lot more complicated than it was to piece?
Our finished Lasting Blossom from the back to take a peek at the pressing of the SAs.

Still loving my wool pressing mat...! It grabs that fabric and holds it as you press.
🔭 Looking for something truly stellar?
You've finished your star quilt block, and you're ready for more!
Browse our collection of 70 stellar star quilt block patterns. All have instructions and cutting charts in multiple sizes. If templates or paper piecing is used in the tutorial, there's a free download for you of those materials.

Eeny. Meenie. Miney. Moe.
Which star quilt block will you sew?
For a star-studded quilting experience, choose from 100+ bedazzling star quilt patterns—for beginners and beyond—click here.
For even MORE blocks to make… 🧩🎨
...visit our Free Quilt Block Pattern Library, with over 260+ blocks to choose from in multiple sizes.
Free downloads are included in all sizes for any blocks require paper piecing patterns or templates.
- Home
- Free Quilt Block Patterns
- Lasting Blossom Quilt Block


By Julie Baird
Copyright © 2008-2026 Generation Quilt Patterns, LLC
All Rights Reserved
Generations-quilt-patterns.com does not sell any personal information. (See Privacy Policy)