- Home
- Free Paper Piecing Patterns
- Harmony Square Quilt Block
The Ultimate Guide to the Harmony Square Quilt Block: Peace, Love, and Patchwork
Harmonize your stash, one square at a time 🎶🧺
This post contains affiliate links, for which I receive compensation.
Be at peace with your inner quilter while stitching up the Harmony Square quilt block.
Both paperpiecing and traditional piecing techniques are presented. Choose the method that works best for you.
🧭Navigate this tutorial faster than a long-arm on turbo! 🏎️💨
Use these handy-dandy anchor links to zip straight to the juicy bits you're after. No need to piece together the information—we've got you covered!
- Cutting Charts in four sizes and a place to download the chart and block design for both traditional and paper piecing
- Paperpiecing patterns to download for each block size
- Step-by-step illustrated instructions for both methods—choose your favorite!
- A Harmony Square coloring page to print
- No time to quilt? Pin this tutorial for later.
Cut. Sew. Press. Stitch your way to quilted nirvana!
📋 General Instructions
Several abbreviations are used on this page. They are:
- SA - seam allowance
- RST - right sides together
- HST - half square triangles
1/4" SA are used through this tutorial.
When instructed to press, first press the patches in the closed position just as they came off your sewing machine. This sets the seam, melding the thread into the fibers of the fabric.
In paperpiecing, SA are always pressed towards the last added patch.
Pressing instructions are highlighted in yellow throughout this tutorial.
📥 Download and print paperpiecing units
If you prefer traditional piecing methods, omit this printing and skip to Step 1. Use the green cutting chart. Follow the traditional piecing instructions in Step 2 for the corner units.
For all you paperpiecers, follow the instructions below to download and print the patterns used to complete this block.
You'll need the most current version of Adobe installed on your computer to download the pattern.
On the Adobe Print Menu page, under 'Page Size and Handling' set 'Custom Scale' to 100% before printing for accurate results. Click here to see what it looks like on the Print Menu page.
Choose your Finished Block Size from the chart below and print the corresponding number of pages for a total of four units.
Print the Harmony Square Units | |
|---|---|
| Click on the Finished Block Size | Print this many copies for each block |
| 5" | 1 |
| 7-1/2" | 1 |
| 10" | 2 |
| 12-1/2" | 4 |
After printing, use the 1" square graphic on the printed page(s) to check that the patterns printed correctly.

Not sure which paper to use?
Take a look at my review of several of the most popular brands available to us quilters on the market.
You want a super-easy paper to tear away—less stress on the stitches.
New quilt fabrics to tickle your fancy...
Click the images below to see the full collection. We share any commercial and/or free patterns that showcase them, too. (For inspiration, of course!)


✂️ Cutting your Harmony Square quilt block
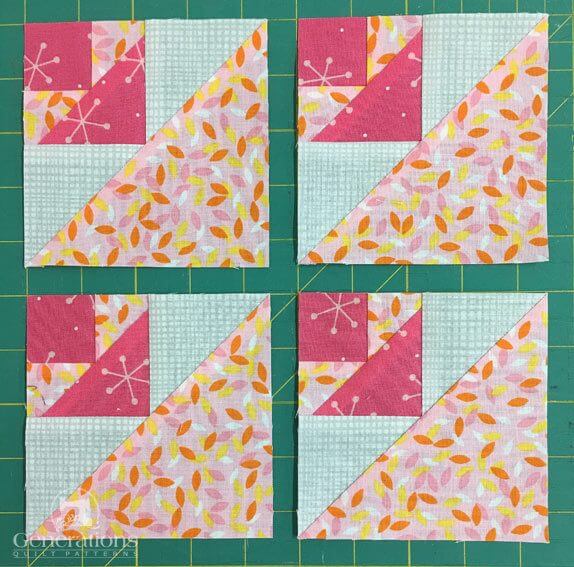
 Harmony Square design
Sample Block Size: 10" finished / 10½:" unfinished
Grid: 10×10
Attribution: Nancy Cabot
Brackman ID: 1854
Design Type: Unequal 9-patch small center | Paper Piecing
A light, a medium, and a dark fabric are needed to complete this patchwork design.
Please label all your patches. We refer to their numbers throughout this tutorial.
Includes paperpiecing
 | Cutting Chart for a~ Includes Paper Piecing ~ | ||||||
|---|---|---|---|---|---|---|---|
| Patch | Fabric | Qty | Finished Block Size | Sub Cut | |||
| 5'' | 7½'' | 10'' | 12½'' | ||||
| 1 | Dark | 4 | 1¼'' x 1¼'' | 1½'' x 1½'' | 1¾'' x 1¾'' | 2'' x 2'' | --- |
| 2,3 | Med | 4 | 1⅞'' x 1⅞'' | 2⅛'' x 2⅛'' | 2⅜'' x 2⅜'' | 2⅝'' x 2⅝'' | |
| 4 | Dark | 2 | 2⅜'' x 2⅜'' | 2⅞'' x 2⅞'' | 3⅜'' x 3⅜'' | 3⅞'' x 3⅞'' | |
| 5, 6 | Light | 4 | 2⅜'' x 2⅜'' | 2⅞'' x 2⅞'' | 3⅜'' x 3⅜'' | 3⅞'' x 3⅞'' | |
| 7 | Med | 2 | 3⅜'' x 3⅜'' | 4⅜'' x 4⅜'' | 5⅜'' x 5⅜'' | 6⅜'' x 6⅜'' | |
| 8 | Light | 1 | 1'' x 7'' | 1¼'' x 9'' | 1½'' x 11'' | 1¾'' x 13'' | --- |
| 9 | Dark | 1 | 1'' x 7'' | 1¼'' x 9'' | 1½'' x 11'' | 1¾'' x 13'' | --- |
| 10 | Light | 1 | 1½'' x 7'' | 2'' x 9'' | 2½'' x 11'' | 3'' 13'' | --- |
| 11 | Med | 1 | 1½'' x 1½'' | 2'' x 2'' | 2½'' x 2½'' | 3'' 3'' | --- |
| Unfinished Block Size | 5½'' | 8'' | 10½'' | 13'' | |||
| Grid Size | ½" | 0¾'' | 1'' | 1¼'' | |||
Traditional piecing
 | Cutting Chart for a~Traditional Piecing ~ | ||||||
|---|---|---|---|---|---|---|---|
| Patch | Fabric | Qty | Finished Block Size | Sub Cut | |||
| 5" | 7½" | 10" | 12½" | ||||
| 1 | Dark | 4 | 1" x 1" | 1¼" x 1¼" | 1½" x 1½" | 1¾" x 1¾" | --- |
| 2, 3 | Med | 4 | 1⅜" x 1⅜" | 1⅝" x 1⅝" | 1⅞" x 1⅞" | 2⅛" x 2⅛" | |
| 4 | Dark | 2 | 1⅞" x 1⅞" | 2⅜" x 2⅜" | 2⅞" x 2⅞" | 3⅜" x 3⅜" | |
| 5, 6 | Light | 4 | 1⅞" x 1⅞" | 2⅜" x 2⅜" | 2⅞" x 2⅞" | 3⅜" x 3⅜" | |
| 7 | Med | 2 | 2⅞" x 2⅞" | 3⅞" x 3⅞" | 4⅞" x 4⅞" | 5⅞" x 5⅞" | |
| 8 | Light | 1 | 1" x 7" | 1¼" x 9" | 1½" x 11" | 1¾" x 13" | --- |
| 9 | Dark | 1 | 1" x 7" | 1¼" x 9" | 1½" x 11" | 1¾" x 13" | --- |
| 10 | Light | 1 | 1½" x 7" | 2" x 9" | 2½" x 11" | 3" x 13" | --- |
| 11 | Med | 1 | 1½" x 1½" | 2" x 2" | 2½" x 2½" | 3" x 3" | --- |
| Unfinished Block Size | 5½" | 8" | 10½" | 13" | --- | ||
| Grid Size | ½" | ¾" | 1" | 1¼" | |||

🪡 Assemble the units for a Harmony Square
Corners
Make 4

In our sample Harmony Square, this unit is paper pieced.
However, I realize that not everyone cares for that technique, so you can choose traditional piecing instructions instead. For those instructions, click here.
Otherwise, for all you paper piecers continue here.
We need to make a few adjustments to our sewing machine settings to paper piece.
- Reduce your stitch length to 16–20 stitches per inch (1.3-1.6 mm). This perforates the paper and stabilizes the seam when you remove the pattern. [Learn more about stitch length here.]
- Reduce your machine's speed or just plain slow down. Sew only as fast as you can AND stay on the solid stitching line.
- Install an open toe appliqué foot (sometimes called an 'embroidery' or 'satin stitch' foot) if you have one (it makes it easier to see where you're stitching).
- Use a larger needle (90/14) IF you have problems removing the pattern. Personally, I use an 80/12 Microtex Sharp for paper piecing without any issues.
Trim away the excess paper from each unit just outside the dashed lines. There's no benefit to being neat, a rough trim will do here.
On to the piecing!
Using the tiniest dab of Elmer's Washable Glue Stick, stick the wrong side of a #1 to the unprinted side of the pattern. Use the dashed placement guides for fast and accurate positioning.
 That was quick and easy to position!
With RST align the short side of a #2 with the #1.

Stitch on the solid line between #1 and #2 starting and stopping a generous 1/4" from the beginning and ending of the line. Each line you stitch is stitched in this same manner to insure secure seams.
Press.
Repeat this same process for #3.
 That long straggly thread tail peaking out from the printed side will get trimmed away.
Time to trim the SA of #2 and #3. At the cutting mat, lay the unit printing up.
You'll need to pull the fabric away from the pattern a little...it will tear a bit (pink arrow). That's normal.

Align the edge of your ruler with the solid line between #2/#3 and #4. Use your thumbnail to crease the paper on the solid line.
Remove the ruler and fold the pattern back on itself on this line.
Position the ruler with its 1/4" marks (pink arrow below) on the fold of the pattern and trim away the excess fabric.

Some quilters find this job easier with an Add-A-Quarter PLUS Ruler.
Use this same technique every time you need to trim a seam while piecing this corner unit.
With RST, align the long bias edge of #4 with the trimmed #2/#3 edges.
 For quick placement, the point of the #4 patch should be opposite the point on the pattern (white arrows). You can just barely make out the printing on the other side of the pattern.
Stitch the seam. Since it runs from edge-to-edge, you can chain piece this step.
Press.
 Our Harmony Square quilt block is coming along nicely!
Trim the seam allowance as you did before for #2/#3 for both unstitched sides of #4.
After trimming, with RST position the short side of a #5 with the edge of #4.
 The fold lines in the paper are from the creasing I did to trim the #4 patch to size
Stitch and press.
Repeat for #6.
 Adding #6
Press.
Trim the #5/#6 SA as you did before.
 The 1/4" line on your ruler is right on top of the folded edge of the pattern(pink arrow).
With RST align the long bias edge of #7 with the freshly trimmed edges of #5/#6.
 Position the point opposite the corner of the pattern.
Stitch and press.
All that's left is do is trim the unit to size.
At your cutting mat, paper side up, place the 1/4" mark on your ruler directly on the solid outside line of the pieced corner unit.
Trim the excess away with your rotary cutter.
 Match the 1/4" mark on your ruler with the solid outline of the corner(pink arrow)
Repeat for all four sides of all four units.
This is what they look like after all is said and done.
 Don't forget to remove the paper from your Harmony Square corner units.
The paper piecing is complete. From this point forward, return your stitch length to the one you regularly use for piecing and install your favorite 1/4" presser foot.
Click here to go directly to the Side units for this Harmony Square quilt block...
Or...
...click here to see how the Corners are pieced using traditional methods.
📌 Stick a pin in it! 🧷
Save this tutorial for later and always have harmony at your fingertips. It's like a yoga class for your quilting soul!

If you've enjoyed making this unit...

There's another block that uses it. Only the fabric placements have changed.
Take a look at the Blacks and Whites quilt block tutorial here.
For even MORE blocks to make… 🧩🎨
...visit our Free Quilt Block Pattern Library, with over 260+ blocks to choose from in multiple sizes.
Free downloads are included in all sizes for any blocks require paper piecing patterns or templates.
- Home
- Free Paper Piecing Patterns
- Harmony Square Quilt Block


My
Favorite Paper
Piecing Tools
For a complete list of all the tools I personally use, click here to read 'The Right Tools Make Your Job Easier', part of my series called, "Essential Paper Piecing Skills".


The serrated edge on this short-bladed scissor make it easy to trim seam allowances—my all-time favorite scissor.

By Julie Baird
Copyright © 2008-2026 Generation Quilt Patterns, LLC
All Rights Reserved
Generations-quilt-patterns.com does not sell any personal information. (See Privacy Policy)