- Home
- Free Paper Piecing Patterns
- Goose Tracks Quilt Block
Make Tracks with the Goose Tracks Quilt Block
Take a gander at these gorgeous Goose Tracks!" 👀✨
This post contains affiliate links, for which I receive compensation.
Skill Level: Confident beginner
The Goose Tracks quilt block looks more complicated than it actually is—and paper piecing the units makes it even easier!
The block is based on a 5x5 grid, though it can also be classified as an uneven nine-patch because the corner units are twice as wide as the center ones.
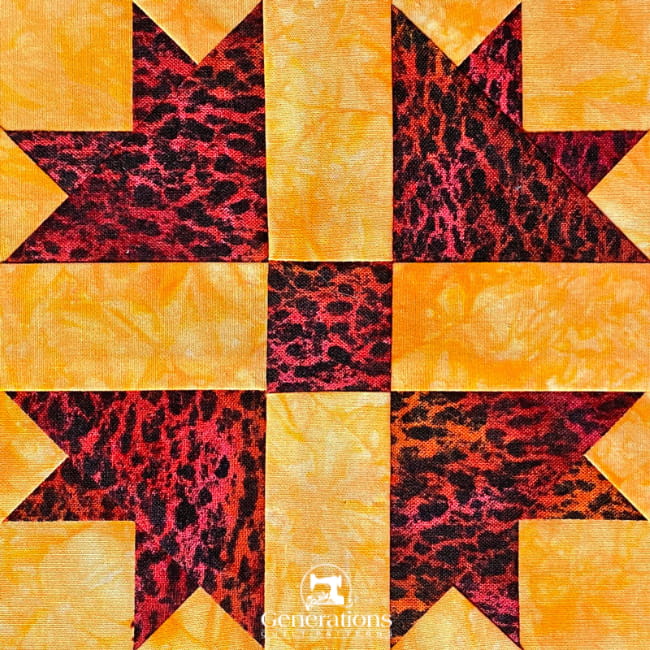
Foundation piecing patterns in five different sizes are provided for you to download just a bit further down on the page.
Time to stop yakking and start quilting!
🧭Ready to make tracks through this tutorial?
Use these handy links to navigate faster than a goose in V-formation. Let's waddle on!
Cut. Sew. Press.
📋 General Instructions
All seam allowances (SA) are 1/4" unless otherwise indicated.
When you are instructed to 'Press' your Goose Tracks quilt block, first press the unit in the closed position. Then press the patch open. Finger-pressing the seam open before using the iron seems to reduce the formation of tucks in the seam allowance.
I use a dry iron for this type of piecing. In my experience, steam tends to 'curl' the paper pattern...yuck!
To create wonderfully flat quilt blocks—no matter how you piece them—check out our Best Technique for Pressing Quilt Blocks. The results are remarkable for such a simple trick—and you don't need to buy a clapper to do it.
📥Download paper piecing patterns
You'll need the most current version of Adobe installed on your computer to download the pattern.
On the Adobe Print Menu page, under 'Page Size and Handling' set 'Custom Scale' to 100% before printing for accurate results. Click here to see what it looks like on the Print Menu page.
After printing, use the 1" square graphic on the printed pages to confirm they are printed accurately.
Download and Print Paper Piecing Pattern | ||
|---|---|---|
| Finished Block Size | # of copies to print | PDF Link to Download |
| 5" | 1 | 2" |
| 7½" | 1 | 3" |
| 10" | 2 | 4" |
| 12½" | 4 | 5" |
| 15" | 4 | 6" |

Not sure which paper to use?
Take a look at my review of several of the most popular brands available to us quilters on the market.
You want a super-easy paper to tear away—less stress on the stitches.
The newest quilt fabrics to tickle your fancy...
Click the images below to see the full collection. We share any commercial and/or free patterns that showcase them, too. (For inspiration, of course!)
✂️Cut patches for the Goose Tracks
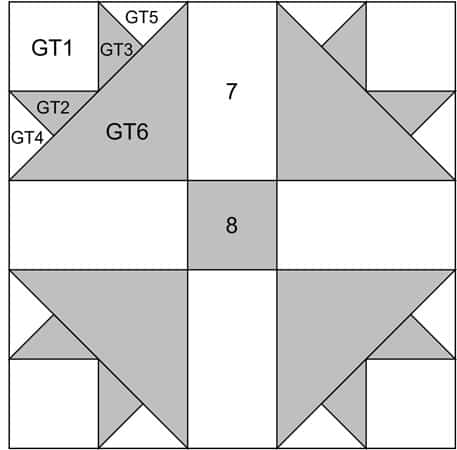
Sample Size: 5" finished / 5½" unfinished
Grid: 5x5
Attribution: Rural New Yorker
AKA: Signal (Woman's World)
Design Type: Uneven 9-patch, small center
We cut oversized patches instead of using 'hunks' to reduce the amount of ripping when the patch doesn't quite fill the space.
The little bit of extra fabric is a cheap price to pay to save more time for other things.
Make a block, then if you'd prefer different sizes for the paper piecing patches, note your changes right on your printed cutting chart.
 | Cutting Chart for a~ Includes Paper Piecing ~ | |||||||
|---|---|---|---|---|---|---|---|---|
| Patch | Fabric | Qty | Finished Block Size | Sub Cut | ||||
| 5'' | 7½'' | 10'' | 12½'' | 15'' | ||||
| GT1 | Light | 4 | 1¾'' x 1¾'' | 2¼'' x 2¼'' | 2¾'' x 2¾'' | 3¼'' x 3¼'' | 3¾'' x 3¾'' | --- |
| GT2, GT3 | Dark | 2 | 2⅝'' x 2⅝'' | 3⅛'' x 3⅛'' | 3⅝'' x 3⅝'' | 4⅛'' x 4⅛'' | 4⅝'' x 4⅝'' | |
| GT4, GT5 | Light | 2 | 2⅝'' x 2⅝'' | 3⅛'' x 3⅛'' | 3⅝'' x 3⅝'' | 4⅛'' x 4⅛'' | 4⅝'' x 4⅝'' | |
| GT6 | Dark | 2 | 3⅜'' x 3⅜'' | 4⅜'' x 4⅜'' | 5⅜'' x 5⅜'' | 6⅜'' x 6⅜'' | 7⅜'' x 7⅜'' | |
| 7 | Bac | 0 | 1½'' x 2½'' | 2'' x 3½'' | 2½'' x 4½'' | 3'' x 5½'' | 3½'' x 6½'' | --- |
| 8 | Dark | 0 | 1½'' x 1½'' | 2'' x 2'' | 2½'' x 2½'' | 3'' x 3'' | 3½'' x 3½'' | --- |
| Unfinished Block Size | 5½'' | 8'' | 10½'' | 13'' | 15½'' | |||
| Grid Size | 1'' | 1½'' | 2'' | 2½'' | 3'' | |||

🪡Paperpiecing the Goose Tracks unit
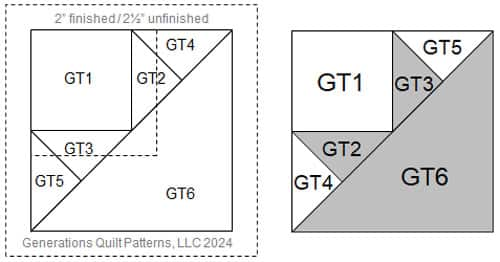 Our Goose Tracks unit from the pattern side (left) to the fabric side (right).
Helpful Tip
Notice the GT2, GT4 patches switch places when this unit is flipped from the pattern side to the fabric side.
While it doesn't make any difference for our Goose Tracks tutorial, but might make a difference in another pattern you use or design.
Set your stitch length to 15-20 stitches per inch, install an open toe applique foot to make it easier to see the line and switch to a larger needle (90/14) to help perforate the paper to make removal easier later on.
Don't worry. The pattern will look like the reverse of the unit pictured right because the stitching is done from the back of the block. It's a little disconcerting at first, but you do get used to it. Promise!
With the back side of the fabric next to the unprinted side of the pattern, match the edges of a light 1-3/4" square with the dashed lines as shown below.
Special Note: I've updated the paper piecing patterns since writing this tutorial. I've added 'GT' before every patch number. You won't see it on the pics of the sample block. The numbers are all in the same position.
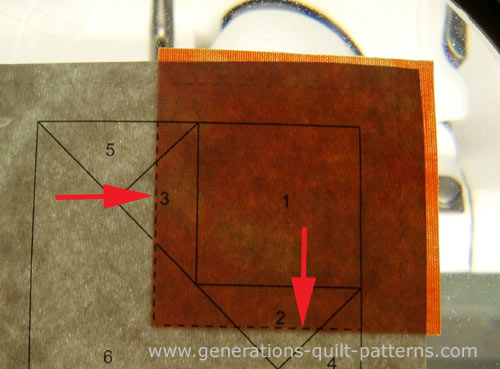
The outside edge of this patch does extend past the dashed outline of the edge of the block. It will be trimmed off when this unit is complete.
With RST, match the LONG edge of a #2 small dark triangle with Piece #1. Stitch starting before and ending after the solid line. These stitches will be secured by the next line of stitching that cross it. There is no need for back stitching or a fix stitch.

Press.
Repeat for #3, another small dark triangle.
Press.
Add the small light triangles, #4 and #5, but this time match the SHORT edge of the triangle to the previous patch.
Press.
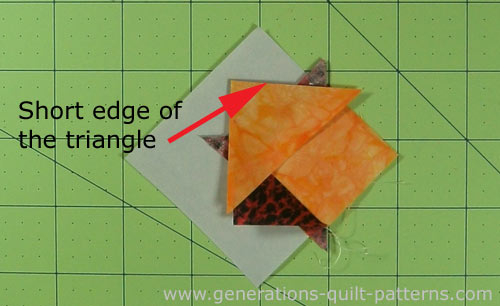
Press.
To establish the next seam-line and neaten up the block, place the unit paper side up on your cutting mat. Match the edge of your ruler with the solid line between #6 and the rest of the block.
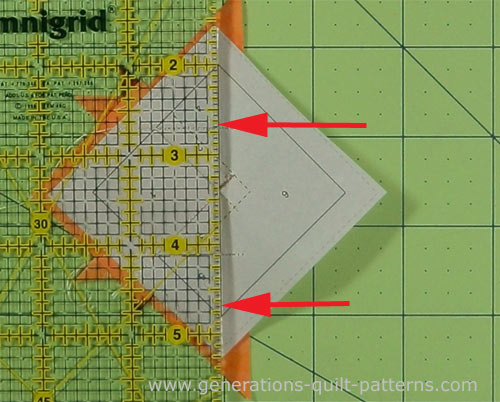
Use your fingernail to crease the paper. Remove the ruler and fold back the paper back on itself on this line.
Replace the ruler, this time with the 1/4" marking directly over the fold and trim. Fabric extends beyond the fold-line by 1/4"—this is your perfect seam allowance.
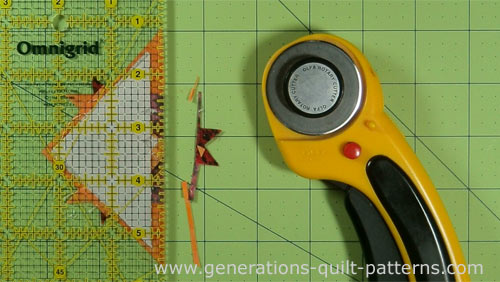
With RST, align the cut edge with the diagonal edge of a #6 large dark triangle.
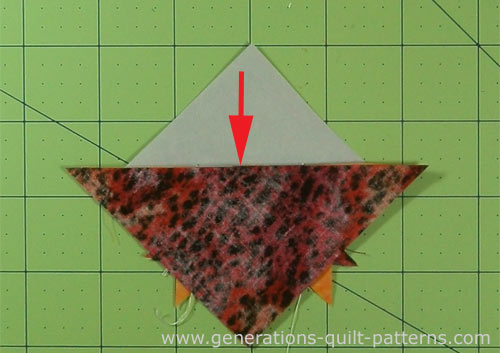
Stitch on the line making sure to start and stop stitching outside the dashed line that surrounds the block.
Press.
Repeat for the three remaining units.
Once these units are paperpieced, the Goose Tracks quilt block is put together like a traditional nine patch.
Trim the units
Align the 1/4" line of your ruler with the solid line that surrounds the block and trim with your rotary cutter. I find it much easier to do this than to try to line up the edge of the ruler with the dashed lines.
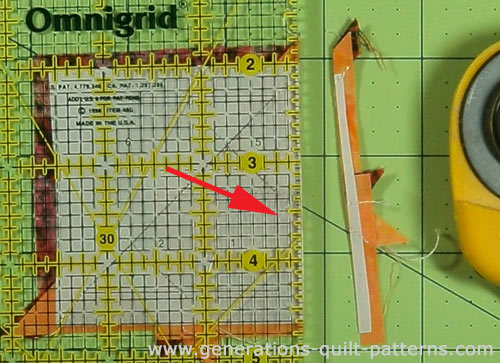 The 1/4" line of the ruler is directly over the solid outline of the block
Repeat for the remaining sides and units.
🧩Assemble the Goose Tracks quilt block
Lay out both the cut square and rectangles and pieced units in rows to create the Goose Tracks design.
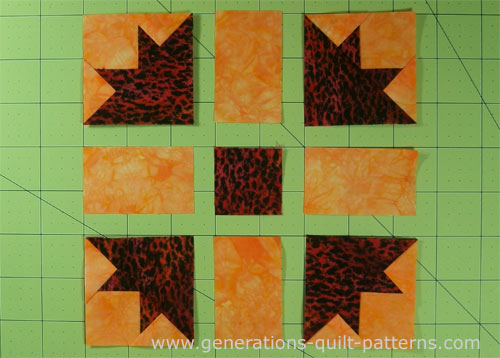
At this point you'll need to switch to your favorite quarter inch foot. Stitch the patches into rows, pressing towards the rectangles in each row.
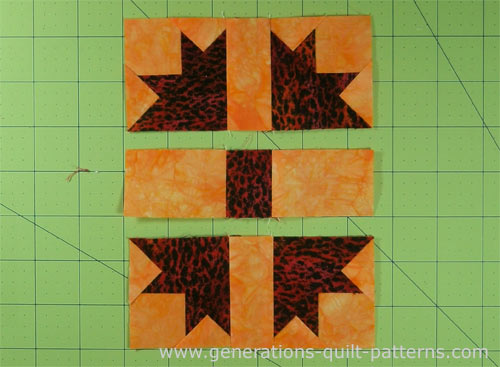
Stitch the rows together, pinning if needed.
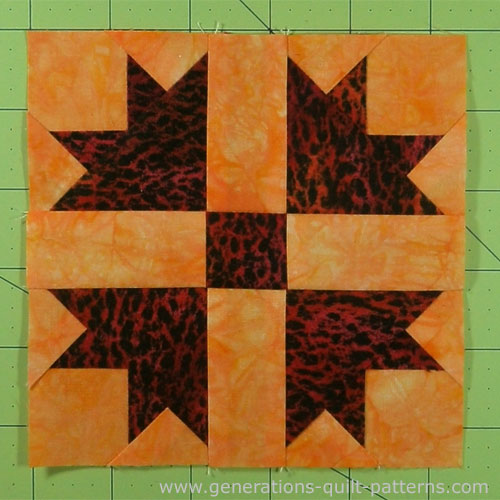
This is your finished Goose Tracks quilt block, all ready to be pieced into a quilt.
Change things up...
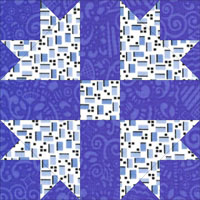
Cross and Crown
Based on the same drawing as the Goose Tracks quilt block, but here the lights and darks are swapped.
It is also called 'Bouquet's Quilt' and 'Tulip Wreath'.
📌Don't wing it later
Pin this Goose Tracks tutorial and stay on track! 🎯🦆
For even MORE blocks to make… 🧩🎨

...visit our Free Quilt Block Pattern Library, with over 260+ blocks to choose from in multiple sizes.
Free downloads are included in all sizes for any blocks require paper piecing patterns or templates.
- Home
- Free Paper Piecing Patterns
- Goose Tracks Quilt Block
