- Home
- Free Paper Piecing Patterns
- Flying Kite Quilt Block
Flying Kite Quilt Block Tutorial
A Pinwheel-type Design
This post contains affiliate links, for which I receive compensation.
Skill Level: Confident Beginner
Making a Flying Kite quilt block is Easy Peasey when you paper piece it!
No templates to fiddle around with and perfect little blocks...every time! And the seam allowances are ALWAYS pressed in the right direction.

On this page, you'll find:
- Download a coloring/fabric planning page
- Download and print the Cutting Chart for your Flying Kite block
- Complete illustrated instructions
- Two ideas for quilts - one would make a terrific baby quilt
- Links to tutorials for other pinwheel-type blocks like the Flying Kite
Let's begin!
General Instructions
Set up your sewing machine for paper piecing: reduce the stitch length to 1.5 or 15-18 stitches/inch, install an open toe appliqué foot and, if you find it difficult to remove the paper after all the stitching is complete, install a 90/14 needle.
If you haven't tried it, take a look at our Best Pressing Technique for the flattest paper pieced blocks you've even seen.
Step 1: Download and print the pattern
You'll need to have Adobe installed on your computer. If you don't have it, click here to go to Adobe's website to download and install the most current version of the free program.
Print the size of your choice by clicking on it from the list below:
- 8" - you'll need two copies to make a block
Remember, before printing either pattern sheet, set 'Custom Scale' to '100%' under the 'Page Sizing and Handling' heading to print the correct block size. There's a 1" square on the download page to help you quickly assess if it's right.
NOTE: The pattern will look like it's backwards, and that's exactly right. It's because the unit is asymmetrical, and the printed side is actually the backside of the block.

Not sure which paper to use?
Take a look at my review of several of the most popular brands available to us quilters on the market.
You want a super-easy paper to tear away—less stress on the stitches.
New quilt fabrics to tickle your fancy...
Click the images below to see the full collection. We share any commercial and/or free patterns that showcase them, too. (For inspiration, of course!)


Step 2: Cut the patches for your Flying Kite
 Flying Kite design from the fabric side
Sample Size: 6" finished / 6½" unfinished
Grid: 8x8
Attribution: KC Star
AKA: Pinwheel (Grandmother Clark)
Design Type: 4-patch, Pinwheel
While many quilters use 'hunks' of fabric to paperpiece with, I prefer to pre-cut my patches for traditional blocks.
There's less fabric waste, but more importantly, pre-cutting ensures most of the outside edges are on the straight of grain. This makes for a more stable block.
After stitching a few, make any adjustments you need to the cut dimensions suggested below.
Do you have a cute Charm Pack just languishing in your stash? The 6-inch block uses 5" squares for the pinwheels. Or take a look at these if the spirit moves you.
Click here to download and print the block design and cutting chart to use at your cutting table.
 | Cutting Chart for a~ Paper Piecing ~ | |||||
|---|---|---|---|---|---|---|
| Patch | Fabric | Qty | Finished Block Size | Sub Cut | ||
| 4'' | 6'' | 8'' | ||||
| 1 | Dark | 1 | 4" x 4" | 5" x 5" | 6" x 6" | |
| 2 | Bac | 4 | 1¼" x 3¼" | 1½" x 4¼" | 1¾" x 5¼" | --- |
| 3 | Light | 1 | 4" x 4" | 5" x 5" | 6" x 6" | |
| 4 | Bac | 1 | 4" x 4" | 5" x 5" | 6" x 6" | |
| Unfinished Block Size | 4½'' | 6½'' | 8½'' | na | ||
| Grid Size | 1'' | 0¾'' | 1'' | na | ||
Remember to cut #1, #3, and #4 squares twice on the diagonal, just like you would for quarter square triangles.

Step 3: Assemble the Flying Kite units
Cut the units apart between the dashed lines. This is a rough cut—everything will get prettied up at the end—even all those scraggly thread tails!
Dab a dot of Elmer's glue stick (the one that goes on purple and dries clear) on the unprinted side of the pattern behind #1. Adhere the wrong side of your fabric Patch #1 to the paper, using the dashed lines for foolproof placement.
You can see how the fabric extends past the dashed outline. We'll trim the excess off at the end for a perfect block.

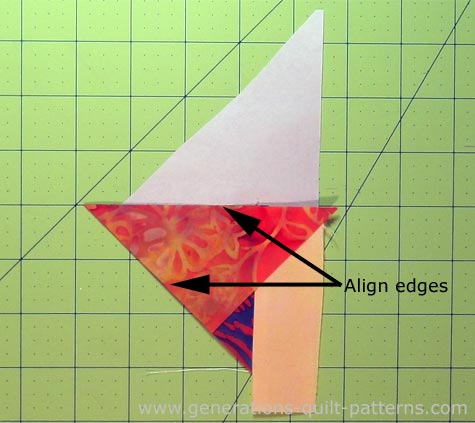
With right sides together (RST) match the long edge of #2 with #1. (see arrows)

Stitch on the solid line between #1 and #2, starting and stopping past the dotted lines.

Press.
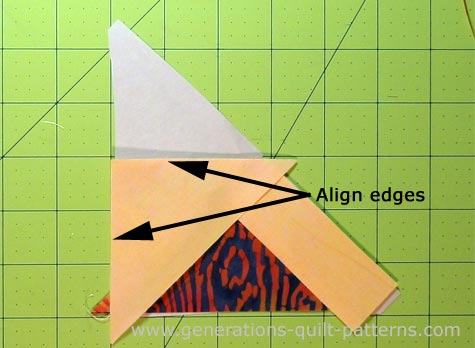
Position #3, RST, with the sewn patches—the long edge with#2 and the short edge with #1.
Stitch the seam between #3 and #1.
Press.
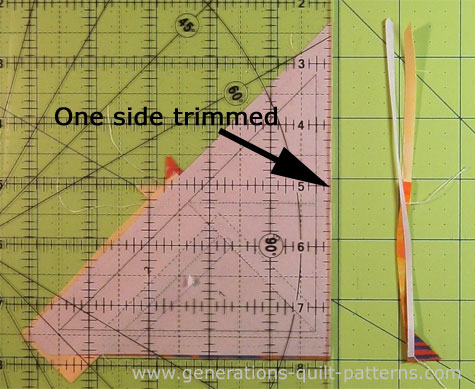
At this point, we need to trim #3 to establish the placement line for the final patch.
Match the edge of your ruler to the black seamline between #3 and #4. To crease the paper along the ruler's edge, you'll need to pull the it away from the stitching (see the red circle below).
If you accidentally rip the paper too far, you can use a piece of Scotch Brand Magic Tape to repair it. Just be careful not to iron directly on the tape—it will melt! This shouldn't be a problem though, as all the pressing is done from the fabric side of the unit.

Line up the 1/4" mark with the folded edge (red arrow) and trim with your rotary cutter.

Align the short bias sides of #4, RST, with the sewn unit.
Stitch the seam between #3 and #4, starting and stopping outside the dashed lines.
Press.
Trim with your rotary cutter and repeat for all sides of all four units.
Helpful Hint
I do trim all three sides at this point.
However, if your block regularly comes up a smidge too small, wait to trim the outside edge of the block until all the units are sewn together.
Step 4: Assemble the Flying Kite quilt block

The paper piecing is complete. From this point forward, return your stitch length to the one you regularly use for piecing and install your favorite 1/4" presser foot.
Lay out the units as shown below. Unlike many of the blocks in the library, the units of our Flying Kite are triangular instead of square.

One of the benefits of paperpiecing is that the seam allowances will automatically nest if you follow the order of piecing provided.
Select two adjacent units and with RST pin them, nesting the SA at the center. I like to feed the center or squared end into my sewing machine first. This prevents the machine from chewing up the pointy end.

You can see in the photo above that I've switched back to my regular 1/4" foot. I am stitching just at the right edge of the black line, at a scant 1/4"
I've found that it's not necessary (most of the time) to push the pin through both layers of paper—through the top layer and then both fabric layers is usually enough.
Repeat for the second pair.
Press with the seam allowance following in the same direction or towards #1. (You can see the SA peeking out below in the upper left and lower right corners below.)

With RST, pin the two halves together, again taking care to match the center. Stitch starting and stopping past the dashed outline.

Press. Twirl the SA if you'd like to reduce bulk in the center of the block.
Trim the dog ears with a scissor (the only one left to trim is circled in red) and your finished Flying Kite quilt block looks like this...
 Flying Kite quilt block
Quilt Ideas using the Flying Kite block
Put all the blocks together in a straight set with simple sashing and cornerstones and this is what it looks like.

Now swap in all sorts of bright kid prints, and you'll have a terrific baby quilt!

🌀More playful pinwheel quilt blocks to stitch!

You've finished your pinwheel quilt block, and you're ready for more!
Our pinwheel quilt blocks are a delightful blend of playful interlocking patterns and vivid, eye-catching color. The interlocking patterns dazzle your eyes and inspire your creativity, while our step-by-step instruction ensures that you can create these stunning blocks with ease.
Click here to dive in and turn your fabric into MAGIC!
For even MORE blocks to make… 🧩🎨
...visit our Free Quilt Block Pattern Library, with over 260+ blocks to choose from in multiple sizes.
Free downloads are included in all sizes for any blocks require paper piecing patterns or templates.
- Home
- Free Paper Piecing Patterns
- Flying Kite Quilt Block


My
Favorite Paper
Piecing Tools
For a complete list of all the tools I personally use, click here to read 'The Right Tools Make Your Job Easier', part of my series called, "Essential Paper Piecing Skills".


The serrated edge on this short-bladed scissor make it easy to trim seam allowances—my all-time favorite scissor.

By Julie Baird
Copyright © 2008-2026 Generation Quilt Patterns, LLC
All Rights Reserved
Generations-quilt-patterns.com does not sell any personal information. (See Privacy Policy)