- Home
- Free Quilt Block Patterns
- Dewey Dream Quilt Block
Dewey Dream Quilt Block Tutorial:
5", 7½", 10", and 15" finished blocks
From our Free Quilt Block Patterns Library
This post contains affiliate links, for which I receive compensation.
Don't let your quilting dreams become nightmares, follow our step-by-step fully illustrated instructions in the Dewey Dream Quilt Block tutorial and make them come true!
In this tutorial, you'll find:
- A coloring/planning page to download and print
- No time to quilt? Pin this to make and enjoy later.
It's time to cut up and sew!

General Instructions
Several abbreviations are used on this page. They are:
- SA - seam allowance
- RST - right sides together
- HST - half square triangles
1/4" SA are used through this tutorial.
Pressing instructions are highlighted in yellow throughout this tutorial to make them easy to spot.
When instructed to press, first press the patches in the closed position just as they came off your sewing machine. This sets the seam, melding the fibers of the threads into the fibers of the fabric.
Then press the SA to the dark unless otherwise noted.
New quilt fabrics to tickle your fancy...
Click the images below to see the full collection. We share any commercial and/or free patterns that showcase them, too. (For inspiration, of course!)


Step 1: Cutting for a Dewey Dream quilt block
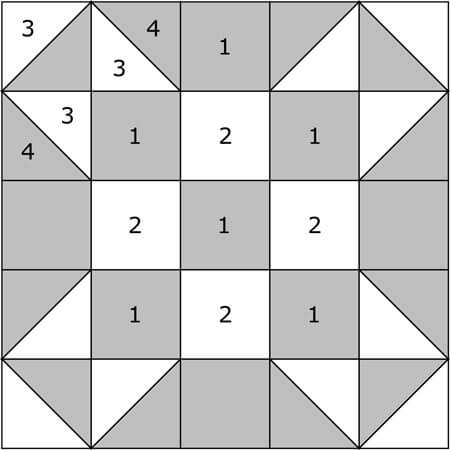
Sample Block Size: 10" finished / 10½" unfinished
Grid: 5x5
Design Type: 5-patch, Uneven 9-patch-large center, Star
Please label all your patches. We refer to their numbers throughout this tutorial.
The sample uses a print from Art Gallery Fabrics, and my go-t0 for a neutral background, Moda's Grunge.
To print a copy of the block design and cutting chart to use at your cutting table, click here.
 | Cutting Chart for a~ Traditional Piecing ~ | ||||||
|---|---|---|---|---|---|---|---|
| Patch | Fabric | Qty | Finished Block Size | ||||
| 5'' | 7½'' | 10'' | 15 '' | ||||
| 1 | Dark | 9 | 1½'' x 1½'' | 2" x 2" | 2½'' x 2½'' | 3½'' x 3½'' | |
| 2 | Light | 4 | 1½'' x 1½'' | 2" x 2" | 2½'' x 2½'' | 3½'' x 3½'' | |
| 3 | Dark | 6 | 2¼'' x 2¼'' | 2¾'' x 2¾'' | 3¼'' x 3¼'' | 4¼'' x 4¼'' | |
| 4 | Light | 6 | 2¼'' x 2¼'' | 2¾'' x 2¾'' | 3¼'' x 3¼'' | 4¼'' x 4¼'' | |
| Unfinished Block Size | 5½'' | 8'' | 10½'' | 15½'' | |||
| Grid Size | 1" | 1½'' | 2" | 3" | |||
Step 2: Assemble the units for a Dewey Dream block
NOTE: I've chosen to piece this as an uneven 9-patch with a large center (as shown below). It could also be pieced as an uneven 9-patch with a small center, or in five rows of five patches each.
As always, YOU get to decide which method works best for you. The cutting requirements are the same for all assembly methods.
9-Patch Unit
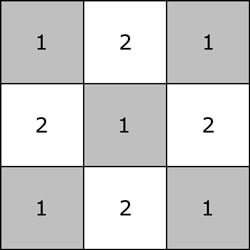
Make 1
With RST, sew a #1 to a #2, pressing towards the darker #1.
I have better results with pressing as I go—a nice flat seam with no tucks.
Waiting to press the two SAs in each group makes it harder to get the iron into the SAs.
Stitch 3 pairs.

Add a #1 to two of the pairs, and a #2 to the third pair. Again, pressing towards the darker #1.

Here are the 3 units...

Sew the units together with the #1s in the outside corners and center.
The finished center 9-patch after pressing the SAs out from the center, this is so the SAs will nest together when we assemble your Dewey Dreams block.
 Beautiful!
Half Square Triangles
Make 12
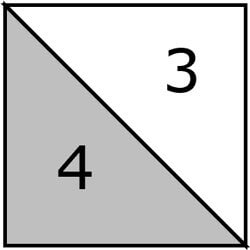
On the back side of the lighter #3 mark a diagonal line from corner to corner as shown below.
With your favorite 1/4" presser foot installed, stitch 1/4" away from BOTH sides of the drawn line.
NOTE: Alternatively, you could use your Magic Wand or Quick Quarter ruler to draw lines 1/4" away from the center diagonal, and stitch on those lines for the same result.
 Stitch a 1/4" away from both sides of the line. While not my preference for this type of sewing, the 1/4" foot with the guide worked out just fine.
Press the sewn pair flat to set the seams. With scissors or rotary cutter, cut in half diagonally between the stitching lines.
Find your Finished Block Size in the chart below and trim your HST to the perfect size.
HST Dimensions | |
|---|---|
| Finished Block Size | Trim HST to… |
| 5" | 1½" x 1½" |
| 7½'' | 2" x 2" |
| 10" | 2½" x 2½" |
| 15" | 3½" x 3½" |
For the 10" sample block, the HST are trimmed to 2½" square.
Below shows how the #1 and #2 squares became HSTs.
 From left to right, seams sewn, cut in half between the stitching, pressed, and finally trimmed to perfection
Side Units
Make 4
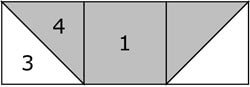
With RST, add a #3/#4 HST to both sides of a #1 square.
Press these SA toward #1 to reduce bulk.
 A completed side unit
Step 3: Assemble the Dewey Dream quilt block
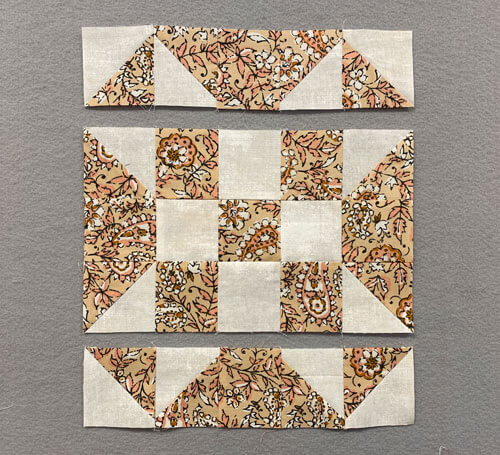
Arrange your HSTs, sides and center 9-patch as shown below. The corners are light, and the outside edges of the side units are dark.
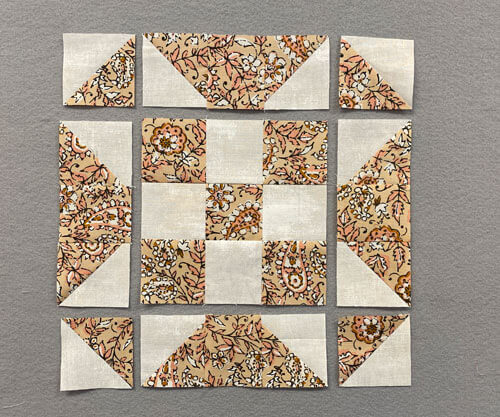
With RST, stitch the units in each row together. If you followed the pressing instructions, the seams in the middle row will nest to help you match the points.
The SAs in the top and bottom rows are pressed out from the center. The middle row SAs are towards the center.
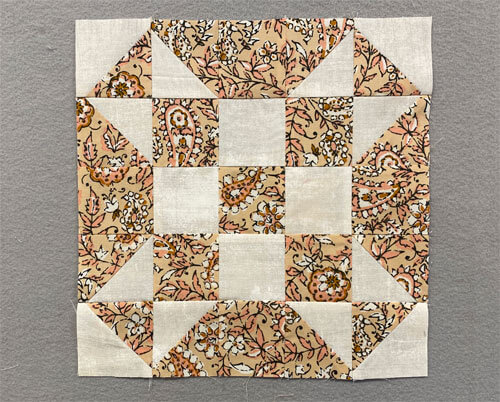
After one final turn at the ironing board, your finished Dewey Dream quilt block looks like this. A nice little star-like quilt block.
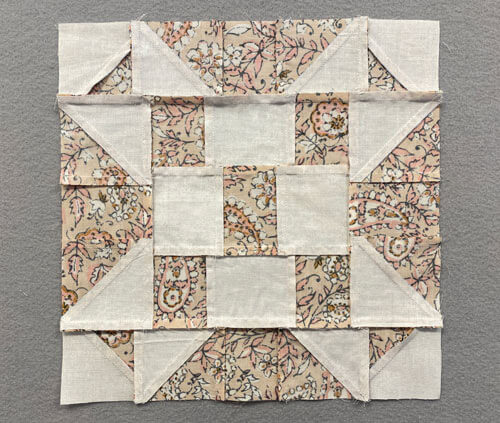
And as always, a quick peek at the backside to see how all those seam allowances were pressed.
🔭 Looking for something truly stellar?
You've finished your star quilt block, and you're ready for more!
Browse our collection of 70 stellar star quilt block patterns. All have instructions and cutting charts in multiple sizes. If templates or paper piecing is used in the tutorial, there's a free download for you of those materials.

Eeny. Meenie. Miney. Moe.
Which star quilt block will you sew?
For a star-studded quilting experience, choose from 100+ bedazzling star quilt patterns—for beginners and beyond—click here.
For even MORE blocks to make… 🧩🎨

...visit our Free Quilt Block Pattern Library, with over 260+ blocks to choose from in multiple sizes.
Free downloads are included in all sizes for any blocks require paper piecing patterns or templates.
- Home
- Free Quilt Block Patterns
- Dewey Dream Quilt Block


Yummy fabrics
to drool over
Click any image below to see the full collection and find pricing and ordering information.


By Julie Baird
Copyright © 2008-2026 Generation Quilt Patterns, LLC
All Rights Reserved
Generations-quilt-patterns.com does not sell any personal information. (See Privacy Policy)