- Home
- Free Quilt Block Patterns
- Santa Fe Quilt Block
Santa Fe Quilt Block Instructions
From our Free Quilt Block Patterns Library
This post contains affiliate links, for which I receive compensation.
Skill Level: Beginner
A Santa Fe quilt block is a non-traditional design made with very traditional piecing techniques.
A few connector corners are thrown in for good measure and simplicity. That's all there is to it.
I DO know the way to Santa Fe and I'm going there now and won't let you lose your way.
Come with me and learn to make this interesting nine patch patchwork design!

📋 General Instructions

These abbreviations are used in this tutorial:
- SA - seam allowance
- RST - right sides together
- BAC - background fabric
SA are 1/4" and pressed toward the darker fabric unless noted otherwise.
Starching your quilt fabric before cutting, I believe, makes for more precise cuts and easier, more accurate stitching.
You'll see me switch between my favorite quarter inch foot with a guide and an open toe applique foot to make the stitching easier.
New quilt fabrics to tickle your fancy...
Click the images below to see the full collection. We share any commercial and/or free patterns that showcase them, too. (For inspiration, of course!)


Step 1: Cut patches for your Santa Fe
 Santa Fe design
Sample Size: 9" finished / 9½" unfinished
Grid: 9x9
Design Type: Even 9-patch
Strong contrast between the two fabrics gives this patchwork design more impact.
Solids, or fabrics that read as solids like tone-on-tones or low contrast, are good choices for the smallest block sizes so that the design doesn't get 'mushy' or disappear.
 |
Cutting Chart for a~ Traditional Piecing ~ | ||||
|---|---|---|---|---|---|
| Patch | Fabric | Qty | Finished Block Size | ||
| 4 1/2" | 9 " | 18 " | |||
| 1 | Background | 4 | 2”sq | 3-1/2”sq | 6-1/2”sq |
| 2 | A | 5 | 1”sq | 1-1/2”sq | 2-1/2”sq |
| 3,7 | Background | 20 | 1”sq | 1-1/2”sq | 2-1/2”sq |
| 4 | Background | 1 | 1” x 5” | 1-1/2” x 7” | 2-1/2” x 11” |
| 5 | A | 2 | 1” x 5” | 1-1/2” x 7” | 2-1/2” x 11” |
| 6 | A | 8 | 1” x 2” | 1-1/2” x 3-1/2” | 2-1/2” x 6-1/2” |
| Unfinished Block Size | 5 " | 9 1/2" | 18 1/2" | ||
| Grid Size | 1/2" | 1 " | 2 " | ||

Step 2: Assembling the Santa Fe units
Nine Patch

Make 1
Arrange all the #2s and four of the #3 patches into a standard nine-patch arrangement with the #2s in the corners and center.
With right sides together, stitch the squares in each column together, pressing the SAs towards the darker #2s.

Stitch the rows together, pinning if it helps you to match the SA. Press the SA either in or out. The finished unit looks like this...

"O" Units

Make 4
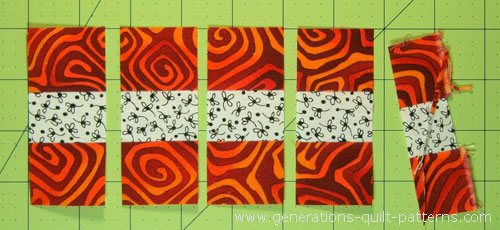
With RST, sew a #4 and #5 together along the long edge.
Then add the second #5 so that the fabrics alternate.
 I prefer my quarter inch foot with a guide for stitching strip sets.
SA are pressed toward the darker fabric.
Straighten the edge of the strip set by lining up the seam lines with the marks on your ruler (arrows). Trim away just a smidgeon with your rotary cutter.
 While you do have extra fabric, there's no need to cut more than a silver to straighten the edge.
Find the Finished Block Size in the chart below and cut four segments from it at the Subcut Width.
| Subcutting Chart for the Santa Fe Quilt Block | ||
|---|---|---|
| Finished Block Size | Unfinished Sewn Width of Strip Set | Subcut Width |
| 4-1/2” | 2” | 1” |
| 9” | 3-1/2” | 1-1/2” |
| 18” | 6-1/2” | 2-1/2” |
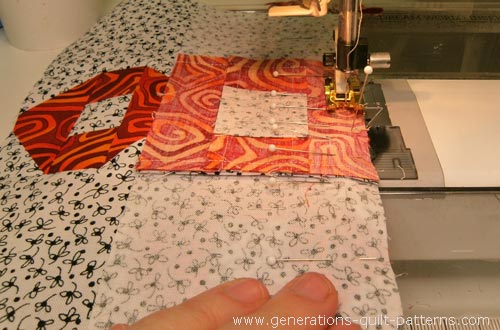
With RST, sew a #6 to each side of the #5/#4/#5 patch as shown below. Make 4. SA are pressed towards #6.

Mark the backside of sixteen #7s with a diagonal line. Position a marked #7 in each corner.
 Position the marked #7 in the corners for stitching (above, left). Press the #7 squares open towards the corners (above, right).
I prefer to use my open toe applique foot for stitching on drawn lines like this because there's nothing between my eyes and the needle.
 Using an open toe applique foot for this stitching.
You can trim away the excess in the corners of the #7s as shown below. Leave a 1/4" seam allowance. (below, left) All you can see (just barely) on the back are the stitching lines. (below, right)

Or you can cut away the excess of both the #6 and #7 patches leaving the same 1/4" SA. From the back it looks like this...

Repeat these steps for a total of 4 "O's".
Step 3: Assembling your Santa Fe quilt block
If you'd switched to an open toe applique foot, switch back to your favorite 1/4" foot now.
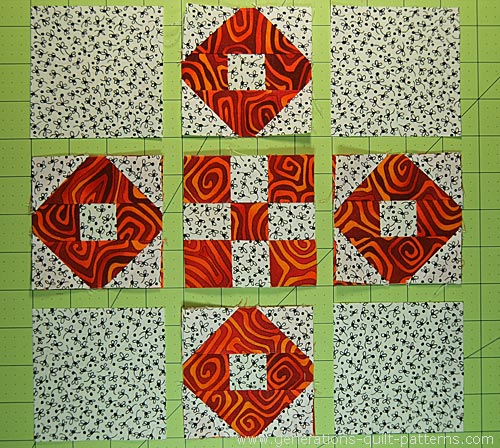
Arrange your cut squares and pieced units into rows like this. The 'O' units look a little off kilter right now. That's OK. The upcoming seams square off the block a bit and make it look 'right'.
With RST, stitch the units in each row together. SA are pressed toward the solid cut squares and the nine-patch to reduce bulk.
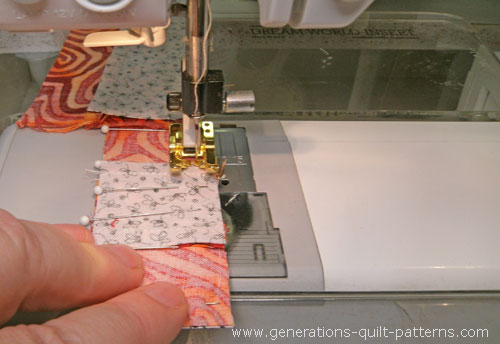
 Pinning helps make it easy to match the points of the O and 9-patch blocks.
Helpful Hint
I find it much easier to ensure the match of the points of the "O" block to the squares in the 9-patch if I use pins. [Click here to learn about the technique I use...]
You can see the head of one of my perpendicular 'matching' pins in front of the needle bar below.
Give your Santa Fe quilt block one final press. If you've left the back layer of the corners in your "O" units, your block might be a bit lumpy. Try my favorite pressing technique to squash that lumpiness into oblivion!
Here is our finished Santa Fe!
 The Santa Fe is finished!
What about a different quilt block?
For a list of all the 260+ quilt block patterns on this site, start here.
If you know the name of the block, shorten your search by using these links:
Click here if you're looking for blocks with at least some paper piecing.
Click here if you're looking for the basic building blocks of quilting, i.e., Flying Geese, half square triangles, quarter square triangles, etc., along with several techniques to make each.
And finally, use these links to find blocks in these finished sizes:


Yummy fabrics
to drool over
Click any image below to see the full collection and find pricing and ordering information.


By Julie Baird
Copyright © 2008-2026 Generation Quilt Patterns, LLC
All Rights Reserved
Generations-quilt-patterns.com does not sell any personal information. (See Privacy Policy)