- Home
- Beginner Quilt Blocks
- Triangle in a Square Quilt
Learn to Piece Triangle in a Square Quilt Blocks w/o specialty rulers
Technique #2 - Template Piecing
This post contains affiliate links, for which I receive compensation.
Our final technique for making Triangle in a Square quilt block is using templates.
No specialty rulers to buy—because you shouldn't have to buy an expensive new tool just to try out a new pattern.
The templates we use are free for you to download for blocks that finish 1-1/2", 2", 3" or 4" square. As many times as you need for your won personal use.
In this tutorial are:
- Free downloads of the templates for 1-1/2", 2", 3" and 4" finished blocks
- A step-by-step, beginner friendly tutorial
- Alternate cutting instructions if you'd prefer to cut generously and trim to size
- A guide to how to check the accuracy of your stitching or trimming an oversized unit to perfection—all without a specialty ruler
If you've missed the previous tutorials for alternative methods to make your Triangle in a Square, use the links below to find them:
It's time to cut up and sew!
Download, print and prepare the templates
To simply printing, all the templates for all the sizes are in one download. Click here to download your copy of the Triangle in a Square quilt templates.
Cut out the 3 templates for the finished size you've chosen. The size and shape is marked on each to help keep them straight.
Don't bother to cut exactly on the line. A wee bit past the outside dashed line is good enough for now.
I keep my templates in plastic page protectors stored in a notebook for simple organization.
The newest quilt fabrics to tickle your fancy...
Click the images below to see the full collection. We share any commercial and/or free patterns that showcase them, too. (For inspiration, of course!)
Cutting Triangle in a Square quilt patches
I strongly urge you to starch your fabric before cutting. It's one of the easiest ways to improve the accuracy of your work.
After installing your favorite quarter inch presser foot, take a quick Sewing Test to confirm the accuracy of your seam allowance.
Make any adjustments now. Make a note on a PostIt note and keep it at your machine in case your sewing time gets interrupted.
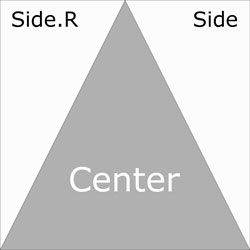
For each unit, you'll need two fabric with enough contrast so the point doesn't get lost—doesn't make any sense to go to the effort of piecing it if the point disappears.
Here are our Triangle in a Square quilt patches, laid out and ready to stitch.
Sewing a Triangle in a Square quilt block
Check for accuracy or trim to perfection
Units that are perfectly sized are the easiest to piece into a quilt.
While a specialty ruler like the V-Block makes this super-simple, it's still pretty easy to check with your every day ruler once you know how.
Place your finished, nicely pressed Triangle in A Square quilt block on your cutting mat.
Notice first, that the seams at the base of the center triangle DO NOT bisect the corners. They are a bit off—this is exactly how they should be.
Lay a square ruler over the top of your unit with the outside edges aligned with the top and side edge of your ruler.
The cut edges of your unit that are under the ruler should align exactly with the unfinished size.
The Center measurement should go right through the point of the Center triangle.
Finally, for the bottom edge.
The bottom of your seams should land exactly on the dot a 1/4" up from the bottom and 1/4" in from the side.
For our 4" sample, those marks are on the ruler are (measuring from the righthand side):
Left side: 4-1/4" left, 4" down
Right side: 1/4" left, 4" down
Help! My Triangle in a Square isn't quite right
The Basic Building Blocks of Quilting
Click here for instructions for more beginner-friendly quilt blocks and units in our basic building blocks of quilting series.
You'll find multiple methods for all of these basic units:
Rail Fence, Half Square Triangles, Quarter Square Triangles, 4-Patch, 9-Patch, Square in a Square, Triangle in a Square, Corner Beams, Half Rectangle Triangles, and Flying Geese.
Choose the technique that works best for your skill set and your project.
For even MORE blocks to make… 🧩🎨

...visit our Free Quilt Block Pattern Library, with over 260+ blocks to choose from in multiple sizes.
Free downloads are included in all sizes for any blocks require paper piecing patterns or templates.
