- Home
- Beginner Quilt Blocks
- Triangle in a Square
BUST MORE STASH!
Use a V Block Ruler to make Triangle in a
Square units
...the perfect tool for the job!
This post contains affiliate links, for which I receive compensation.
Have you ever tried to make a triangle in a square block, and it just didn't turn out the way you wanted it to?
With Studio 180's V-Block, that won't be a problem anymore.
This nifty little gadget will help you make perfect triangles every time. This tutorial shows you how it works. You'll be surprised at how easy it is.
Using this quilting tool is a big confidence builder...
...and a confident quilter makes more quilts...
...and BUSTS MORE STASH!
Needs PINTEREST long image and hard link-image is done and in file - NEED TO ADD
 Don't forget to pin this for later!
In this tutorial, you'll find:
If you decide not to spend the $$$ for this quilting tool, you DO have other options:
If you're not a gadget girl, you might not want to shoot the lock off the old wallet for another ruler.
There are three other ways to get this block done. Links to these resources are below.
- Paper piecing (includes free patterns and cutting templates)
- Template piecing (includes free templates)
Let's get started!
What is the V-Block by Studio 180
This ruler is beautifully engineered by Deb Tucker for making a Triangle in a Square unit or block.
With it, you cut oversized patches with accurate angles.
Insert picture on bamboo here
After stitching and pressing, you use the different markings on it to trim the patch to perfection.
With it, you can make 11 different sizes of TiaS, from 1" to 6" finished in 1/2" increments.
Finally, as we've come to expect from Studio 180, there are instructions for both left- and right-handed quilters.
Deb Tucker thinks of everything. :)
Getting Started
Like all other rulers from Studio 180, you can download a set of instructions if you need them.
There are two benefits:
- The pages are formatted for a 3-ring binder—very handy!!
- There's a cutting chart which isn't included in the printed instructions in the packaging
While all the cutting dimensions are found right on the rulers, it's nice to have a cutting chart, too. Especially for yardage calculations when you're designing your own quilts, or converting from a technique you don't care for to this technique.
Cutting patches for a Triangle in a Square
 Triangle in a Square unit
NOTE: In the paper piecing patterns on this website for Triangle in a Square units, the 'Center' above is marked as 'TiaS.1' instead. This was done to avoid confusion in the cutting charts where more than one patch would be labelled 'Center.
Because the V Block printed instructions refer to it as 'Center', that is the label used in this review/tutorial.
Our sample in this tutorial is a 3" finished (3-1/2" unfinished) Triangle in a Square quilt block or unit.
You can see the left and right 'Side' skinny triangles are the same patch, one being the reverse of the other.
Since they are asymmetrical, it DOES matter whether the fabric is right- or wrong-side up when you cut.
Using the chart below show, we need 4" strips for both the Side and Center triangles for our 3½" unfinished/3" finished Triangle in a Square (TiaS).
 The download of the instructions from Studio 180 includes a cutting chart, the directions that came in the package did not.
The same information is found on the ruler on the angled side.
Show this on the ruler for the 3" sample block
There's also calculations for how many V units you'll get from a strip.
This is helpful for yardage calculations when you're designing your own quilts or calculating yardage when you're converting to this technique from another like paper piecing or templates or the Tri Recs ruler.
Use the V-Block Ruler to make a Triangle in a Square
Choose a pair of contrasting fabrics. Cut a 4" strip from each as instructed in the chart above.
Center Triangle
Since we're making a single Triangle in a Square, use a single layer of your Center fabric.
Straighten one short edge with your rotary cutter.

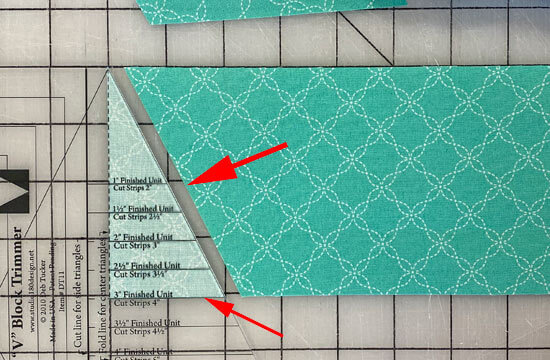


 The 3" finished line (red arrow) is aligned with the bottom of the strip. Then the left edge is trimmed away to straighten it.
Next, align the 'Finished Unit' line with the bottom edge of the strip and the 'Fold line for center triangle' marking with the left edge of the strip.
Cut along the angled side of the V-Block.
The instructions for Studio 180 instruct you to cut the first Center triangle from a folded edge. See my note below why I prefer to cut it this way instead.
Side and Side.R
Fold the 'Sides' fabric strip in half, either right sides OR wrong sides together. This is so you create two side triangles—Side and Side.R—which are mirror images of each other.
Straighten the short edge of the two layered ends.
 Use the V-Block to straighten one short edge
Align the 'Cut line for side triangles' solid line on the ruler with this edge. The 'Finished Unit' line is aligned with the bottom long edge of the strips.
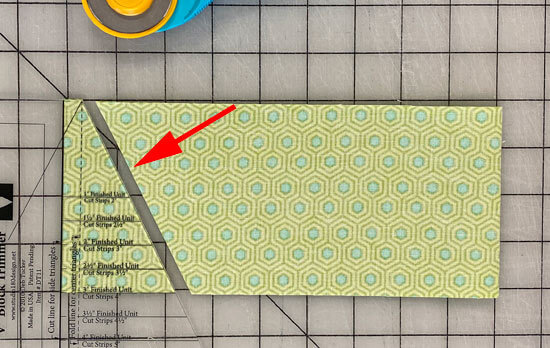
Cut along the angled edge of the ruler (red arrow) and you've created the 2 patches you'll need for a single unit.
If you're making a bunch of units, you'll flip the ruler to use another set of guides to cut the patch. These guides are clearly marked on the ruler.
 While it's a bit hard to see, there is a thin dark line on the left side of the second triangle. It is used to position the ruler correctly.
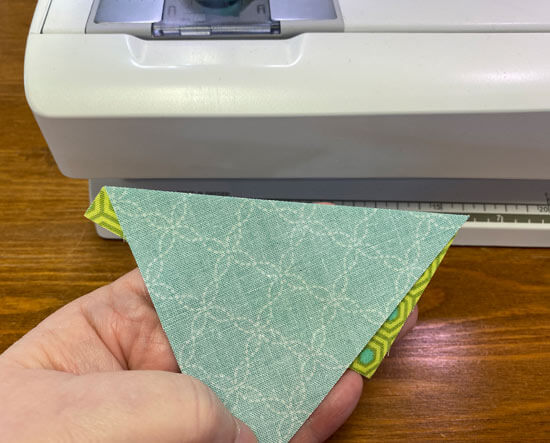
Opening up the two pairs of Side/Side.R, here are the mirror-imaged sides that we need to complete two TiaSs.
 Since our strips are placed either right sides together or wrong sides together, we get mirror-image patches. Exactly what we need!
Sewing a Triangle in a Square
Install you favorite 1/4" presser foot.
Take a Sewing Test to test the accuracy of your sewing machine settings and write down those settings once you get a perfect 1/4".
Lay out your patches to be certain you've got the Side/Side.R triangles positioned correctly.
NOTE: These units are always sewn with the wide end to the narrow one, at the start and at the finish.

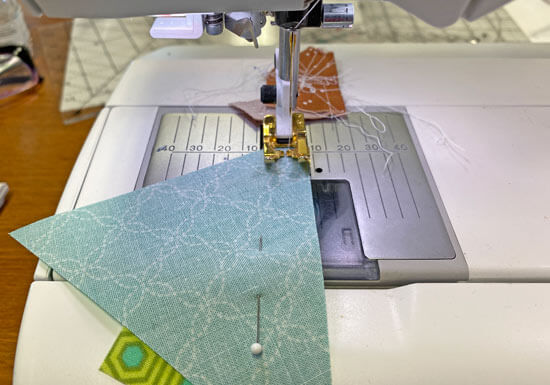
With RST, layer the Center and a Side or Side.R triangle (it doesn't matter which one you start with), aligning the long bias edges. The points at the top point of the Center patch—on the right-hand side in the photo below— line up perfectly.
Stitch with a 1/4" seam.
Press the sewn pair flat to set the seam. Then press it toward the Side to minimize bulk at the point.
Regardless of the technique (V Block ruler, paper piecing or templates) you use to make these units, the seams are always pressed away from the Center to reduce or minimize bulk.
Repeat the steps to add the Side.R to the opposite side. Again, the points on the patches match.
 Add the second Side to your Triangle in a Square
Your oversized Triangle in a Square is ready for its trim down.
 All that's left is to trim our Triangle in a Square
Trimming a Triangle in a Square
NOTE: What makes the V-Block ruler different from, say, the Tri Rec or other specialty rulers for a Triangle in a Square, is that it's a 'trim down' ruler. The marks you need for trimming are printed right on it, so there's no losing them.
That Deb Tucker's a SMART gal!
Along the longest edge of the V-Block you'll find a bunch of progressively larger Vs.
Align the corresponding 'Finished Size' line with the seam lines. (Ignore the little X's at the top. We use them in the next step.
You can see here why the rule is names the 'V-Block'. :)
For our 3" finished/3½" unfinished sample Triangle in a Square unit, the 3 is at the point of the V.
Trim the two exposed edges with your rotary cutter.
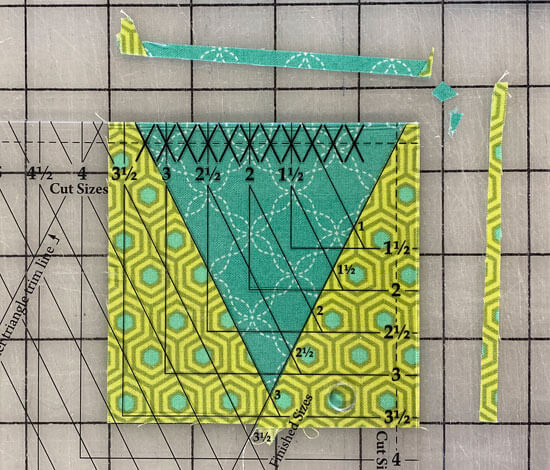 The 'V' lines on this ruler are directly over the seam lines
We're revealing accuracy of this technique already. Check out the upper right corner of our TiaS. The seam allowance on that side is a perfect 1/4" from the top and right edges as marked by the dashed lines.
Turn your unit 180° to trim the remaining two edges.
Line up the trimmed edges with the square that corresponds to your unit's unfinished size (for our sample it's 3-1/2" on the left and bottom of the unit shown here).
Trim the final two exposed sides.
 Use the 'Cut Size' lines with the freshly trimmed edges to make the final two trims
Our Triangle in a Square is the perfect size and its points and seams are all at the 1/4" mark. It's ready for your your block or quilt!
Couldn't be any easier, could it?!!
 A perfect Triangle in a Square block or unit
Unlike the half square triangle whose seam cuts a corner in half, a Triangle in a Square's SAs don't even touch the corners. However, if you lay a ruler over the top, you'll see that the 1/4" mark for the SAs falls exactly on the seamline.
Best practices for sewing a Triangle in a Square
These three simple things will improve your accuracy. And when our piecing is 'right-on' we're all happier Quilters!
Take the Sewing Test. Since both edges you stitch are on the bias, a little off is multiplied.
Starch your fabric. It helps to control that bias edge, both as you sew and as you cut.
Cut through only 2 layers of fabric at a time. The purpose is to get the angle correct when you're cutting. Multiple layers of fabric have a tendency to shift more. Cutting accurate patches is ALWAYS faster than ripping sewn seams.
 Accurate patches are easier to sew into your quilts
What if you've already got a Tri-Recs ruler?
It's possible, if you've been quilting for any length of time, that you've already got a Tri Recs ruler combo—you can read about using that ruler set to make this unit here.
Just as with templates, if you use the Tri Recs, you cut patches to the extra size you need. That means you must sew with a reliably accurate 1/4" seam allowance. Starched fabrics help keep the angles true during sewing and pressing.
The V-Block ruler, on the other hand, includes a step for trimming the sewn unit to the perfect size.
As long as you stitch a reliably uniform seam (even if it's reliably a bit different from that perfect 1/4") trimming the oversized patches results in a perfect unit. Again, starch helps tame all those bias edges.
My personal opinions and deviations from the instructions
Like every other tool review on the website, I've personally purchased my V-Block just like you would. My opinions are based solely on my own experience and not because of discounted or free product.
Over the years, I've become a HUGE fan of Deb Tucker and Studio 180 quilting rulers.
Her trim down rulers—hands down—are some of the very best on the market. I prefer this system over the Tri Recs rulers combo, in particular because the V-block is A TRIM DOWN RULER.
Trimming oversized blocks and units to perfection IS my preferred way of working with units with unusual angles in them.
That's not to say I don't do a couple of things different.
Knowing how YOU prefer to work is a good thing. Adapting quilting techniques to embrace your strengths helps YOU make more quilts.
AND have more fun at the same time!
Not included in the instructions is a recommendation to starch your fabric before cutting. For any patch with numerous bias edges, starching ahead of time makes sewing those edges so much easier with much less stretching out of shape.
 If I think ahead, I use the StaFlo, 50/50 with water. If I'm pressed for time, it's the Faultless or other spray starch (not sizing). With Argo, you can mix your own, but I don't have time for that.
I starched all my fabrics with a 50/50 mixture of Sta Flo Liquid Starch Concentrate and water, unless I'm pressed for time. My fallback is spray starch.
[Learn more about how to starch your fabric here.]
Did you know you can make your ruler less slippery?
If you find that the ruler wants to slip as you cut these uncommon angles, consider using Grippy® on the wrong side. It adds a bit of 'traction' as you cut.
A bit smelly to apply (I recommend doing it in the garage), it adds just the grip needed for more accurate cutting.
Smelly glue not your thing?
A few strips of Nexcare on the bottom will reduce the slippage, too.
Cut a more accurate Center patch
And finally, I don't cut my first Center triangle by folding the fabric strips. That fold is a place where I can screw it up (especially if I'm folding two layers of fabric as Deb's instructions direct).
I'd rather sacrifice a bit of fabric to get a patch cut with perfect angles because if the angles are off, no amount of accurate sewing or 'trimming to perfection' can fix it.
Other than these three things, I followed the directions as written for our Triangle in a Square sample.
It's really a superb quilting tool!
So what is my favorite method for making TiaS, you ask?
Hands down, I prefer paper piecing.
It has the same 'trim to perfection' step that this ruler does, and I've always got paper and a printer on hand. The blocks in 2", 3" and 4" finished sizes are available right from this website for you (and me) to print.
Because I don't make tons of these units, I prefer NOT to add to my personal ruler collection if I don't have to.
That said, if you're totally against paper piecing, the V-Block ruler is the absolute next best thing for creating perfect little units.
Where to purchase a V-Block ruler
If your local quilt shop doesn't carry the Studio 180 line of rulers, you can find them online at the Fat Quarter Shop and on Amazon.com.
Green Fairy has Studio 180 rulers from time to time, too.
Be sure to check out the other trim down rulers designed by Studio 180.
You'll be glad you did!
- Home
- Beginner Quilt Blocks
- Triangle in a Square


By Julie Baird
Copyright © 2008-2025 Generation Quilt Patterns, LLC
All Rights Reserved
Generations-quilt-patterns.com does not sell any personal information. (See Privacy Policy)