- Home
- Free Quilt Block Patterns
- Snowflake Quilt Block
Snowflake Quilt Block Pattern: Achieve Perfect Points Through Smart Preparation
🌟 Because precision isn't about perfection — it's about process
This post contains affiliate links, for which I receive compensation.
The secret to a stunning Snowflake quilt block isn't in expensive tools or perfect stitching — it's all in the process.
We'll show you how starting with generously sized pieces and following our proven trimming techniques leads to precise, professional results every time.
This pattern combines the accuracy of paper piecing with the efficiency of making eight half-square triangles at once, creating a block that's as fun to piece as it is beautiful to display.
Ready to discover how preparation paves the way to precision?
🧭 Find Your Way Through This Tutorial
Just as our Snowflake block comes together through clear, manageable steps, we've organized this tutorial to help you find exactly what you need when you need it. ✨
- A cutting chart in 3 sizes with a download of the chart and block design
- A download of the paper piecing patterns for each size
- 🎨 A coloring/fabric planning page to download and print
📋 General Instructions
Several common abbreviations are used in this tutorial:
- SA - seam allowance
- RST - right sides together
- HST - half square triangle
I use an open toe applique foot for both the paper piecing and for making the HSTs. This foot provides and unobstructed view of my presser foot.
For assembling the block, I then switch to my favorite 1/4" foot with a guide.
You'll need a paper piecing pattern for the center of this block.
From the chart below choose your finished block size and then click the link to the corresponding 'Economy' quilt block (that's the common name of the center unit).
One unit is all it takes for each block you make.
Download and print paper piecing pattern
You'll need the most current version of Adobe installed on your computer to download the pattern.
On the Adobe Print Menu page, under 'Page Size and Handling' set 'Custom Scale' to 100% before printing for accurate results. Click here to see what it looks like on the Print Menu page.
After printing, use the 1" square graphic on the printed pages to confirm they are printed accurately.
| PRINT the Economy Paperpiecing Pattern for the center of your Snowflake block | ||
|---|---|---|
| Finished Block Size | Link to PDF Download | |
| 5" | Economy 3" | |
| 7½" | Economy 4½" | |
| 10" | Economy 6" | |
✂️ Cut patches for your Snowflake block

Sample Size: 10" finished / 10½" unfinished
Grid: 5x5
Design Type: Uneven 9-patch large center | Paper Pieced
I've used batiks for these blocks.
'Absolutely love working with them because they finger press so nicely and take a crease so well.
The other nice thing about batiks is I can see no visible difference (usually) between the front and backsides. All I have to do is choose the prettier one.
However, I do recommend prewashing or at least pre-testing to make sure they don't bleed.
There's nothing worse than getting a quilt finished, only to have the fabrics run the first time it's washed.

 | Cutting Chart for a~ Paper PLUS Traditional Piecing ~ | |||||
|---|---|---|---|---|---|---|
| Patch | Fabric | Qty | Finished Block Size | Sub Cut | ||
| 5'' | 7½'' | 10'' | ||||
| 1 | A | 1 | 2" x 2" | 2¾" x 2¾" | 3½" x 3½" | --- |
| 2 | Bac | 2 | 2½" x 2½" | 3" x 3" | 3½" x 3½" | |
| 3 | A | 2 | 2⅝" x 2⅝" | 3⅜" x 3⅜" | 4⅜" x 4⅜" | |
| 4 | Bac | 1 | 4¼'' x 4¼'' | 5¼'' x 5¼'' | 6¼'' x 6¼'' | --- |
| 5 | A | 1 | 4¼'' x 4¼'' | 5¼'' x 5¼'' | 6¼'' x 6¼'' | --- |
| 6 | Bac | 4 | 1½'' x 1½'' | 2'' x 2'' | 2½'' x 2½'' | --- |
| 7 | A | 4 | 1½'' x 1½'' | 2'' x 2'' | 2½'' x 2½'' | --- |
| Unfinished Block Size | 5½'' | 8'' | 10½'' | na | ||
| Grid Size | 1'' | 1½'' | 2'' | na | ||

Subcutting and marking
Subcut #2 and #3 once on the diagonal.
Mark the back of either the #4 or #5 patch (choose the one it's easier to see the marks on) with either:
- A diagonal line from each pair of corners, OR...
- Two pairs of diagonal lines a quarter inch away from the center diagonal
Because I didn't have my regular quarter inch foot with me when I made the Snowflake quilt block sample, I chose Method 2 above and used my Quick Quarter Ruler and a Bohin Mechanical Chalk Pencil for marking.
 You can see where I've already marked the #5 patch in preparation for making HSTs 8 at a time.
🪡 Sew the units for our Snowflake block
Center - An Economy block
Make 1

If you haven't already, print an Economy Block pattern for the center of your Snowflake. The printing links are here.
Install your open toe appliqué foot if you have one—it makes it so much easier to see where you're stitching. Reduce your stitch length to 15-20 stitches/inch. This makes it easier later to remove the paper.
Though many quilters recommend using a 90/14 needle for this technique, honestly I stick with the 80/12 Microtex Sharp that I piece with without any problems.
Cut out 1 Economy block from the sheet you downloaded above. No need to get fancy. A rough cut is all you need.
With a tiny dab of Elmer's Washable Glue Stick, stick the wrong side of your #1 fabric patch to the unprinted side of the paper. Center the square between the dashed placements guides.
 The dashed placement guides make this so much quicker.
Align the long edge of a #2 triangle with one edge of the #1 square.
 For perfect placement, line up the edge of the #2 with the edge of #1. The point of #2 should be directly opposite the corner of its patch on the pattern (red arrow).
From the printed side sew a generous seam, i.e., stitch starting a good quarter inch before the printed line and ending a good quarter past the printed line.
This is so your stitches won't come undone. The next sewing lines secure the ends.
 ALWAYS start and end a line of stitching a generous 1/4" before and after the solid line. This prevents your seams from coming undone.
Repeat for the opposite #2 patch. At this point press the #2 patches as sewn (to set the seam) and then open.
Add the final two #2 patches and press.
 For easy alignment, position the point of the #2 triangle with the corner of the patch on the pattern (red arrow).
After sewing all four #2s, your Economy unit looks something like this. Don't worry about those little dog ears for now.

They'll be gone after we trim away the excess fabric and establish your next placement lines for the patches.
With paper side up, fold back the paper on the solid line between #2 and #3 (the next patch you'll add).
If you sewed past the solid lines as instructed, you will need to pull the stitching away from the paper a bit (see that little V of holes below the red arrow—that's where I've pulled the stitches away from the paper.)
 Using my Add-A-Quarter Plus ruler to fold back the pattern.
(I'm using an Add-A-Quarter Plus to do this - my new favorite!) Place the lipped side of the ruler over the folded edge. The ruler's edge is exactly 1/4" away from the fold. Trim.
 The Add-A-Quarter Plus Ruler makes this trimming foolproof!
Repeat for the remaining three sides.
If you don't have an Add-a-Quarter ruler, simply match the 1/4" marks on your every day rotary ruler to the folded edge and trim, leaving behind an exact 1/4" SA.
Add the #3 patches just as you did the #2s—two opposites at a time, pressing in between.
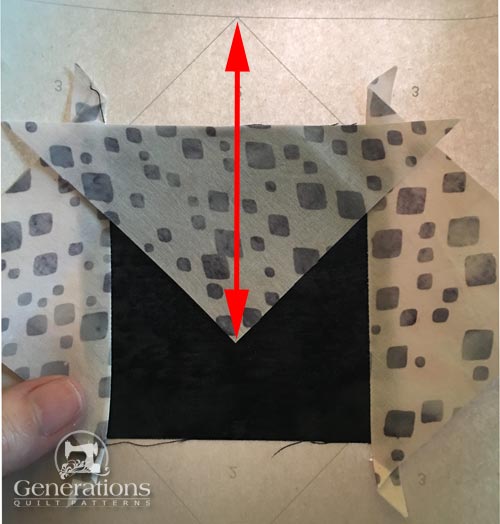
 The point of the #3 should line up with the point in the #1 square (red arrow)
This is the sewn Economy patch after adding all four.
Not much to look at right now, but with the magic of a little trimming...
 A wee bit messy, don't you think?
Trim to the exact size
At your cutting mat, pattern side up, match the 1/4" mark on your ruler with the solid outside line (red arrow). Trim with your rotary cutter.
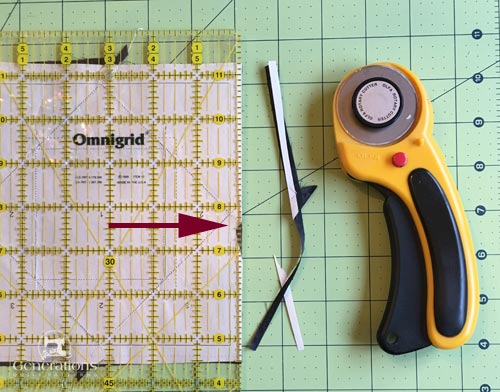 The red arrow points to the 1/4" line on the ruler and solid line on the pattern
Repeat for the three remaining sides and you have this.
 Straggly thread tails and wonky edges are all gone!
Remove the paper. Our patches are cut so that all the outside edges are on the straight of grain. The edges are stable.
The paper no longer serves a purpose.
I like to use my secret pressing technique to perfectly flatten this unit after it's stitched and trimmed to size.
Super flat blocks are so much easier to work with, don't you agree?!!

The paper piecing is complete. From this point forward, return your stitch length to the one you regularly use for piecing and install your favorite 1/4" presser foot.
Now that you've created your precisely-pointed center with paper piecing, we're going to shift to a different kind of precision work with our half-square triangles.
While paper piecing gave us perfect points through careful stitching, our HST method achieves precision through smart preparation and trimming. Notice how both techniques share the same goal—accuracy—but approach it in complementary ways.
You've already proven you can follow a precise stitching line; now let's see how generous cutting creates space for perfect trimming.
Half Square Triangles (HST)
Make 8

The 8 at a time method of making HSTs is PERFECT for our Snowflake quilt block and efficient, too! Starting with oversized squares gives us a little wiggle room in our sewing.
With RST, layer a #4 and #5. Stitch on the marked lines. (If you only marked the two center diagonal lines, use your quarter inch foot to stitch a 1/4" away from both sides of both lines.)
 This nice, fine lines were drawn with my Bohin mechanical chalk pencil.
Press the unit flat. It's sometimes a wee bit wavy after stitching the bias lines.
Use the chart below to find your Center Measurement. (For this 10" sample that number is 3⅛".)
| HST Measurements | ||
|---|---|---|
| Finished Block Size | Center | Trim HST to… |
| 5" | 2⅛" | 1½" sq |
| 7-1/2" | 2⅝" | 2" sq |
| 10" | 3⅛" | 2½" sq |
Align this line of your ruler with the edge of your block (red arrow) and cut. This cuts your square in half from top to bottom.

Align this same line of your ruler with an adjacent edge and cut. This cuts the patches in half from side to side. (If you've got a smaller mat, it's easier to turn the mat than the patches.)
You now have four equal sized squares equal to the Center measurement. All four pairs of squares have two lines of diagonal stitching in them.
Cut these squares in half between the stitching lines to create a total of 8 HSTs.
Press with the SA toward the dark.
Referring back to the chart, find the 'Trim HST to' measurement and trim your HSTs as needed. (For the 10" sample, they are trimmed to 2-1/2" x 2-1/2".)
As you position your ruler for the first trim, notice how starting with larger pieces has given you the freedom to focus on accuracy rather than perfection in your initial cuts and stitching.
This isn't about correcting anything—it's about revealing the precise unit that's been there all along, waiting to emerge.
Position your ruler so the diagonal seam line aligns perfectly with the 45-degree line on your ruler. Trim two adjacent sides. Rotate your unit 180 degrees and trim the remaining sides to size.
 Perfect HST every time!
Side Centers

Make 4
Arrange two HSTs and one #6 as shown.
With RST, stitch the units together.
 Make a total of four for this Snowflake block
SA can be pressed either way; however, if you press toward the #6 (like I did to reduce bulk) you may need to grade the seam allowance—trim away a little bit of the darker fabric—so that the dark doesn't shadow through to the top of the quilt block.
After stitching and pressing, your side units should match the measurements in the chart below. Make adjustments if needed.
| Side Measurements | |
|---|---|
| Finished Block Size | Measurement after stitching |
| 5" | 1½" x 3½" |
| 7½" | 2" x 5" |
| 10" | 2½" x 6½" |
✨ Bringing Your Snowflake to Life ❄️
Look at what you've created! Each piece of your Snowflake block tells the story of your growing skills—from the crisp center that emerged through paper piecing to the perfectly-sized triangles you crafted through careful trimming.
As you bring these pieces together, you'll notice something wonderful: those points that might have seemed tricky before will meet naturally, thanks to all your careful preparation.
Arrange the units into the Snowflake design as shown below.
Pay particular attention to the side units. On the top and bottom, the dark HST points point in. On the sides they point out.

Stitch units together to form rows. SA are pressed toward the Economy block and away from the side units.
 Press SA in the direction of the arrows
Pin as needed to hold things in place.
This is our finished Snowflake quilt block—in all its pointy-goodness, ready for a quilt.
 The finished Snowflake block
If you're in the mood for snow, check out our recommendations for Snowman quilt patterns.
Celebrate your success 🌟
Look at what you've created!
Your Snowflake block combines two different paths to precision—paper piecing and precise HST construction—into one beautiful design. Each point tells the story of your careful preparation and attention to detail.
Whether this block stands alone or becomes part of a larger quilt, you've mastered techniques that will serve you well in future projects.
📌 The 'Yes-You-Can' Snowflake Block Tutorial ❄️
'Like finding the perfect fabric on sale, some tutorials are too good not to save for later! This one shows how preparation leads to precision through clear steps and real quilter tips.
Pin now, create beautiful points later! ✨

For even MORE blocks to make… 🧩🎨
...visit our Free Quilt Block Pattern Library, with over 260+ blocks to choose from in multiple sizes.
Free downloads are included in all sizes for any blocks require paper piecing patterns or templates.
- Home
- Free Quilt Block Patterns
- Snowflake Quilt Block


Yummy fabrics
to drool over
Click any image below to see the full collection and find pricing and ordering information.


By Julie Baird
Copyright © 2008-2026 Generation Quilt Patterns, LLC
All Rights Reserved
Generations-quilt-patterns.com does not sell any personal information. (See Privacy Policy)