- Home
- Free Quilt Block Patterns
- Providence Quilt Block
🌟 Providence Quilt Block:
Your Destiny in Fabric Form! 🧵
Divine Design Meets Quilting Mastery
This post contains affiliate links, for which I receive compensation.
🚪🔔 The Providence quilt block is knocking at your door, and trust us, you'll want to answer! 😇✨
This divine design is your ticket to quilting bliss, complete with a free cutting chart 📏 and coloring page 🎨 to fuel your creativity.
With our easy-to-follow tutorial, you'll be singing "hallelujah" 🙌 as you watch this heavenly block come to life under your nimble fingers. 🧵🪄
Navigate your way through this divine tutorial with ease!
Use these heavenly links to jump to the sections you need. Whether you're a seasoned quilter or just starting your journey, providence will guide your stitches to success:
It's time to cut up and sew!
📋 General Instructions
These abbreviations are used on this page:
- SA - seam allowance
- RST - right sides together
- HST - half square triangles
- QST - quarter square triangles
- Bac - background fabric
1/4" SA are used through this tutorial.
When instructed to press, first press the patches in the closed position just as they came off your sewing machine. This sets the seam, melding the fibers of your thread into the fibers of your fabric.
Then press the SA to the dark unless otherwise noted.
Pressing instructions are highlighted in yellow throughout this tutorial to make them easy to find.
New quilt fabrics to tickle your fancy...
Click the images below to see the full collection. We share any commercial and/or free patterns that showcase them, too. (For inspiration, of course!)


✂️Cut the patches for your Providence quilt block
 Providence design
Sample Block Size: 10" finished / 10½" unfinished
Grid: 5x5
Attribution: Nancy Cabot
AKA: Providence (H&H), Providence Quilt Block (LAC)
Barbara Brackman: #1819
Design Type: Star | Uneven 9-patch, small center | Twenty-Five Squares
Please label all your patches. We use their numbers throughout this tutorial.
I've used two different batiks from my stash and a Bella Solid for the background.
YOU are always in charge of the fabrics you choose for your own blocks.
In that spirit, I decided to swap lights and darks in the design, which is why the fabrics are labelled 'A' and 'B' to avoid confusion. I selected a variegated batik and a Bella Solid to work with.
If you're interested in using batiks, check out some new ones from our favorite fabric brands here.
My go-to online source for Bella Solids is Green Fairy Quilts—who's frequently got a sweet discount on one of my favorite fabrics.
To print a copy of just the block design and cutting chart to use at your cutting table, click here.
 | Cutting Chart for a~ Traditional Piecing ~ | ||||||
|---|---|---|---|---|---|---|---|
| Patch | Fabric | Qty | Finished Block Size | ||||
| 5'' | 7½'' | 10'' | 12½'' | 15'' | |||
| 1 | Bac | 1 | 4¼'' x 4¼'' | 5¼'' x 5¼'' | 6¼'' x 6¼'' | 7¼'' x 7¼'' | 8¼'' x 8¼'' |
| 2 | A | 1 | 4¼'' x 4¼'' | 5¼'' x 5¼'' | 6¼'' x 6¼'' | 7¼'' x 7¼'' | 8¼'' x 8¼'' |
| 3 | Bac | 9 | 1½'' x 1½'' | 2'' x 2'' | 2½'' x 2½'' | 3'' x 3'' | 3½'' x 3½'' |
| 4 | Bac | 2 | 2½'' x 2½'' | 3'' x 3'' | 3½'' x 3½'' | 4'' x 9'' | 4½'' x 4½'' |
| 5 | B | 2 | 2½'' x 2½'' | 3'' x 3'' | 3½'' x 3½'' | 4'' x 9'' | 4½'' x 4½'' |
| 6 | B | 4 | 1½'' x 1½'' | 2'' x 2'' | 2½'' x 2½'' | 3'' x 3'' | 3½'' x 3½'' |
| Unfinished Block Size | 5½'' | 8'' | 10½'' | 13'' | 15½'' | ||
| Grid Size | 1'' | 1½'' | 2'' | 2½'' | 3'' | ||

🧵Stitch the units for your Providence block
HSTs and QST: Marking/sewing
The HSTs and QSTs that we need to make this block both start out pretty much the same.
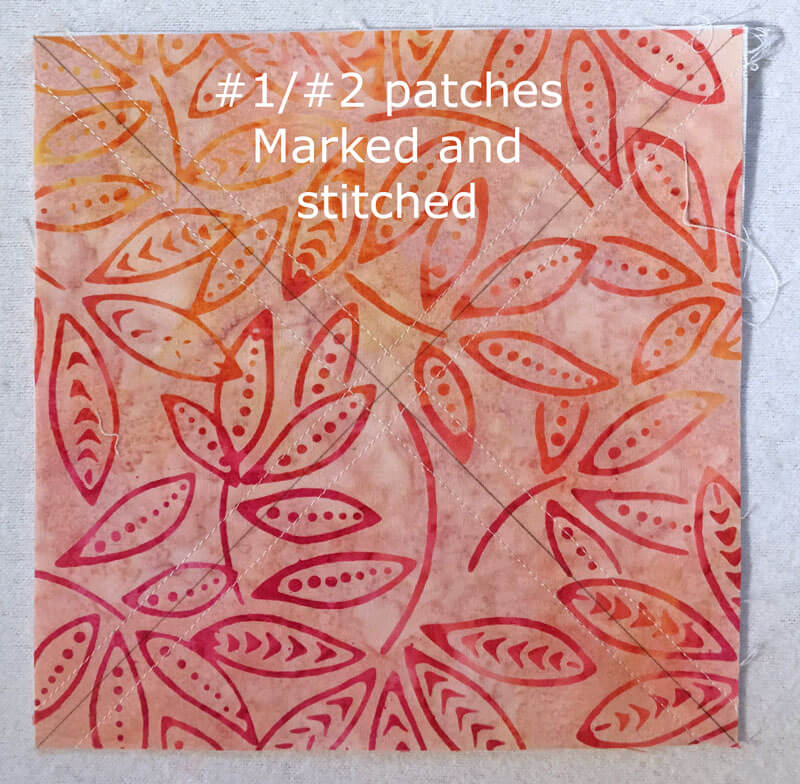
On the lighter of your #1 or #2 square mark a diagonal line from each pair of diagonal corners.
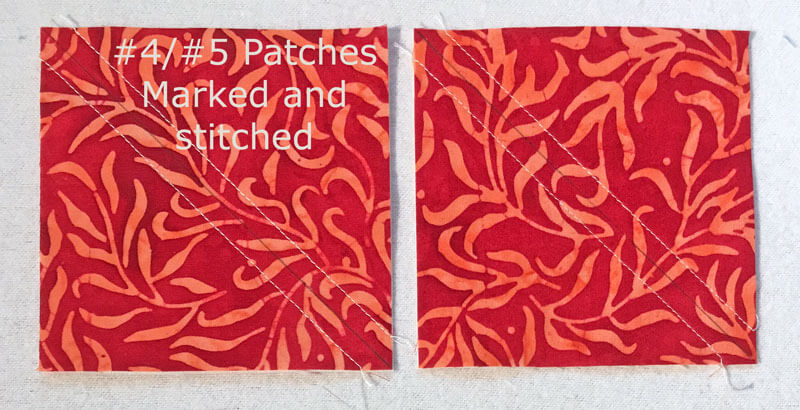
On the lighter of your smaller #4 and #5 squares mark a single diagonal line.
I've used a mechanical pencil to do this marking. It should be dark enough for you to see it as you sew, but not so dark that it shadows through to the right side of your fabric.
 #2 (left) two diagonals marked, #5 (right) one diagonal marked
A note from Julie...
You probably noticed that in this example I've marked the DARKER of the two fabrics...my background is a creamy white solid.
In this case, I didn't want the marking to show or shadow through my background. While the pencil lines are dark enough to see to use as a guide while sewing, they're barely dark enough to see in this tutorial.
My apologies for this oversight.
With RST, layer #1 and #2 for one pair.
With RST, layer #4 and #5 for a total of two pairs.
Pin as needed, keeping the pins away from where you'll be stitching so you don't have to stop to pull them out.
With your favorite 1/4" foot installed, stitch 1/4" away from both sides of each line.
 I made this sample at a Bee retreat and completely forgot to bring my 1/4" foot. (Shame! Shame!) So I adjusted the position of my sewing machine needle and used my open toe appliqué foot as a 'faux' 1/4" foot.
For closeups of the marking and stitches click the link below:
Press all three pairs flat to set the seams.
HSTs
Make 8

Find the finished size of the block you are making from the chart below.
HST Dimensions | ||
|---|---|---|
| Finished Block Size | Center Measurement | Trim HST to… |
| 5" | 2⅛" | 1½" |
| 7½" | 2⅝" | 2" |
| 10" | 3⅛" | 2½" |
| 12½" | 3⅝" | 3" |
| 15" | 4⅛" | 3½" |
Move your pressed #1/#2 square to your cutting mat.
Use your ruler to align the 'Center' measurement from the chart with the edge of your #1/#2 (blue arrow below).
 For our 10" sample block the 'Center' measurement is 3-1/8". That's the line on the ruler that we line up with the left edge if you're a right-handed cutter.
Cut the #1/#2 in half on the opposite side of the ruler through the center.
Turn your mat a quarter turn and repeat the process.
At this point, you've got four equal-sized square pairs of patches.
Finally, cut along the markings you drew.
Your HSTs look like this.
 Eight HSTs made with just four lines of stitching!
Press these HSTs open. (I've pressed mine towards the darker fabric.)
Refer to the chart above, this time to find the 'Trim to...' size that corresponds to the block you're making.
Trimming to perfection results in 8 HST that are accurate. And there's nothing easier to piece into your blocks than perfect units!
 For our 10" sample, HSTs are trimmed to 2-1/2".
QSTs
Make 4

Cut the two pressed #4/#5 stitched pairs in half on the original marking. Scissors or rotary cutter will do.
 Before (left) and after (right) cutting in half.
Press with the SA toward the darker fabric.
On the backside of two of the four resulting HSTs, draw a line from corner to corner as shown below.
For amazingly accurate QST, make sure to align a straight line on your ruler with the stitches in the seam. That way you truly have 90° angles at the center of the sewn QST. With a perfect angles in the center your QSTs will always press flat.
 The 6-1/4" line on the ruler is directly over the stitches in the seam.
Below you can see that when the marked diagonal is truly perpendicular to the seam line, the corners of the patch aren't necessarily in the right position.
That's why I cut my patches generously, then trim to size. There's a bit of wiggle room built in for any minor sewing errors.
Perhaps my 1/4" seam was off a bit. Maybe the patches shifted a bit before sewing.
Whatever the reason, I didn't find out until AFTER #4/#5 was cut in half, too late to re-sew.

With RST, layer a marked #4/#5 HST with an unmarked one, pinning as needed to ensure a good match in the center. The seams nest when dark fabrics are touching the background.
Stitch again 1/4" away from both sides of the diagonal markings.
Repeat for a second pair.

Open the units to check the match in the center. Make any adjustments now, i.e. re-sew if necessary.
 Whew!!!
Press flat. Then cut apart on the markings to create four QSTs.
Press the QST open.
To trim to perfection, in the table below find the 'Center' measurement that corresponds to the finished size of your Providence block.
QST Dimensions | ||
|---|---|---|
| Finished Block Size | Center Measurement | Trim QST to… |
| 5" | ¾" | 1½" |
| 7½" | 1" | 2" |
| 10" | 1¼" | 2½" |
| 12½" | 1½" | 3" |
| 15" | 1¾" | 3½" |
For our 10" sample, the 'Center is at 1-1/4" inches. Match this intersection on your ruler with the center of your QST (intersecting blue lines below).
At the same time, align the 45° line on your ruler with the diagonal seam that runs from lower left to upper right (blue arrow).
When everything is lined up correctly, the 'Trim to' measurement (2-1/2" for our 10" sample) points on the outside edges of your ruler are directly over the upper left and lower right seam.
Trim the two exposed sides.

Turn the QST 180°, align the ruler again the same way, and trim the final two edges.
Repeat for all four QSTs.
Corners
Make 4

With RST, layer a #1/#2 HST with a #3 background square, dark fabric to background as shown below.

Press with the SA toward #3.
With RST, join pairs together to make four little 'bowties' for the corners.

Press this last seam to one side. You can make out in the photo below that when all the corners are laid out in the same direction, this last SA was pressed toward the bottom of the unit.

Sides
Make 4

With RST, layer a #4/#5 QST with a #6 square matching dark fabrics and stitch.

Create four pairs and press with SA toward the #6 square.
🧩Let's get this Providence quilt block put together
Arrange the corners, sides and center square as shown below to create the Providence design.
Solid cut background squares are in the corners. QSTs surround the center of the design.
When you position the corner units, one of the #3s in each will have both SAs pressed towards it. That #3 should be closest to the center. (You'll be able to see this better on last photo where I've marked the #3s. It shows the finished block from the backside.)

All the seams nest—making matching them easier—pin as you find necessary for matching SA.
After stitching, the SAs in each row are pressed toward the #4/#5/#6 narrow units.

Pin the rows together. Again the seams should all nest.
After stitching the rows together, the SAs are pressed out from the center row.
After a good final press using my favorite 'secret' pressing technique, this is our finished Providence quilt block.
 'Providence' sure looks a lot more complicated than it was, doesn't it???
And finally, here's our Providence from the backside. You can see how all the SAs nested together.
 Our finished Providence quilt block from the backside with the #3 patches marked.
🎉 Bravo, Quilter! 🌟
You've unlocked the divine secrets of the Providence quilt block. 🔓
With this heavenly design in your repertoire, you're ready to stitch up some serious magic. ✨🧵 May your quilting journey be filled with serendipity and beautiful creations! 🍀
Ready to keep this quilting revelation close at hand? 👇
🔮✨ Providence works in mysterious ways
Pin this tutorial now, and watch as it magically reappears when your quilting mojo strikes! 📌🧵 Your future self will thank you. 🙏😊

🔭 Looking for something truly stellar?
You've finished your star quilt block, and you're ready for more!
Browse our collection of 70 stellar star quilt block patterns. All have instructions and cutting charts in multiple sizes. If templates or paper piecing is used in the tutorial, there's a free download for you of those materials.

Eeny. Meenie. Miney. Moe.
Which star quilt block will you sew?
For a star-studded quilting experience, choose from 100+ bedazzling star quilt patterns—for beginners and beyond—click here.
For even MORE blocks to make… 🧩🎨

...visit our Free Quilt Block Pattern Library, with over 260+ blocks to choose from in multiple sizes.
Free downloads are included in all sizes for any blocks require paper piecing patterns or templates.
- Home
- Free Quilt Block Patterns
- Providence Quilt Block


Yummy fabrics
to drool over
Click any image below to see the full collection and find pricing and ordering information.

By Julie Baird
Copyright © 2008-2026 Generation Quilt Patterns, LLC
All Rights Reserved
Generations-quilt-patterns.com does not sell any personal information. (See Privacy Policy)