- Home
- Free Quilt Block Patterns
- Martha Washington Star Quilt Block
✂️ Join the Paper Piecing Revolution with the Martha Washington Star Quilt Block ⭐
Declare your independence from imperfect points! 🌟
This post contains affiliate links, for which I receive compensation.
The quilting revolution has begun! ⭐ Paper piecing the Martha Washington Star quilt block isn't just another technique—it's a declaration of independence from the tyranny of imperfect points and mismatched seams.
This tutorial demonstrates why so many quilters have converted to this revolutionary approach for star patterns.
With precise points guaranteed and significantly less trimming required, you'll soon understand why even the most traditional stitchers eventually join the paper piecing movement for blocks like the Martha Washington Star! 🪡
🧭 Revolutionary Resources 🌟
Navigate through our arsenal of revolutionary techniques and resources designed to transform your Martha Washington Star from ordinary to extraordinary!
- A cutting chart in five sizes, with downloads of the chart and block design
- Paper piecing patterns to download and print in all sizes
📋 General Instructions
⚡ PRINTING TIP: Need help printing this tutorial? Click here for easy instructions!
Several abbreviations are used on this page. They are:
- SA - seam allowance
- RST - right sides together
- FG - Flying Geese
- 3P-QSTs - 3-patch Quarter Square Triangle pairs
- QST - Quarter Square Triangle
- HST - Half Square Triangle
A 1/4" SA is used in this tutorial.
📥 Download and print paper piecing pattern
To download the pattern, use the most current version of Adobe.
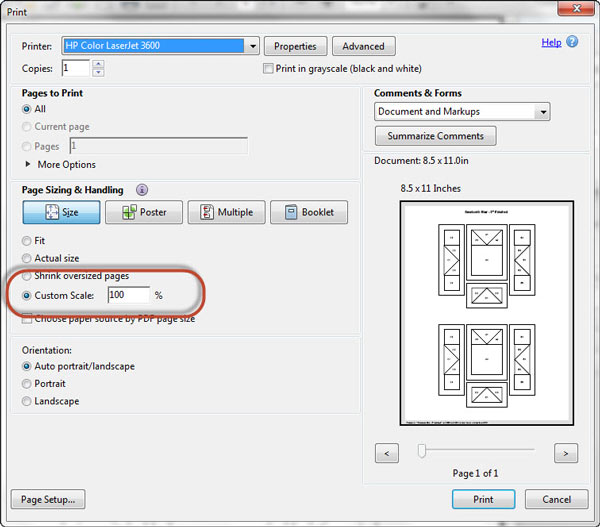
For accurate results, on Adobe's Print Menu page, under 'Page Size and Handling' set 'Custom Scale' to 100%. Then print.
Click here to see what it looks like on the Print Menu page.
Find your finished block size from the chart below. Print the corresponding number of pages for a total of two 3-Patch QST pairs and four Flying Geese for each block you want to make.
| Finished Block Size | 3 Patch QST Download Links Print 1 copy | Flying Geese | |
|---|---|---|---|
| # of pages to print | PDF Download Links | ||
| 4" | 1" x 2" | 1 | 1" x 2" |
| 6" | 1½" x 3" | 1 | 1½" x 3" |
| 8" | 2" x 4" | 1 | 2" x 4" |
| 10" | 2½" x 5" | 2 | 2½" x 5" |
| 12" | 3" x 6" | 2 | 3" x 6" |
After printing, use the 1" square graphic on the printed page(s) to check that your patterns printed at the correct size.
Then cut out the required number of patterns from your copies. A rough cut is good enough—an 1/8"-1/4"-ish away from the outside dashed square.
Not sure which paper to use?

Take a look at my review of several of the most popular brands available to us quilters on the market.
You want a super-easy paper to tear away—less stress on the stitches.
✂️ Cutting patches for your Martha Washington Star block
Sample Block Size: 10" finished / 10½" unfinished
Grid: 4x4
Design Type: Pinwheel | Star | Paper piecing | Unequal 9 Patch, Large Center
Attribution: The Farmer's Wife, 1926
AKA:
- Dewey’s Victory (Clara Stone)
- Martha Washington Design (The Farmer’s Wife)
- Martha Washington (The Farmer’s Wife)
- Octagonal Star (Carlie Sexton)
- Queen Victoria (Evangeline’s)
Barbara Brackman ID: 2147
Please label all your patches. We use their numbers throughout this tutorial.
 | Cutting Chart for a~ Paper Piecing ~ | ||||||||||
|---|---|---|---|---|---|---|---|---|---|---|---|
| Patch | Fabric | Qty | Finished Block Size | Sub Cut | |||||||
| 4'' | 6'' | 8'' | 10'' | 12'' | |||||||
| Goose1 | Bac | 1 | 3⅝'' x 3⅝'' | 4⅝'' x 4⅝'' | 5⅝'' x 5⅝'' | 6⅝'' x 6⅝'' | 7⅝'' x 7⅝'' | | |||
| Sky2 | A | 4 | 2⅜'' x 2⅜'' | 2⅞'' x 2⅞'' | 3⅜'' x 3⅜'' | 3⅞'' x 3⅞'' | 4⅜'' x 4⅜'' | | |||
| 1, 4 | A | 1 | 2¾'' x 2¾'' | 3¼'' x 3¼'' | 3¾'' x 3¾'' | 4¼'' x 4¼'' | 4¾'' x 4¾'' | | |||
| 2, 5 | Bac | 1 | 2¾'' x 2¾'' | 3¼'' x 3¼'' | 3¾'' x 3¾'' | 4¼'' x 4¼'' | 4¾'' x 4¾'' | | |||
| 3, 6 | Bac | 2 | 2⅜'' x 2⅜'' | 2⅞'' x 2⅞'' | 3⅜'' x 3⅜'' | 3⅞'' x 3⅞'' | 4⅜'' x 4⅜'' | | |||
| 7 | Bac | 4 | 1½'' x 1½'' | 2'' x 2'' | 2½'' x 2½'' | 3'' x 3'' | 3½'' x 3½'' | --- | |||
| Unfinished Block Size | 4½'' | 6½'' | 8½'' | 10½'' | 12½'' | ||||||
| Grid Size | 1'' | 1½'' | 2'' | 2½'' | 3'' | ||||||
✂️✂️ Subcutting for paper piecing
These are the units after subcutting.
- #1 & #4, #2 & #5, and Goose,1 are cut twice on the diagonal to form QST shapes.
- #3 & #6, and Sky.1 are cut only once on the diagonal to create HST shapes.

🪡 Assemble the units for your Martha Washington Star block
The first patch of both paper pieced units—the pairs of 3-patch QST and the FG—are held in position on the unprinted side of the pattern with the tiniest bit of Elmer's Washable Glue Stick®.
"A tiny dab will do'ya," as the saying goes. This only needs to hold long enough to stitch on the second patch,
 Those dashed guidelines make placing these patches quick, easy, and accurate. Love that!
We need to make a few adjustments to our sewing machine settings to paper piece.
- Reduce your stitch length to 16–20 stitches per inch (1.3-1.6 mm). This perforates the paper and stabilizes the seam when you remove the pattern. [Learn more about stitch length here.]
- Reduce your machine's speed or just plain slow down. Sew only as fast as you can AND stay on the solid stitching line.
- Install an open toe appliqué foot (sometimes called an 'embroidery' or 'satin stitch' foot) if you have one (it makes it easier to see where you're stitching).
- Use a larger needle (90/14) IF you have problems removing the pattern. Personally, I use an 80/12 Microtex Sharp for paper piecing without any issues.
Pressing
✅ KEY TECHNIQUE: PRESSING PAPER PIECED PATCHES
To streamline the instructions, it is assumed that you ALWAYS press with your iron after adding each patch.
First press it in the closed position as it came off your sewing machine. This sets the seam, melding the fibers of the threads into the fabric. Then press the patch open. In paper piecing, all SAs are pressed toward the last patch added.
Double check ✅✅to make sure you haven't inadvertently pressed a tuck in along the SA. Once you've sewn across both ends of a seam, it's virtually impossible to get that tuck out.
If we're pressing to simply keep something out of the way, you'll be instructed specifically to fingerpress.
Center (3P-QSTs)
Make 2
 Unlike the FG pattern, the 3P-QSTs pattern is the mirror image from the pattern to the fabric side.
A note from Julie...
Why '3P-QSTs' instead of 'half pinwheel'?
At this point, they are a 'pair of 3-patch quarter square triangles'. I feel it's simply a more descriptive name.
With RST, match the edges of #2 with that of #1 (to avoid having to trim—gotta love those dashed placement lines!)
💡 Pro Tip: Every time you add a lighter patch to a darker one, nudge the lighter patch over a few threads past the edge of the darker one (red arrow). This prevents the darker fabric from shadowing through on your finished quilt top.
Once this seam is sewn and pressed open, the other side of the #2 patch (blue arrow) doesn't cover any darker fabric, so we don't bother to nudge it over.
 There's no need to nudge the other side of the #2 triangle (blue arrow). The patch that covers it is also cut from the light background fabric.
Sew this seam.
✅ KEY TECHNIQUE: ALL PAPER PIECED SEAMS
ALL the seams in paper piecing are stitched by starting a generous 1/4" before the solid line between patches and ending a generous 1/4" after that line ends. The next line of stitches that cross this seam secures the ends—just like in traditional piecing.
If the seam begins/ends at the outside edge of the block, start and stop your stitches past the outside dashed line surrounding the block.
Use this technique every time you sew a seam.
The only time I might use backstitches is at the outside edges, but never inside the block or unit. I find the shorter stitch length with good thread tension holds my stitches quite well.

Because we matched the edges of #1 and #2 with the blue arrow, there's no need to trim away excess fabric. ('Love being able to skip a skip!)
Match the long bias edge of #3 with #1/#2.
See those thread tails right under the backwards 3? Trim those off before pressing #3 into place after stitching. It's a total pain to have to go back and clip all the threads after the block...or quilt top is finished. (ask me how I know 🙈)
 We nudge #3 a few threads over because half the patch covers the much darker fabric.
Stitch the seam.
To trim away the excess from #3 and prepare for adding #4, there are two options:
- Use scissors and trim away enough of the long edge of #3 until it's even with the dashed placement line, or
- Use the edge of your ruler to crease and fold the pattern back on itself 0n the solid line between #3 and #4. Then place the 1/4" mark on your ruler directly over the fold and trim away the extra with your rotary cutter.
Both methods work nicely. Choose the way that works best for you.
After trimming, match the long edge of #4 with the fresh trimmed edge or dashed placement line (these should be the same). Stitch from the pattern side.

Trim away the extra fabric from #4, using your chosen trimming technique again.
Repeat for the other exposed side of #4.
 The 1/4" mark on the ruler is directly over the folded edge of the pattern, ready to trim down to a perfect 1/4" SA
Position #5 using the dashed placement lines surrounding #4 (to again avoid having to trim) and stitch,

Add #6 just as you did #3.

Make a second 3P-QSTs pair.
Set these sewn units aside for now.
Flying Geese (FG)
Make 4
With RST, align the long bias edge of a Sky with one side of the Goose.
It doesn't matter which side you start on, though I recommend being consistent if you are making a bunch of these. It's more efficient to chain piece the FGs that way. These seams are both 'chain-piece-able' because they run from one outside edge to another outside edge of our FGs.

Sew the generous seam starting and ending past the outside dashed edges of the FG.
For the most accurate FG to piece with, be sure that you're stitching exactly on the lines where they touch the outside solid rectangle.
Repeat for the other side.

Trimming to size
Give all your paper pieced units a good pressing.
Double check✅✅ there are no tucks. Fix anything that needs fixing.
Then position your paper pieced patches paper side up on the cutting mat.
Match the 1/4" marks on your ruler with one side of the solid square. (blue arrow)
Trim away the excess.
Repeat for every side of every FG and 3-PQST

A FG before and after trimming. The top point and diagonal seams are exactly where they should be. All for the price of sewing on a line.
 and trimmed (right).") These Flying Geese sure clean up nice, don't they!
These Flying Geese sure clean up nice, don't they!A 3P-QST unit looks like this after trimming. Awkward-looking, but correct.
Again, points and seams are accurately positioned.
 and after trimming (right)")
💡Pro Tip: If you do a lot of paper piecing, consider investing in a self-healing ROTATING cutting mat.
While it's not a must-have tool, I've found it to be a game-changer for trimming paper-pieced units. Unlike simply turning a regular mat, the rotating base keeps your pieces in place as you trim each side. I started with a Olfa 12" mat, but later upgraded to a 17" version for more workspace—both sizes work great, but the larger one lets you handle bigger/more units easily.
Yes, rotating mats are a pricey investment, which makes them perfect for your gift wish list (hello, birthday, or Christmas present!).
While you can absolutely paper piece successfully without one, I've found that the precision and convenience make it worth every penny if you frequently work with paper-pieced patterns. It's one of those tools that once you try it, you'll wonder how you ever managed without it!
It's time to remove all the paper
We cut patches so that all the outside edges are on the straight of grain—just like they'd be if you stitched with traditional methods.
The paper piecing's finished
Return your sewing machine to your everyday settings.
We stitch the remainder of the block with traditional techniques.
- Install your favorite quarter inch presser foot.
- Adjust the needle position if needed for an accurate 1/4" SA
- Return to your normal piecing stitch length.
🧩 Assemble units into the Martha Washington Star design
Time to turn those 3P-QSTs into a pinwheel.
Match the edges that are half dark fabric, Pin as needed to hold the edges in position. Personally, I like to add a pin through the match point in the center for insurance. For a refresher on 'Pinning for Perfect Points', click here.

Arrange your stitched and cut patches so that the #7s are in the four corners, the pinwheel is in the center and the FG are in the middle on the sides, pointing in toward the center,

Sew the units in the rows together.
Press these seams away from the FGs.
Stitch the rows together, pinning as needed to hold everything in position.

One last time at the ironing board. It can be a bit lumpy where the points of a pinwheel and FG meet. Use my 'top-secret' 🕵️ pressing technique to help flatten your block. No expensive clapper to buy...simply use something already in your studio.
Sound the liberty bell! 🔔 Our Martha Washington Star block is victorious!

Take a look at the strategic seam work from the back of our Martha Washington Star quilt block.
 The last two seams are pressed away from the center row.
📌 With Liberty, Justice, and Perfect Points for All!
The founding Quilters would approve of sharing this revolutionary technique!
Pin this Martha Washington Star quilt block tutorial to spread the word that paper piecing has freed us from the oppression of imperfect points! 🦅

More playful and dynamic pinwheel quilt blocks!
Your pinwheel-inspired quilt block is done. But you're not!
Our pinwheel quilt blocks are a delightful blend of playful interlocking patterns and vivid, eye-catching color. The interlocking patterns dazzle your eyes and inspire your creativity, while our step-by-step instruction ensures that you can create these stunning blocks with ease.
🔭 Looking for something truly stellar?
You've finished your star quilt block, and you're ready for more!
Browse our collection of 70 stellar star quilt block patterns. All have instructions and cutting charts in multiple sizes. If templates or paper piecing is used in the tutorial, there's a free download for you of those materials.

Eeny. Meenie. Miney. Moe.
Which star quilt block will you sew?
For a star-studded quilting experience, choose from 100+ bedazzling star quilt patterns—for beginners and beyond—click here.
For even MORE blocks to make… 🧩🎨

...visit our Free Quilt Block Pattern Library, with over 260+ blocks to choose from in multiple sizes.
Free downloads are included in all sizes for any blocks require paper piecing patterns or templates.
- Home
- Free Quilt Block Patterns
- Martha Washington Star Quilt Block


Nifty Notions


By Julie Baird
Copyright © 2008-2026 Generation Quilt Patterns, LLC
All Rights Reserved
Generations-quilt-patterns.com does not sell any personal information. (See Privacy Policy)