- Home
- Free Quilt Block Patterns
- Game Cocks Quilt Block
🐓 Game Cocks Quilt Block: Strut Your Stuff in Stitches! 🧵
Cock-a-doodle-do your way to quilting success!
This post contains affiliate links, for which I receive compensation.
Ready to ruffle some feathers in the quilting world? 🐓💥
The Game Cocks quilt block is here to add some plucky pizzazz to your next project! 🎨✨ This feisty fowl-inspired design combines traditional charm with a dash of sass, perfect for quilters looking to strut their stuff. 🦚🧵
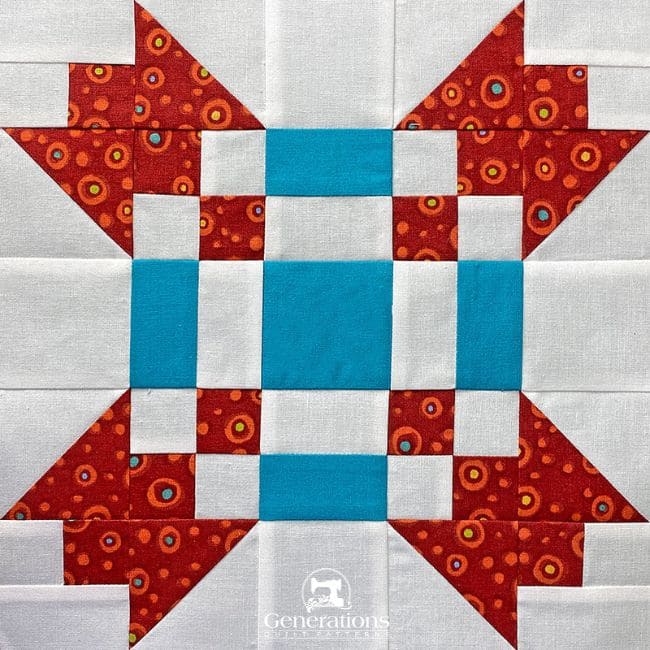
You'll be piecing together this eye-catching block faster than you can say "winner, winner, chicken dinner!"
🧭Quick Navigation🔍
Use these handy links to strut straight to the section you need. Whether you're an early bird or a night owl, we've got you covered!:
- A cutting chart in five sizes, with downloads of the chart and block design
Cut. Sew. Press. For a cock-a-doodle-dazzling masterpiece!!
📋General Instructions
Several abbreviations are used on this page. They are:
- SA - seam allowance
- RST - right sides together
- HST - Half Square Triangle
A 1/4" SA is used in this tutorial.
Highlighted in yellow, pressing instructions are easy to spot.
After sewing, with the piece still folded, use your iron to flatten the seam as sewn. This sets the seam, melding the thread into fabric.
Then press the SA to the dark unless otherwise noted.
New quilt fabrics to tickle your fancy...
Click the images below to see the full collection. We share any commercial and/or free patterns that showcase them, too. (For inspiration, of course!)
✂️ Cutting patches for a Game Cocks quilt block
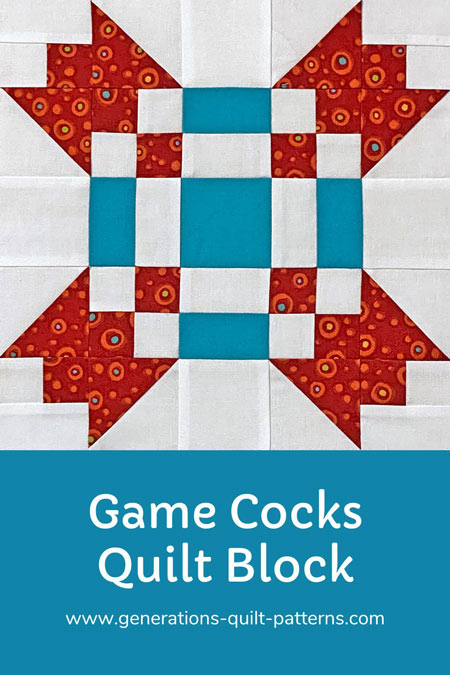
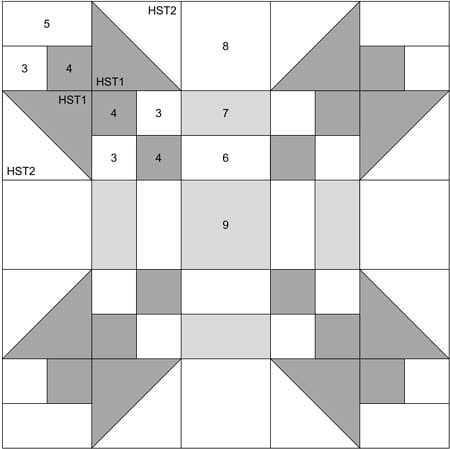 Game Cocks design
Sample Block Size: 10" finished / 10½" unfinished
Grid: 10x10
Attribution: Nancy Cabot
Barbara Brackman: #1867
Design Type: Star | Unequal 9 Patch Small Center | Twenty-Five Squares
Please label all your patches. We refer to them by number throughout this tutorial.
 | Cutting Chart for a~ Traditional Piecing ~ | ||||||
|---|---|---|---|---|---|---|---|
| Patch | Fabric | Qty | Finished Block Size | ||||
| 5'' | 7½'' | 10'' | 15'' | 20'' | |||
| HST1 | Dark | 1 | 4¼'' x 4¼'' | 5¼'' x 5¼'' | 6¼'' x 6¼'' | 8¼'' x 8¼'' | 10¼'' x 10¼'' |
| HST2 | Bac | 1 | 4¼'' x 4¼'' | 5¼'' x 5¼'' | 6¼'' x 6¼'' | 8¼'' x 8¼'' | 10¼'' x 10¼'' |
| 3 | Bac | 1 | 1'' x 13'' | 1¼'' x 16'' | 1½'' x 19'' | 2'' x 25'' | 2½'' x 31'' |
| 4 | Dark | 1 | 1'' x 13'' | 1¼'' x 16'' | 1½'' x 19'' | 2'' x 25'' | 2½'' x 31'' |
| 5 | Bac | 4 | 1'' x 1½'' | 1¼'' x 2'' | 1½'' x 2½'' | 2'' x 3½'' | 2½'' x 4½'' |
| 6 | Bac | 1 | 1'' x 7'' | 1¼'' x 9'' | 1½'' x 11'' | 2'' x 15'' | 2½'' x 19'' |
| 7 | Med | 1 | 1'' x 7'' | 1¼'' x 9'' | 1½'' x 11'' | 2'' x 15'' | 2½'' x 19'' |
| 8 | Bac | 1 | 1½'' x 7'' | 2'' x 9'' | 2½'' x 11'' | 3½'' x 15'' | 4½'' x 19'' |
| 9 | Med | 1 | 1½'' x 1½'' | 2'' x 2'' | 2½'' x 2½'' | 3½'' x 3½'' | 4½'' x 4½'' |
| Unfinished Block Size | 5½'' | 8'' | 10½'' | 15½'' | 20½'' | ||
| Grid Size | ½" | ¾'' | 1'' | 1½'' | 2'' | ||
These are the cut patches for our sample block.
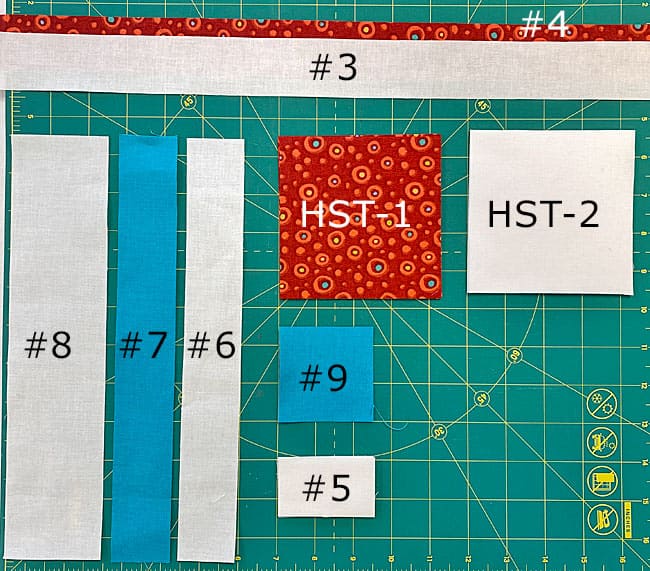 Your eyes 👀 are not deceiving you, #3 and #4 end outside the picture, they-re longer than the mat.
Now that our patches are cut, let's start piecing this plucky block.
🧵Create your patches for a Game Cocks quilt block
4-Patch Units
Make 4
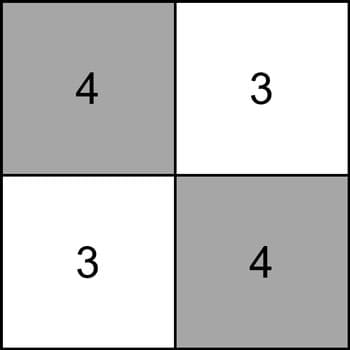 4-Patch
With RST, sew #3 to #4 along the long edge.
Press.
Use the chart below to check the width of your strip set.
#3/#4 StripSet Widths | |||
|---|---|---|---|
| Finished Block Size | After Stitching | SubCut Width | Unit Dimensions |
| 5" | 1½" | 1" | 1½" x 1½" |
| 7½'' | 2" | 1¼" | 2" x 2" |
| 10" | 2½" | 1½" | 2½" x 2½" |
| 15" | 3½" | 2" | 3½" x 3½" |
| 20" | 4½" | 2½" | 4½" x 4½" |
Straighten one short edge of #3/#4 as shown below.
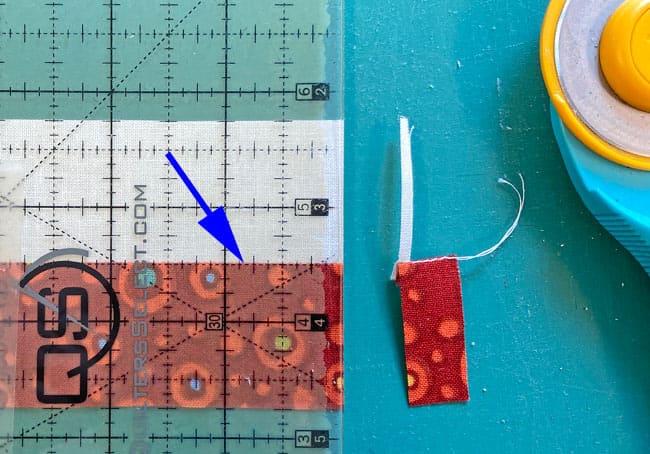 Line up a straight line on your ruler with the seam line and trim away a bit leaving a straight edge.
Cut the strip set into 12 units using the Subcut Width measurement.
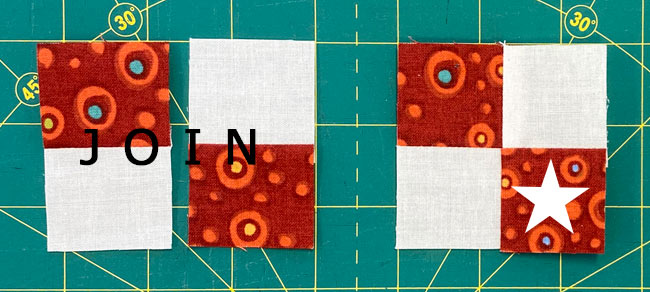
Group 8 into 4 pairs, alternating the light and dark patches (below left).
With RST, sew into a 4-patch. (below right).
Press. One of the dark #4 patches should have both SAs pressed into it. (white star)
Half Square Triangles (HST)
Make 8
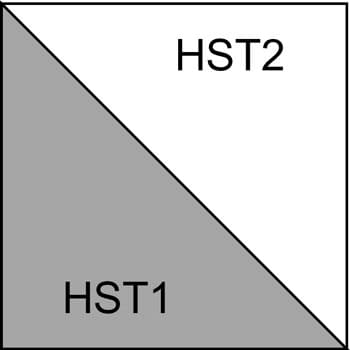 HST unit
We're using the 8-at-a-time method with oversized squares. Let's turn these squares into triangle magic!
Mark a line between each pair of diagonal corners on the lighter square.
Stitch 1/4" from both sides of both lines.
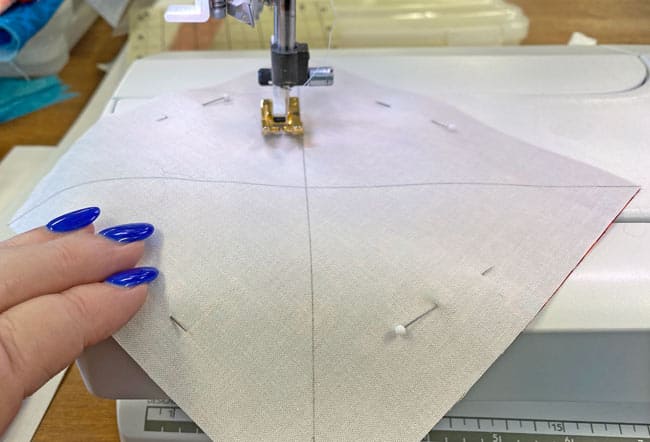
After a quick press, lay the squares marked side up on your cutting mat.
Cut the square into 4 smaller squares. Using the chart, find your Finished Block Size and its Center measurement.
HST Dimensions | ||
|---|---|---|
| Finished Block Size | Center Measurement | Trim HST to… |
| 5" | 2⅛" | 1½" x 1½" |
| 7½'' | 2⅝" | 2" x 2" |
| 10" | 3⅛" | 2½" x 2½" |
| 15" | 4⅛" | 3½" x 3½" |
| 20" | 5⅛" | 4½" x 4½" |
For our 10" sample, it's 3⅛".
Cut your sewn HST squares in half, top to bottom (below left) and left to right (below right).
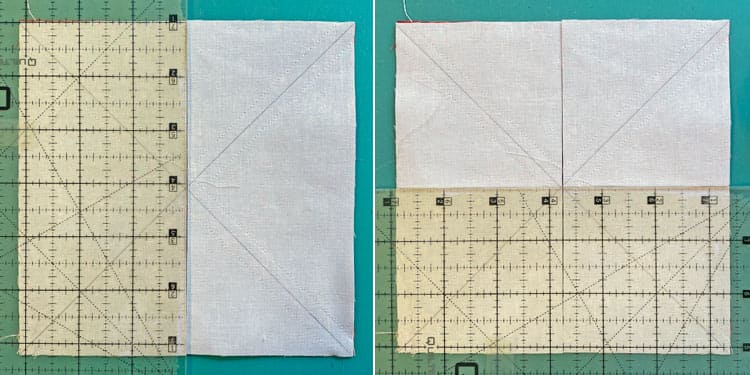 Position the Center measurement on your ruler with the edge of the block to cut through the center.
Cut each square in half on the marked diagonal line to create the 8 HSTs,
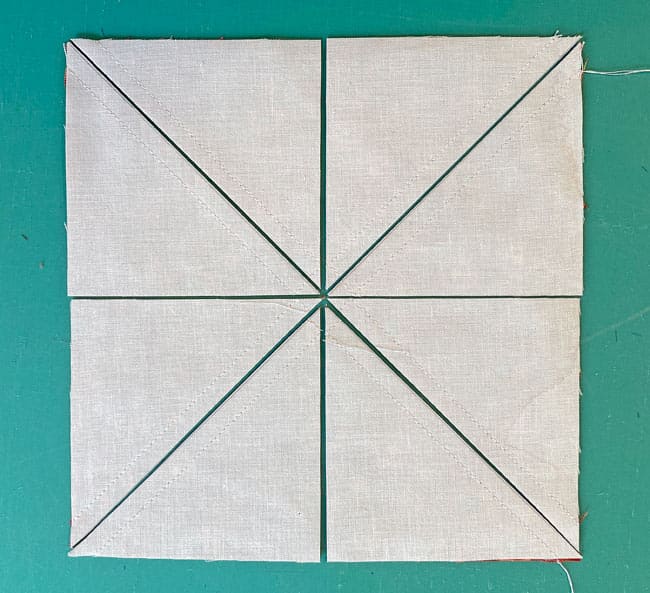
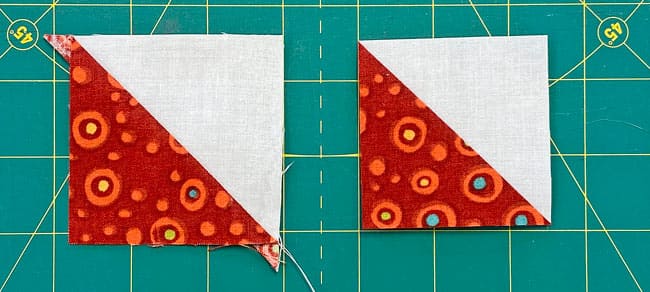
Find the 'HST Trim to...' measurement and trim each HST to the exact size. For our 10" sample, the HSTs get trimmed to 2½" x 2½"
Repeat for all 8.
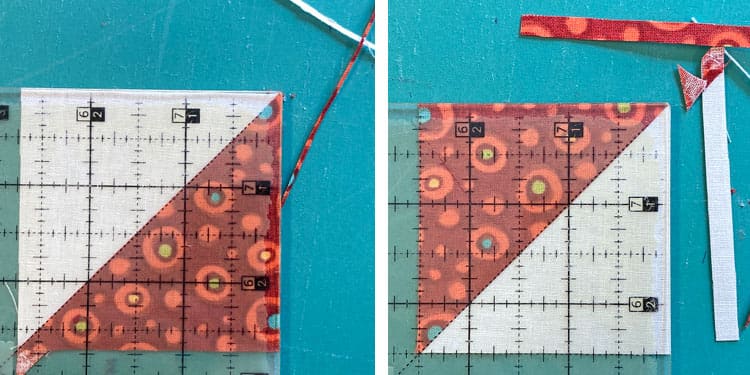
Our HSTs sure clean up nice, don't, they?
Corners
Make 2 each
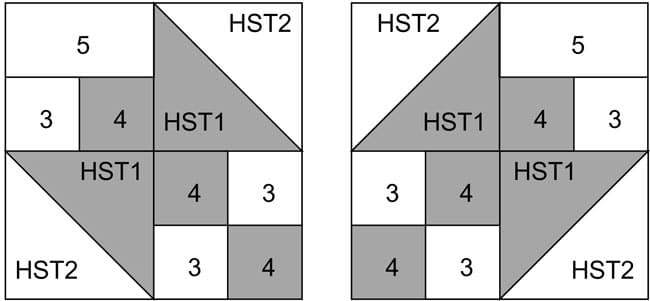 Mirror-image Corner units
We're sewing two mirror-image versions of the Corner so that the #5 patch is on the top and bottom sided of our finished Game Cocks block.
Arrange the #3, #4 and #5 patches into two pairs as shown below (top).
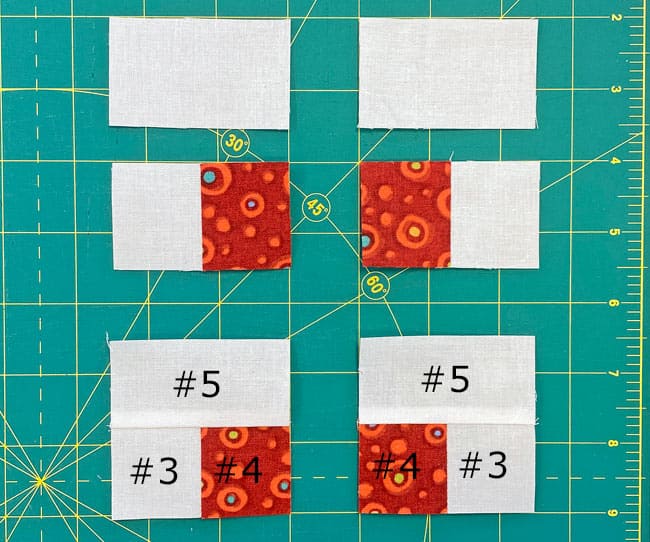
With RST, stitch the #3/#4 to #5, pressing the SA toward #5. (above, bottom)
To make the Corner units, lay out your patches, again in two pairs of like Corners—they almost look like little butterflies, don't they?
In the 4-patch, place the #4 square with both seam allowances pressed toward it on the outside edge. It's marked with a star.
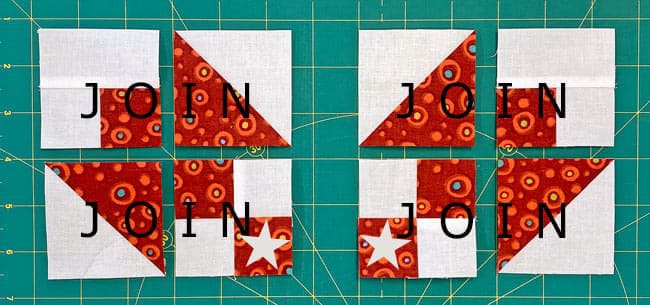
Sew the units into rows, pressing the SA towards the HSTs.
After sewing the rows together, these last seams are pressed toward the #5 side of the block.
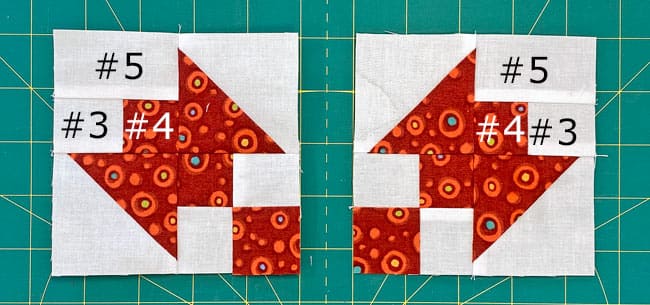
Check your work. Use this chart to verify your Corner unit size. 📏
After sewing, each Corner measures... | |
|---|---|
| Finished Block Size | Edge-to-edge Measurement |
| 5" | 2½" x 2½" |
| 7½'' | 3½" x 3½" |
| 10" | 4½" x 4½" |
| 15" | 6½" x 6½" |
| 20" | 8½" x 8½" |
Sides
Make 4
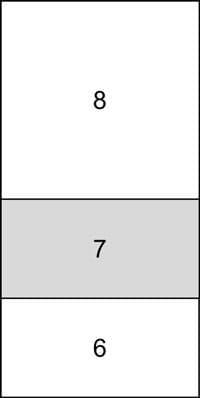 Side unit
With RST, sew #6 to #7 and then to #8. Pressing is easiest if you do it after adding each strip.
Use this chart to verify the width of your #6/#7/#8 strip set.
#6/#7/#8 StripSet Widths | |||
|---|---|---|---|
| Finished Block Size | Stripset Width after stitching | SubCut Width | Dimensions |
| 5" | 2½" | 1½" | 1½" x 2½" |
| 7½'' | 3½" | 2" | 2" x 3½" |
| 10" | 4½" | 2½" | 2½" x 4½" |
| 15" | 6½" | 3½" | 3½" x 6½" |
| 20" | 8½" | 4½" | 4½" x 8½" |
Find the Subcut Width that corresponds to your Finished Block Size and cut the strip set into four equal pieces.
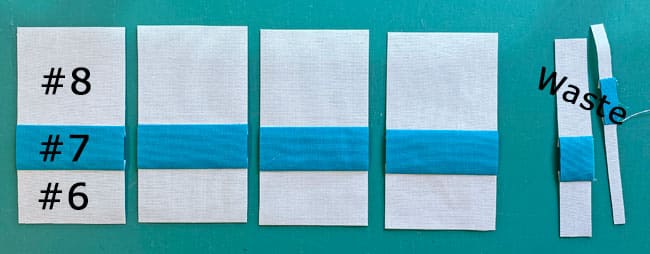 Note: You'll have a small piece of waste from straightening the short edge, and a larger leftover piece.
For our 10" sample block, the Side units measure 2½" x 4½".
🧩 Final Assembly of our Game Cocks
Lay out your patches to form the Game Cocks quilt block design with the background fabric all around the outside edges. The seams between the 4-patches and Sides will nest together.
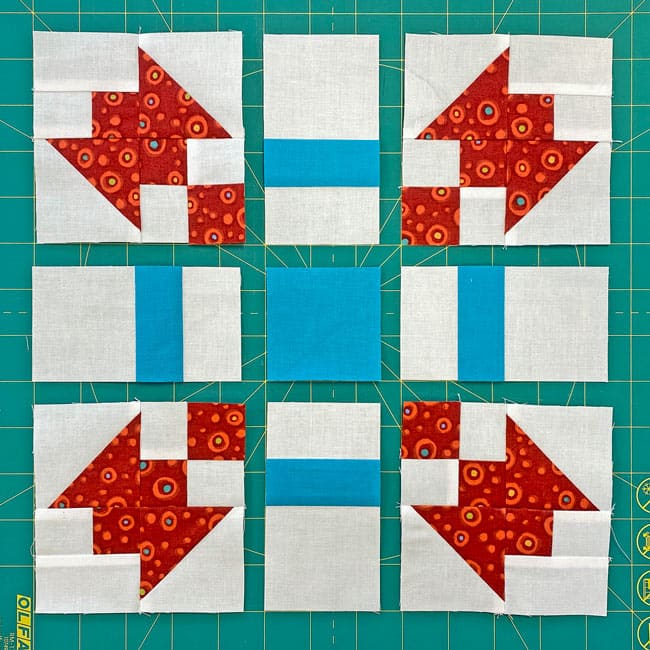
Sew the patches in each row together, matching seams where they meet. Use pins to help hold the patches together and edges even.
All these seams are pressed toward the Side units.
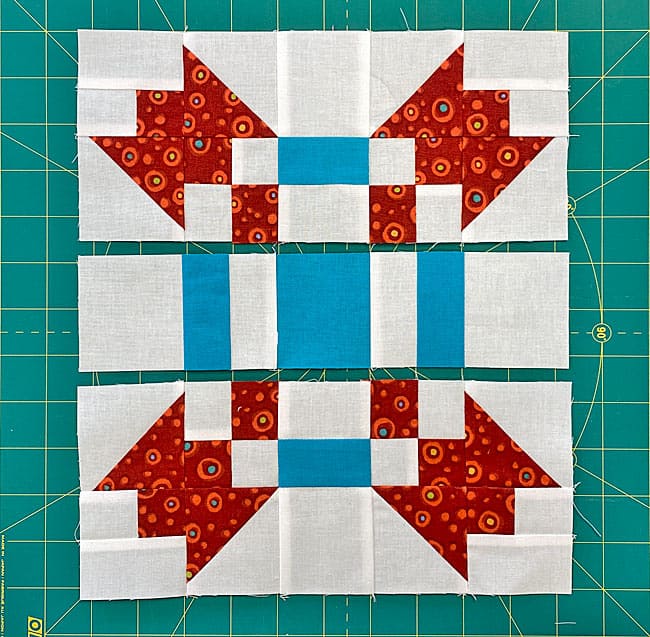
Stitch the rows together. These last two seams are pressed toward the center of the block.
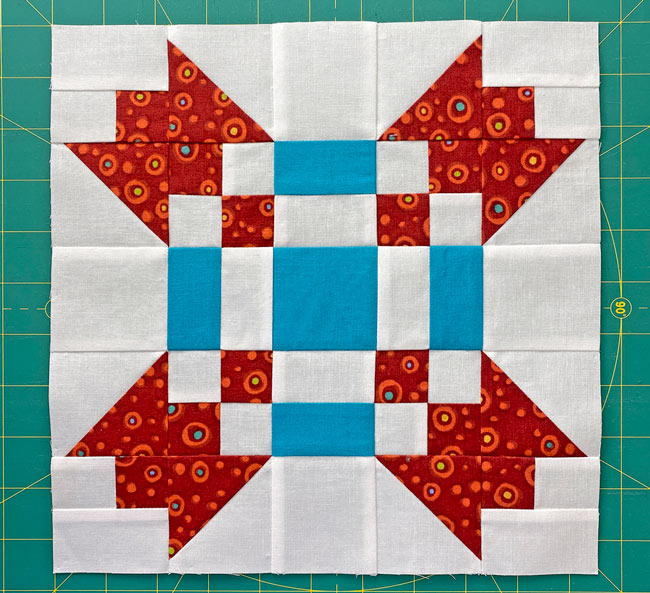
Our Game Cocks quilt block is ready to rule the roost! 🐓✨
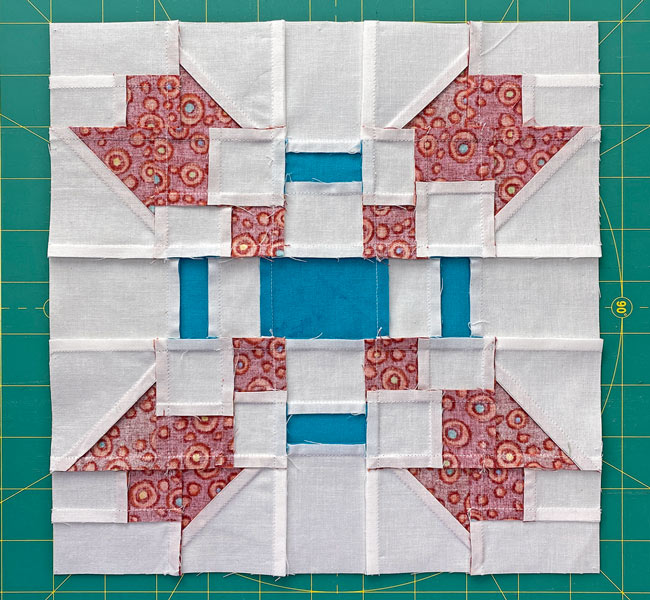
Have a look at the backside of your block to admire your precise pressing. It's a beauty from both sides!
You've cracked the code on the Game Cocks block! 🐓🧵
Now strut your stuff and let your quilting prowess shine!
Remember, whether you're stitching one block or a whole coop full, you're not just quilting – you're ruling the roost. So spread those creative wings and fly! 🦅✨
Until next time, may your seams be straight, and your bobbins be full.
📌Don't let this egg-cellent tutorial fly the coop! 🐔💨
Pin it now, and you'll always have this plucky pattern at your fingertips when inspiration strikes. 📌✨🧵
🔭 Looking for something truly stellar?
You've finished your star quilt block, and you're ready for more!
Browse our collection of 70 stellar star quilt block patterns. All have instructions and cutting charts in multiple sizes. If templates or paper piecing is used in the tutorial, there's a free download for you of those materials.

Eeny. Meenie. Miney. Moe.
Which star quilt block will you sew?
For a star-studded quilting experience, choose from 100+ bedazzling star quilt patterns—for beginners and beyond—click here.
For even MORE blocks to make… 🧩🎨

...visit our Free Quilt Block Pattern Library, with over 260+ blocks to choose from in multiple sizes.
Free downloads are included in all sizes for any blocks require paper piecing patterns or templates.
- Home
- Free Quilt Block Patterns
- Game Cocks Quilt Block
