- Home
- Free Quilt Block Patterns
- Fools Puzzle Quilt Block
Fool's Puzzle Quilt Block Tutorial: 4", 5", 6", 8", and 10" finished blocks
Where paper piecing does the heavy lifting
This post contains affiliate links, for which I receive compensation.
The Fool’s Puzzle quilt block puts flying geese on every edge, all pointing out. One time I stitched the Side units the traditional way, triangle to triangle. Once was enough.
Paper piecing tames the stretchy bias edges and keeps every point accurate. Sew on the line and you’re there.
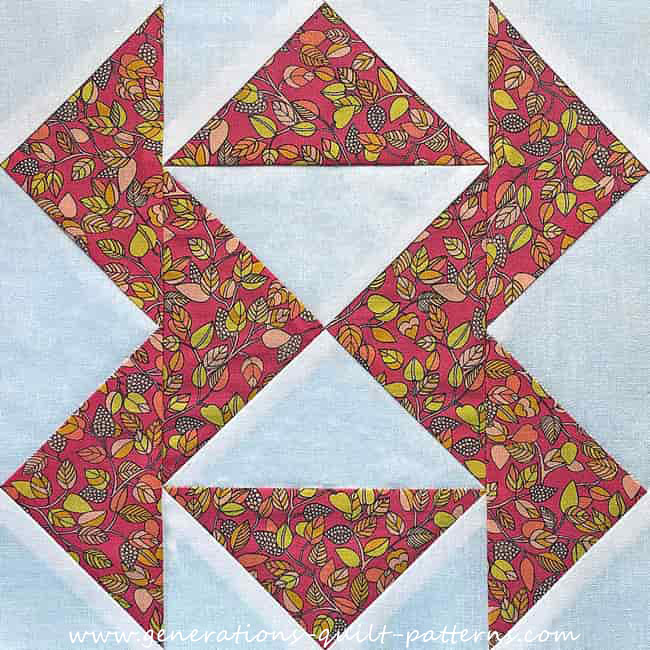
The center quarter square triangle is traditionally pieced with generously cut patches. The only fiddly part is trimming it to size. Lining up the ruler with the center, the diagonal, and the corners takes a hot minute, but it’s oh so worth the effort.
Accurate units go together without a fight, and I’ll walk you through every step.
🔍 Find Your Spot
Jump straight to what you need—especially handy if you're back for a different size or just need one section again.
📋General Instructions
Several abbreviations are used on this page. They are:
- SA - seam allowance
- RST - right sides together
- HST - Half Square Triangle
- QST - Quarter Square Triangle
- FG - Flying Geese Singles
Use a 1/4" seam allowance (SA) throughout this tutorial unless directed otherwise.
To press, first press the patches in the closed position as they came off your sewing machine. This sets the seam, melding the fibers of the threads into the fibers of the fabric.
Then press the SA to the dark unless otherwise noted.
Glue basting
In several of the photos in this tutorial, you might think those patches are defying gravity. Au contraire, mon ami. I've turned into a big fan of glue basting my paper pieced patches while researching the topic for the website.
Learn about the glue basting technique and where and when I've settled on using it in my quilting.
📥Download and print the paper piecing pattern

To download the pattern, use the most current version of Adobe.
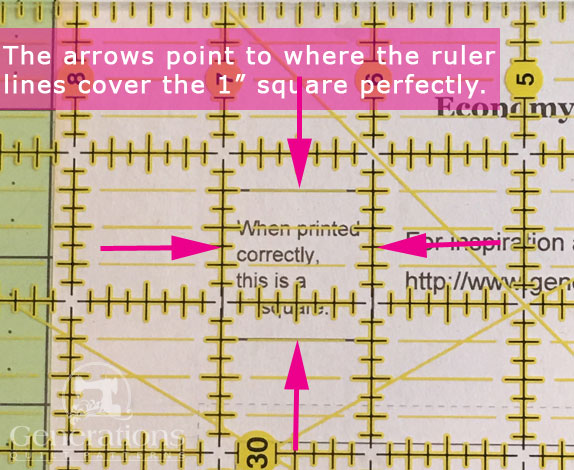
For accurate results, on Adobe's Print Menu page, under 'Page Size and Handling' set 'Custom Scale' to 100%. Then print.
Click here to see what it looks like on the Print Menu page.
Find your finished block size from the chart below. For each block you want to make, print the corresponding number of copies for a total of:
- 2 Side units
- 2 Flying Geese Singles
Download and Print Fool's Puzzle Units | ||
|---|---|---|
| Finished Block Size | FG-Singles | Side Units |
| 4'' | 1" x 2" | 1" x 4" |
| 5'' | 1¼" x 2½" | 1¼" x 5" |
| 6'' | 1½" x 3" | 1½" x 6" |
| 8'' | 2" x 4" | 2" x 8" |
| 10'' | 2½" x 5" | 2½" x 10" |
After printing, use the 1" square graphic on the printed page(s) to double check that your patterns printed at the correct size.
Then cut out the required number of patterns from your copies. A rough cut is good enough—an 1/8"-1/4"-ish away from the outside dashed square.
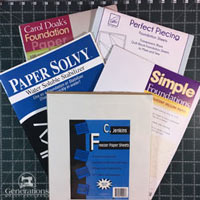
Not sure which paper to use?
Take a look at my review of several of the most popular brands available to us quilters on the market.
You want a super-easy-to-tear-away paper. It puts less stress on the stitches.
✂️ Cutting patches for a Fool's Puzzle quilt block
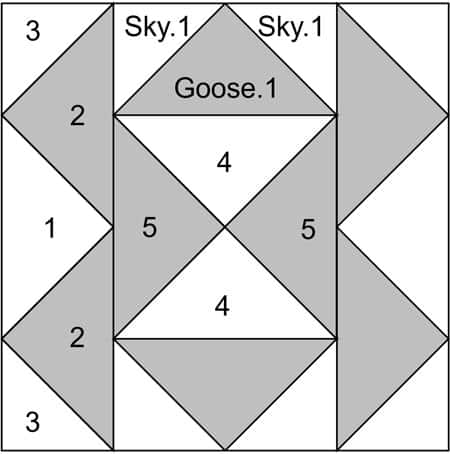
Sample Block Size: 8" finished / 8½" unfinished
Grid: 4x4
Attribution: Comfort
Design Type: Two color quilt blocks | Paper piecing
Please label all your patches. We use their numbers throughout this tutorial.

 | Cutting Chart for a~ Includes Paper Piecing ~ | |||||||
|---|---|---|---|---|---|---|---|---|
| Patch | Fabric | Qty | Finished Block Size | Sub Cut | ||||
| 4'' | 5'' | 6'' | 8'' | 10'' | ||||
| Goose.1, 2, 5 | A | 2 | 3¾'' x 3¾'' | 4¼'' x 4¼'' | 4¾'' x 4¾'' | 5¾'' x 5¾'' | 6¾'' x 6¾'' |  |
| Sky.1, 3 | Bac | 4 | 2⅜'' x 2⅜'' | 2⅝'' x 2⅝'' | 2⅞'' x 2⅞'' | 3⅜'' x 3⅜'' | 3⅞'' x 3⅞'' |  |
| 1, 4 | Bac | 1 | 3¾'' x 3¾'' | 4¼'' x 4¼'' | 4¾'' x 4¾'' | 5¾'' x 5¾'' | 6¾'' x 6¾'' | |
| Unfinished Block Size | 4½'' | 5½'' | 6½'' | 8½'' | 10½'' | na | ||
| Grid Size | 1'' | 1¼'' | 1½'' | 2'' | 2½'' | na | ||
Subcutting
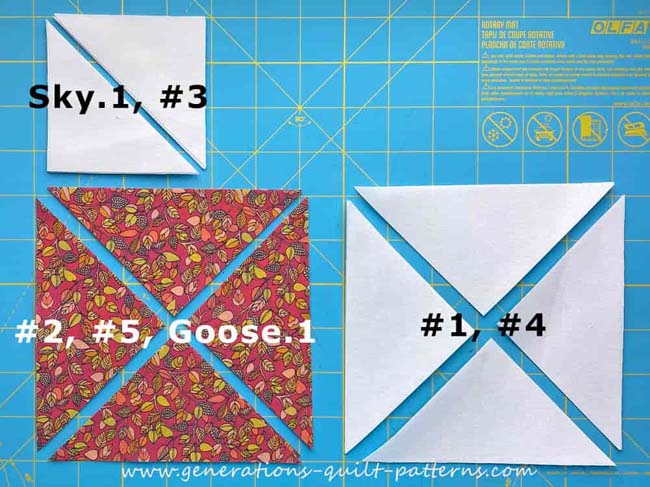
Goose.1, 1, 2, 4, and 5 are all subcut twice on the diagonal to make QSTs.
Sky.1 and 3 are cut once on the diagonal to make HSTs.
🧵Create the units for our Fool's Puzzle quilt block
We use paper piecing for most of this block, but that QST needs to be pieced with traditional methods.
Why? Because it's the best way to get'er done!
Let's get the paper piecing finished first.
Position the first patch on each unit
Grab your Elmer's Washable Glue Stick, we've got a few first patches to position.
Use a tiny dab on the unprinted side of the pattern to hold the Goose.1 and #1 patches in position. Those dashed guidelines make it fast and accurate.
On my 8" sample, the ends of the patches are starting to get wiggly. You might want to dab at all three points of the triangles to hold them in position. (I did.)
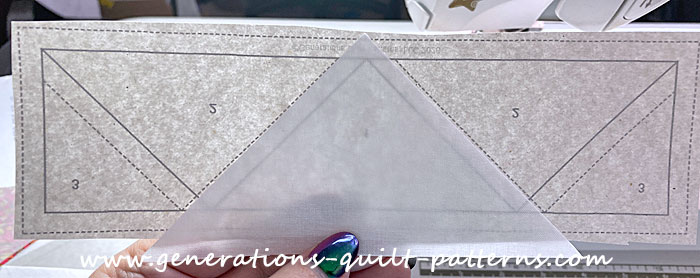 #1 is in position
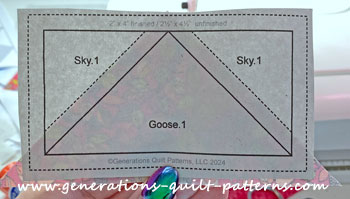 Goose.1 is in position
Repeat for all the Goose.1 and #1.
Set up your sewing machine for paper piecing
We need to make a few adjustments to our sewing machine settings to paper piece.
- Reduce your stitch length to 16–20 stitches per inch (1.3-1.6 mm). This perforates the paper and stabilizes the seam when you remove the pattern. [Learn more about stitch length here.]
- Reduce your machine's speed or just plain slow down. Sew only as fast as you can AND stay on the solid stitching line.
- Install an open toe appliqué foot (sometimes called an 'embroidery' or 'satin stitch' foot) if you have one (it makes it easier to see where you're stitching).
- Use a larger needle (90/14) IF you have problems removing the pattern. Personally, I use an 80/12 Microtex Sharp for paper piecing without any issues.
Flying Geese Singles
Make 2
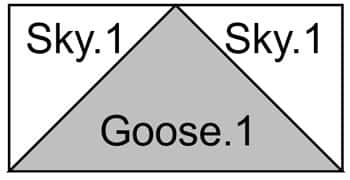
With RST, match a Sky.1 to one side of Goose.1 as shown below. Go ahead and line up all the edges. These patches are cut over-sized.
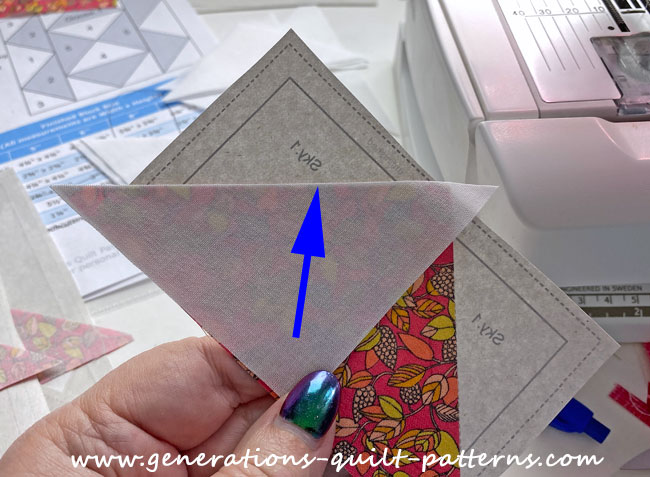 I've nudged the lighter Sky.1 over a couple threads to prevent any shadowing (blue arrow)
✅ KEY TECHNIQUE: Avoid dark fabrics shadowing through lighter ones
In our sample, the background fabric is much lighter than the dark.
To keep the darker print from shadowing through the light background in the finished block, nudge the edge of the lighter patch a couple of threads past that of the print. (arrow)
A simple technique to prevent a lot of angst later.
From the printed side of the pattern, stitch on the solid line, starting and ending past the outside dashed line that surrounds the FG.
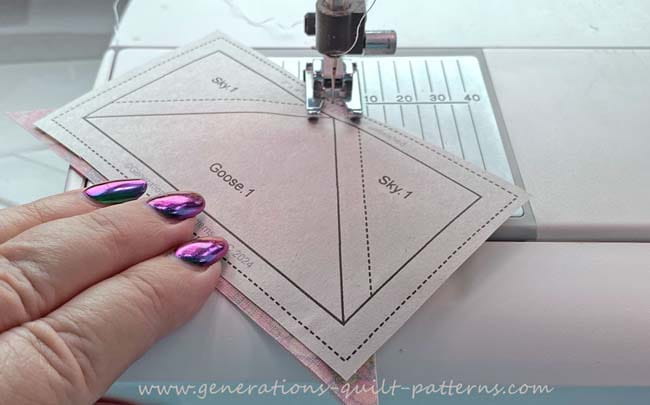
Press.
Repeat for the second Sky.1.
At this point our FG looks rather sloppy. Don't worry. We'll take are of that when we trim the Sides and FG in just a bit.
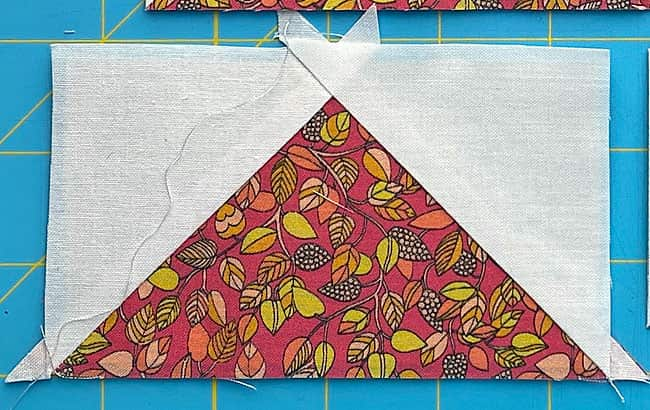 Unless it's driving me nuts, I don't trim away the thread tails on the outside edge. The trim we do a bit later takes care of it. Why waste a motion?
Stitch the second FG in the same manner. Set the stitched units aside for now.
Side Units
Make 2
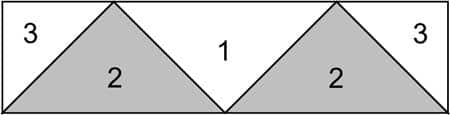
Curious what the traditional way looks like? The Buzzard’s Roost tutorial shows these Side units pieced triangle to triangle.
We're going to position this first #2 to minimize the need to trim the SA.
With RST, match the bias edge on a #2 with one side of the #1. The adjoining bias edge should be even with the dashed line that is in the #3 patch. As you look at the patch and through the pattern, the bias edge and dashed line make one continuous line. (arrow).
And yes, I did glue baste.
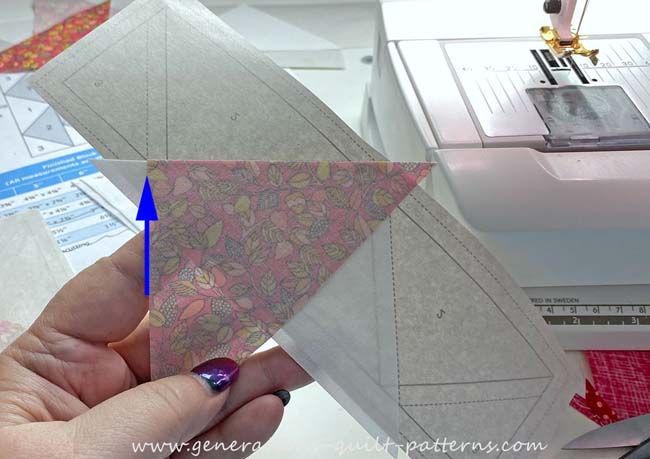
From the printed side of the pattern, sew the seam, again starting and stopping past the outside dashed line.
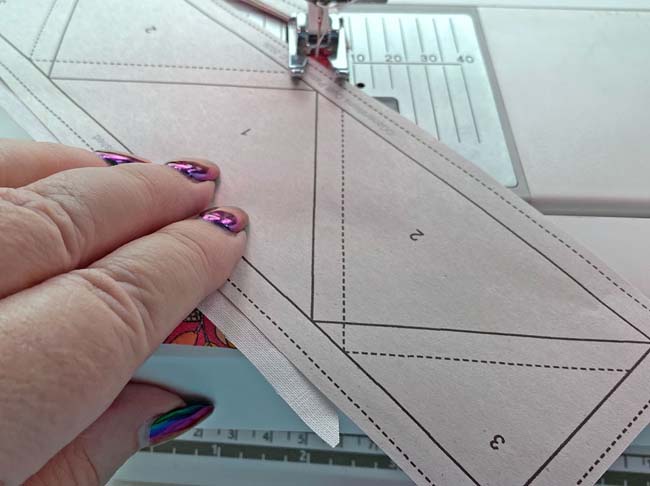
Press.
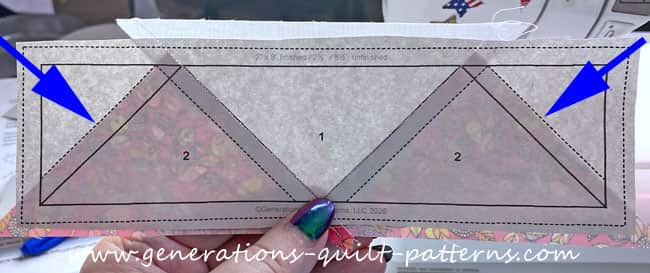
Repeat for the second #2 and press again.
If we were careful lining up the #2 before sewing, there's no need to trim away anything from the #2s (blue arrows).
If they extend a bit past the dashed guidelines, you can use a scissor to give the #2s a quick haircut!
With RST, match the long bias edge of #3 to that of #2. Since we're adding a light to a dark, check to make sure the darker one doesn't shadow through. Nudge the lighter #3 a few threads if it does.
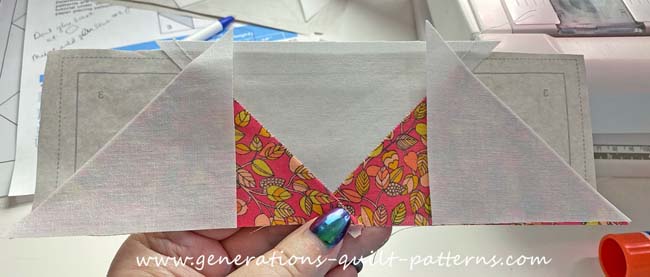
After sewing and pressing, this is what the untrimmed Side looks like.
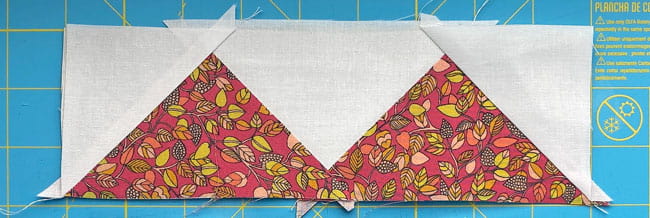
Trim the paper pieced units
At your cutting mat, pattern side up, match the 1/4" marks on your ruler with one side of the solid rectangle that surrounds each FG or Side unit. (blue arrow)
Trim away the excess fabric with your rotary cutter.
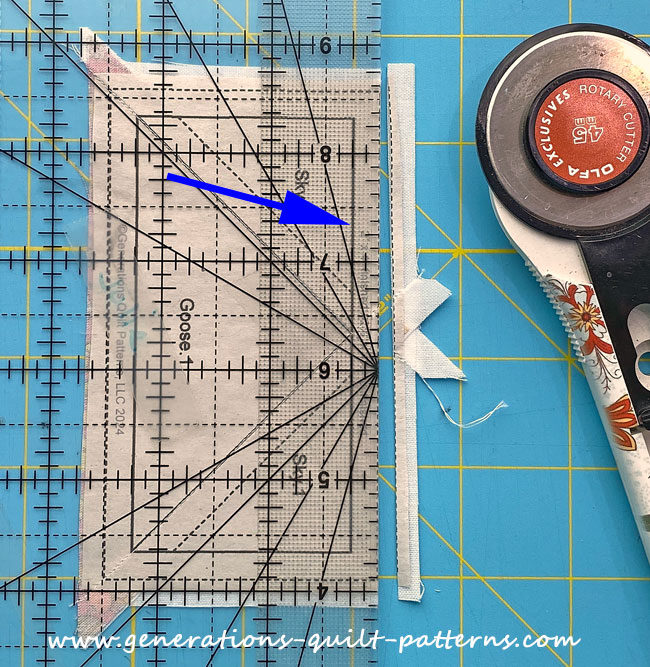
Rotate the unit a quarter turn and repeat the process. Turning and trimming until all four units are trimmed on all four sides.
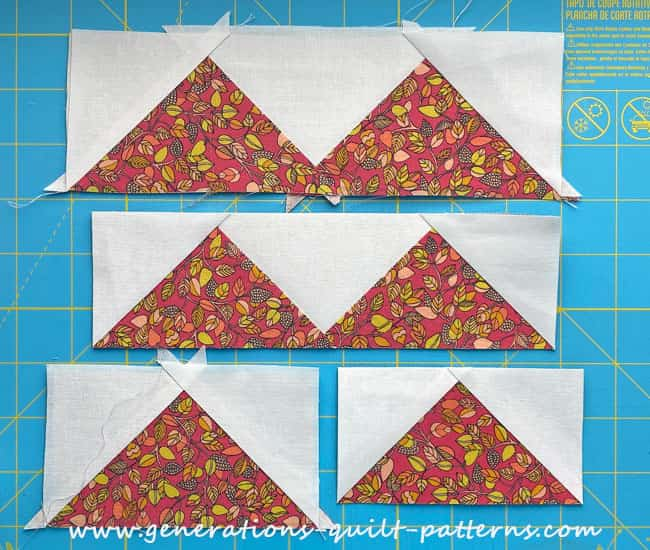 Untrimmed Side (top) and trimmed Side (center). The untrimmed FG (bottom left) and trimmed (bottom right)
At this point, there is no more use for the paper pattern. All the patches are cut so that we end up with a block with outside edges on the straight of grain.
Remove the paper pattern now.

The paper piecing is complete. From this point forward, return your stitch length to the one you regularly use for piecing and install your favorite 1/4" presser foot.
QST
Make 1
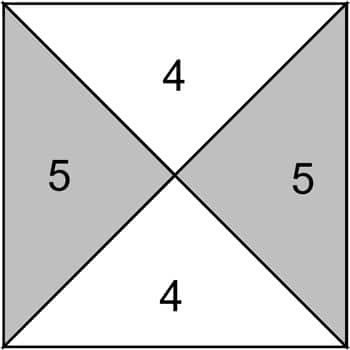
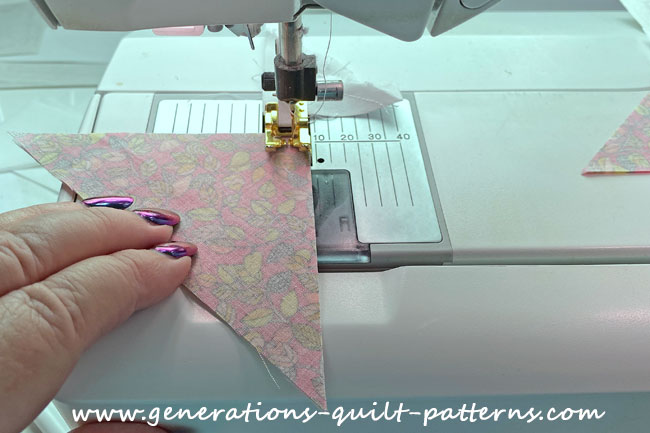
With RST, sew a #5 to a #4 along the bias edge as shown below. The darker #5 is on top.
Start your stitches from the 'flat' edge, there's less chance of your sewing machine chewing up the patches. Do not backstitch at the start.
Repeat for the second pair with the darker #5 on top.
Press.
At your cutting mat, lay your ruler with a line directly over the seam line to make sure that the long edge created by #4/#5 is straight. If it's not, give it a little bit of a trim—less than 1/8" if possible. The patches were cut oversized, but only take away what isn't straight.
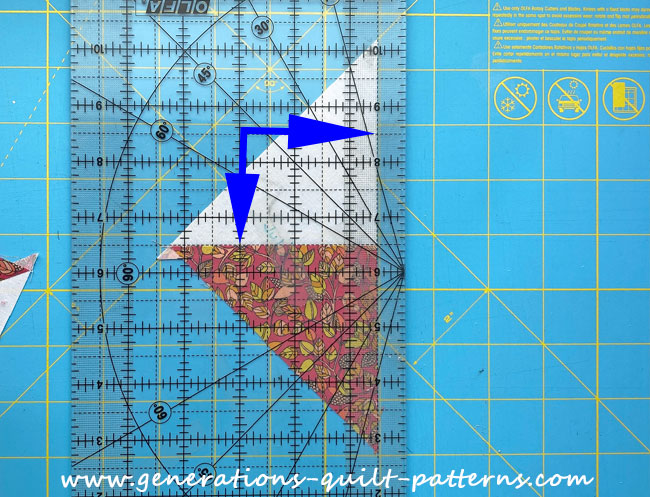 As it should be, the seam allowance is perpendicular to the long edge.
Why are we doing this?
Ideally, the seams in the center are at 90° angles to each other. If the long edge isn't perpendicular to the seam, there's a high chance that you'll end up with a bubble or a dip at the center of your completed QST. No quilter wants that.
This simple trick eliminates any problem.
After checking the accuracy of the angles in our pairs of #4/#5, this is the state of our QST.
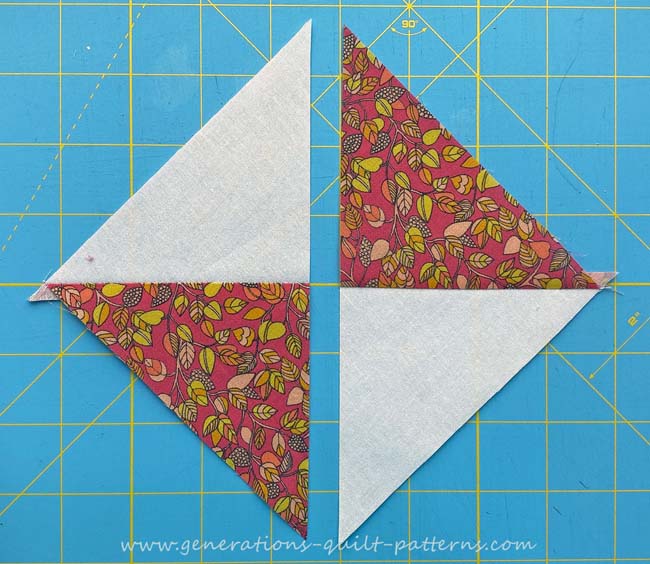
With RST, pin the two halves together. The seams at the center nest with each other for easy matching.
Sew the seam.
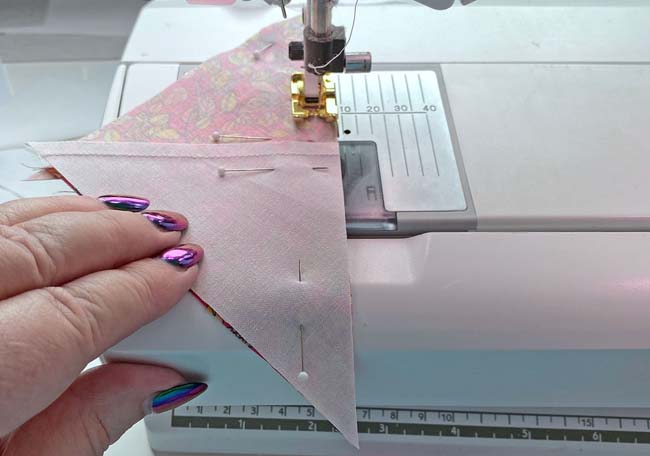
Press.
Now to twirl the SAs in the center. Loosen the threads in the seam allowance in the center.
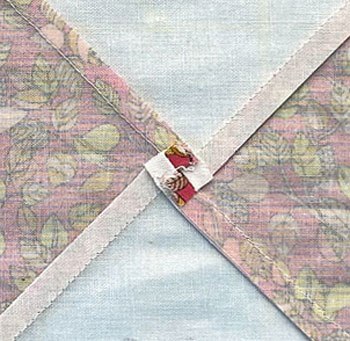 You can just make out the thread tails that I didn't cut off in the center.
Do not cut those thread tails. We need them there for the stability of the block. Now use your fingers to encourage the seams to 'twirl' or 'fan' around the center in a clockwise direction.
Give your QST a good press.
To trim to the exact size, using the chart below, find the 'Center' measurement for the QST based on your finished block size. For our 8" sample, it's 2-1/4".
QST Dimensions | ||
|---|---|---|
| Finished Block Size | Center Measurement | Trim QST to… |
| 4'' | 1¼" | 2½" x 2½" |
| 5'' | 1½" | 3" x 3" |
| 6'' | 1¾" | 3½" x 3½" |
| 8'' | 2¼" | 4½" x 4½" |
| 10'' | 2¾" | 5½" x 5½" |
At your cutting mat, position the 2-1/4" mark on the ruler with the center seam of the QST. We want to trim this to 4-1/2" x 4-1/2". Before cutting, check that:
- The 45° line on the ruler is directly over the seam line.
- The seams also cross the ruler at the 4-1/2" lines.
Once the 4 corners, the center, and the diagonal line are in position, trim away the excess fabric on the top and right sides. (shown below left)
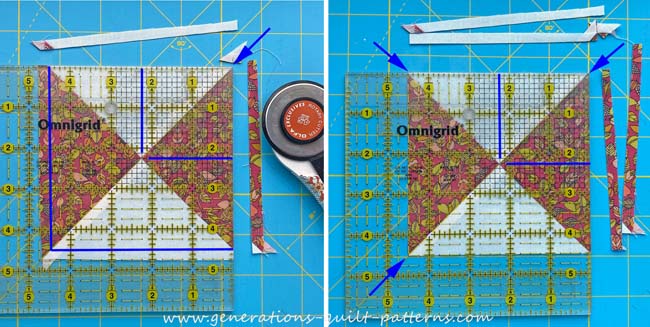
Flip your QST 180°.
Position the 'Trim to size' (4-1/2" for our 8" sample) on the left and bottom freshly cut edges. Line up the 2-1/4" marks over the center, the diagonal 45° line over the seam and trim away the excess again. (above, right)
You now have a perfectly-sized QST. The intersection of the seams is in the center. Each corner is bisected in half by seams.
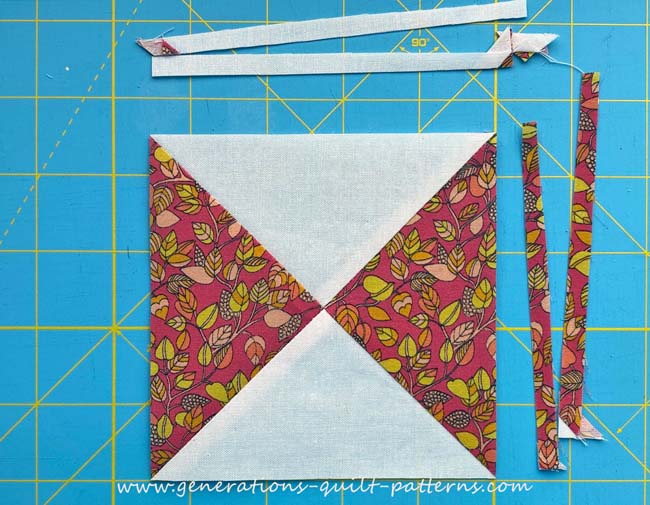
🧩 Solve the Puzzle: Assemble the Block
Arrange your Side units, FG Singles, and QST into the Fool's Puzzle design. All your Fabric A FG points point outward.
With RST, pin a FG to the top and bottom background side of the QST.
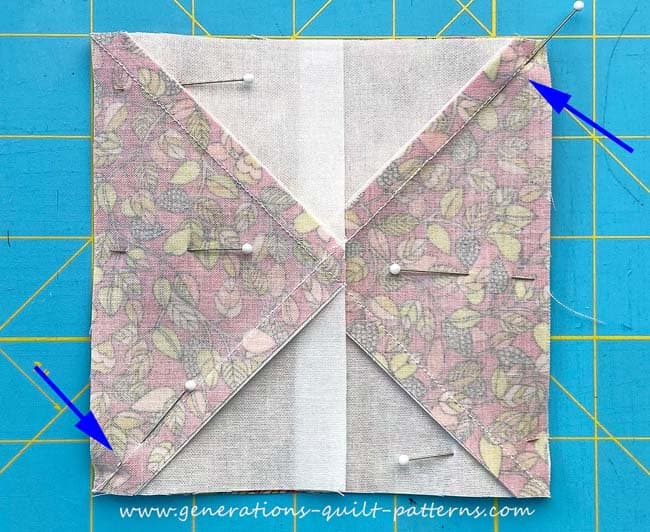 This is what the center row looks like after pinning
Remember we twirled the seam allowance in the QST. There are two benefits:
- It reduces the bulk in the center of the QST
- One seam on each side of the FG will nest. Nesting SAs makes matching easier.
To get the other side of the FG SAs to match, I like to pin on the diagonal as close as possible to the seam (blue arrows), on the side that's two fabrics thick (where it's easier to pin).
Now is not the time to stitch like the Road Runner (Beep! Beep!). I sew the seam with that diagonal pin in place, but slowly. I don't want to hit the pin.
Repeat for the other side.
Press with SAs out toward FG units.
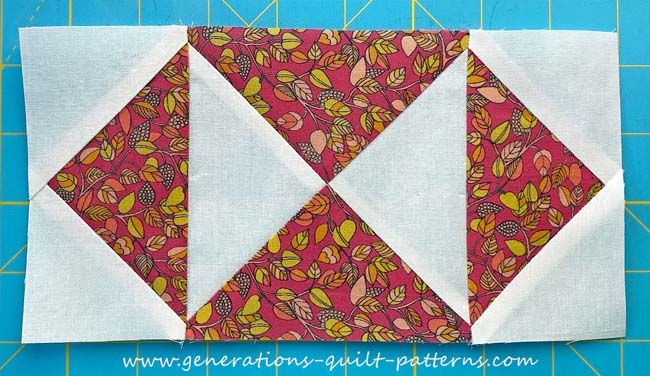
With RST, sew a side unit to the left and to the right edge of the joined unit.
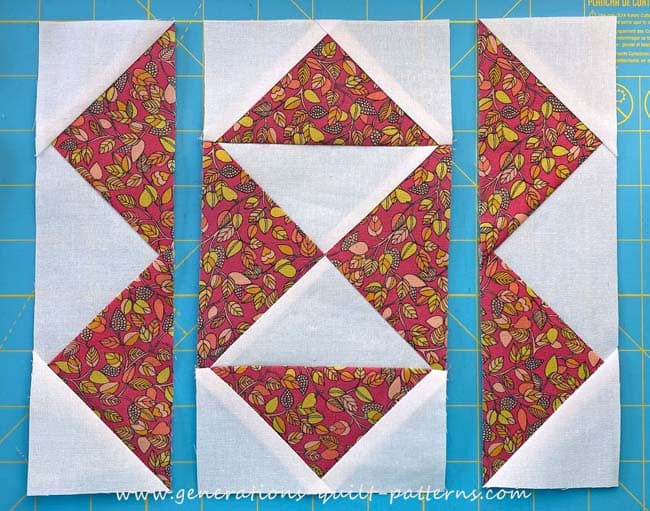
Pin as needed. While there are no seams to match (Yay!), be mindful as you stitch by the points of the triangles. We don't want to cut off any of those.
Best advice? Since we paper pieced, make sure the edges are even as you pin and stitch.
One last dance with the iron. These SAs are pressed away from the center row.
Our Fool's Puzzle quilt block is finished!
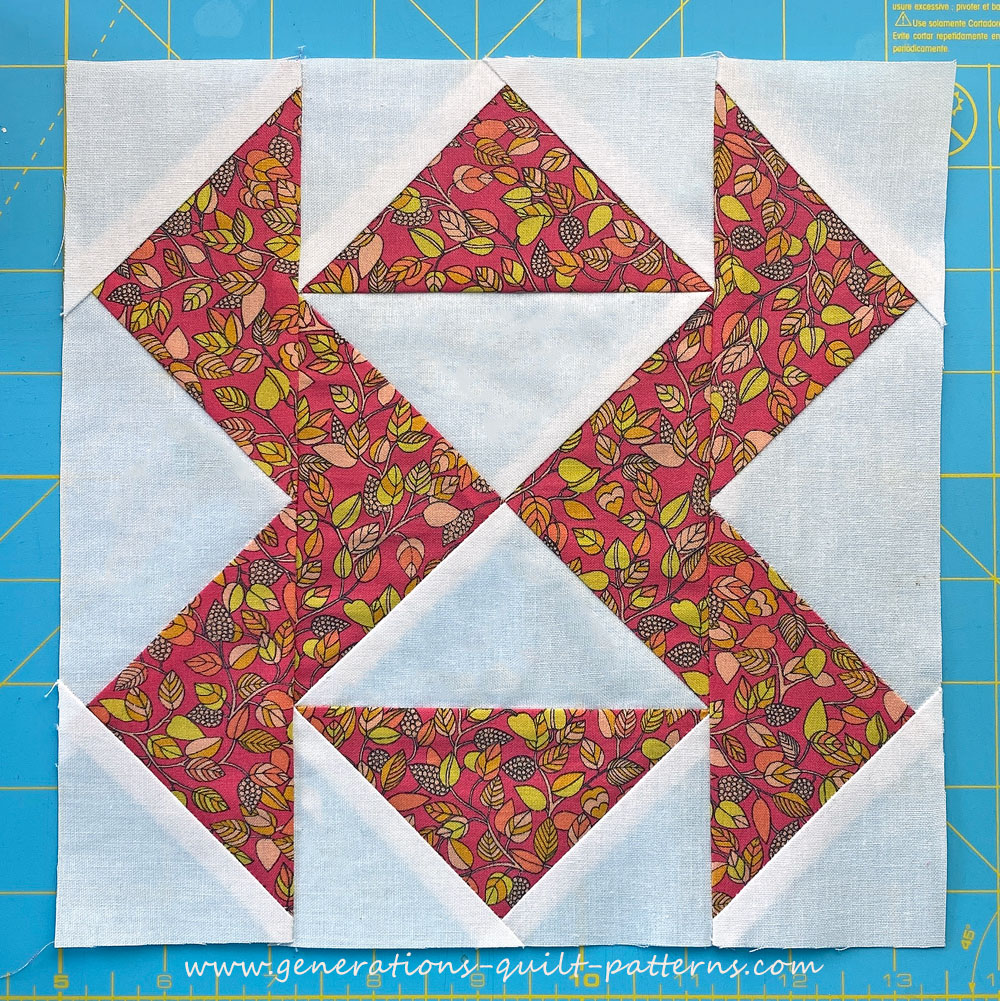
Here it is from the backside to see how all the pressing worked to help us in construction.
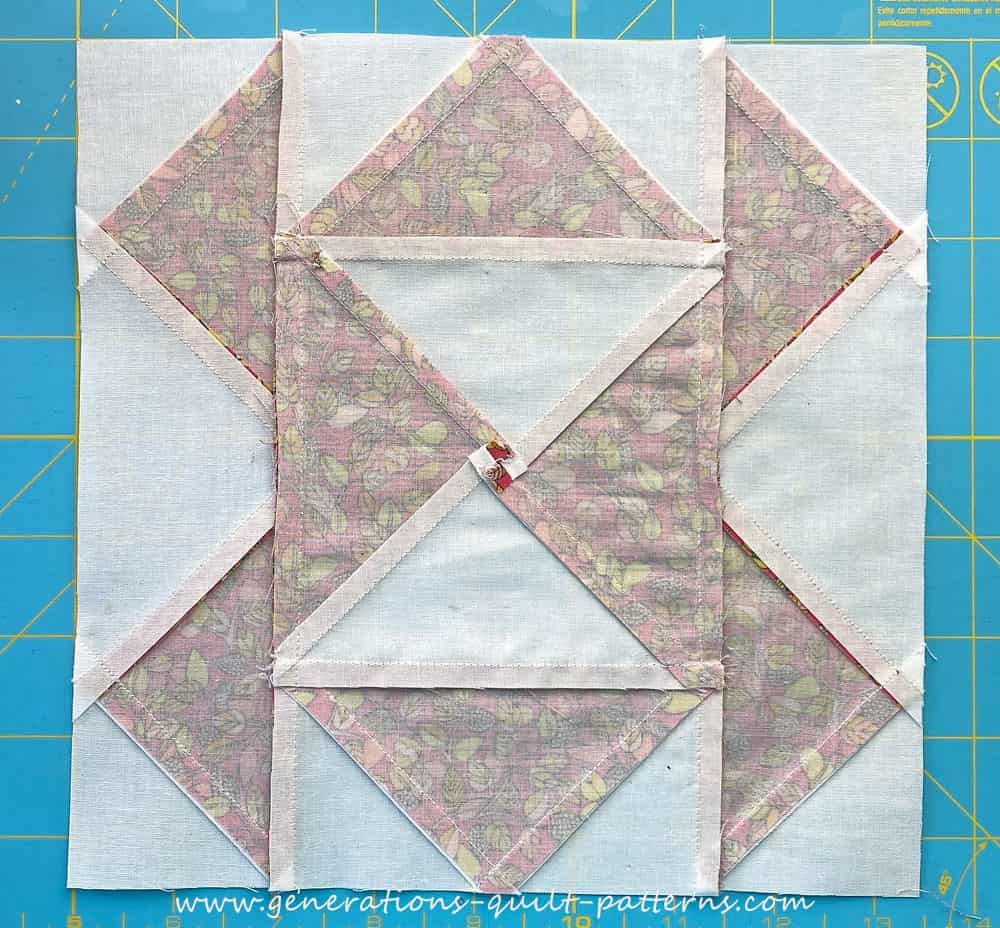
Ta-DAH! Time
Look at those outside points. Every one of them sits ¼" from the edge, right where it belongs. When this block meets its neighbors, not a single goose loses its tip.
You did that. Hold it up and say it out loud: Ta-DAH!
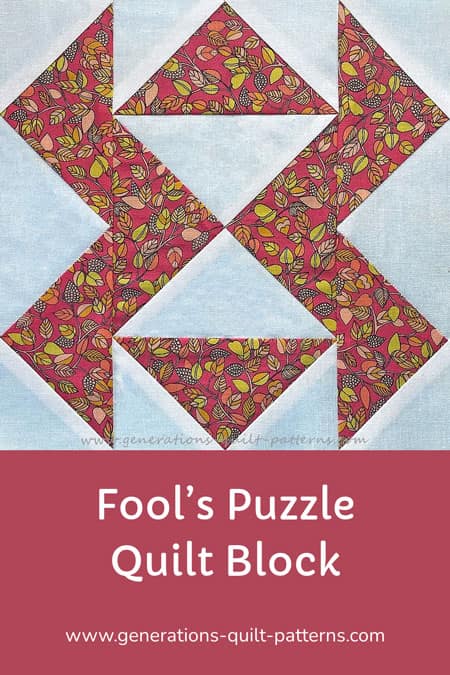
📌 Six Geese, Not a Chopped Point in the Bunch
Paper piecing patterns in five sizes, a cutting chart, and a coloring page are all right here. Pin it now so it’s waiting for you when you’re ready to stitch.
📥 Don’t leave without your free downloads!
Grab what you need below, future you will thank you.
- Cutting chart and block design
- Paper piecing patterns (pick your size from the chart)
- Coloring page
📥 Don’t leave without your free downloads!
Grab what you need below, future you will thank you.
For even MORE blocks to make… 🧩🎨
...visit our Free Quilt Block Pattern Library, with 260+ blocks to choose from in multiple sizes.
Free downloads are included in all sizes for any blocks that require paper piecing patterns or templates.
- Home
- Free Quilt Block Patterns
- Fools Puzzle Quilt Block






Nifty Notions


By Julie Baird
Copyright © 2008-2026 Generation Quilt Patterns, LLC
All Rights Reserved
Generations-quilt-patterns.com does not sell any personal information. (See Privacy Policy)