- Home
- Quilting Tools/Supplies
- Split Rects Ruler
What's the 'Secret Sauce' to
the Split Rects Ruler???
A Tutorial and Review
This post contains affiliate links, for which I receive compensation.
The Split Rects Ruler by Studio 180 Designs is a specialty ruler engineered to make nothing but half rectangle units—a kissin' cousin of the half square triangle—that are twice as tall as they are wide.
If you've used a Tri Recs ruler combo, you know that the Recs part of the ruler can be used for cutting half rectangle units.

But accurate units rely on your ability to stitch a perfect quarter inch seam on a cut bias edge.
Over. And over. And over again.
What if your seam allowance isn't always perfect?—I know mine's not.
The Split Rects ruler is engineered to do TWO things:
- Cut over-sized patches with an accurate angle
- Trim the sewn half rectangle triangles to perfection
Tri Recs rulers are used for cutting patches ONLY—and they are great for accurate cuts.
But you can't trim a sewn half rectangle with one. (See how a Tri Recs ruler works here.)
Does the Split Rects ruler work as advertised?
Should you buy one?
Follow along or use these links to skip to:
- Tutorial on using this specialty ruler
- My recommendation—who does and doesn't need one in their quilting bag o'tricks
Time to cut-up and sew! Let's begin.
What is a Split Rects unit?
Much like its kissin' cousin—half square triangles—split rects are rectangles divided into two along the diagonal line between two opposite corners.
 An unfinished Split Rects ready to sew into a block
When finished, its long side is twice the length of its short side, i.e. it finishes 1"x2", 1½"x3", 2"x4", etc.
But unlike the HST, the seams in unfinished Split Rects don't split the diagonally opposite corners in half.
The trick to making this unit is that the center seam in the unfinished unit does not cut each corner in half like the half square triangle.
Below is a visual comparison of where this diagonal seam falls in both units.
 Half square triangle, left, Split Rects (half Rectangle) right. The blue shaded area represents the finished sizes once the units are stitched into a quilt.
When trimming UNFINISHED Split Rects the point at the intersection of adjacent quarter inch seams (point of each blue arrow) must be on the seam line for an accurate unit.
If it's not, the seam line will NOT be in the corner of the FINISHED BLOCK. The blue arrows in the photo above point to where the diagonally opposite finished corners of the block are.
Special Note:
Yes, you can make half rectangles whose dimensions are other than twice
as tall as they are wide—just not with this Split Rects ruler.
But that is the subject of another tutorial. When it is ready for prime time, you'll find the link to it here.
The Split Rects Ruler
This ruler is a 'trim down' ruler—designed for cutting oversized patches from strips. After sewing you use it again to trim down to the perfect size.
If you've used any of the free block tutorials on this site, you know that 'trimming down to perfection' is a favorite technique of mine.
I don't know about you, but I can sit and make a couple of units pretty much spot on. But when there's a gaggle of them to make, my attention wanders.
I get sloppy.
Trimming to size is the perfect solution!
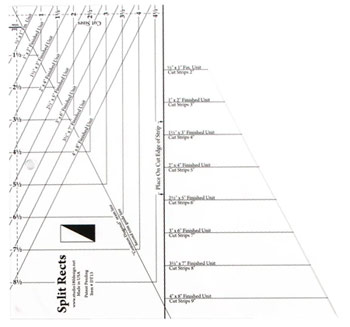
This is the ruler to use—all 9-5/8" by 10" of it.
Now there's lots of lines—rather confusing at first glance.
Relax.
They make total sense once you've used it a time or two because they're all marked.
Below, I've marked the first placement line for cutting patches with a pink arrow.
For the second cut the ruler is flipped 180°. This time the cut edge of your fabric is aligned with the edge and short line at the blue arrow. (Again, sounds confusing but makes sense once you cut a patch or two.)
 Any specks in the photo are from the batting it's sitting on for this portrait.
The diagonal lines touching the top and left side are used for cutting your half rectangles to the perfect size.
It's a beautifully engineered ruler!
How to use the Split Rects Ruler
If this is the first time you've used the ruler, make an extra copy of the instructions or take a good photo with your phone—then you'll always have them handy.
The instruction sheet is quite complete (Deb Tucker, the inventor, writes good instructions!) and includes info for left-handed quilters, too.
Step 1: Cutting with the Split Rects ruler
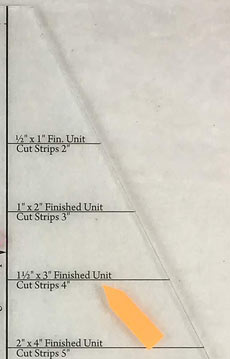
Choose the finished size of your Split Rects/half rectangles.
Then refer to either the instruction sheet or to the ruler, itself, along the angled edge to find the strip width to cut that correspond to your units.
For our 3" x 1-1/2" finished unit, strips are cut 4" wide by the width of fabric (WOF).
This information is printed right on the ruler (click here to see it).
Because Split Rects aren't symmetrical either vertically or horizontally, the position of the strips during cutting makes an IMPORTANT difference in the finished unit.
These are your options.
Option #1
 Seam: Upper left to lower right
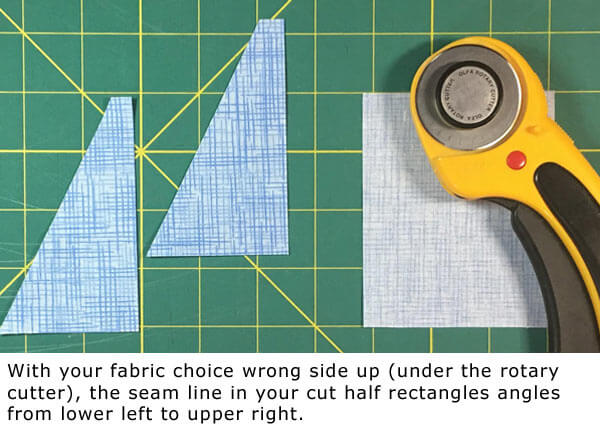
Option #2
 Seam: Lower left to upper right
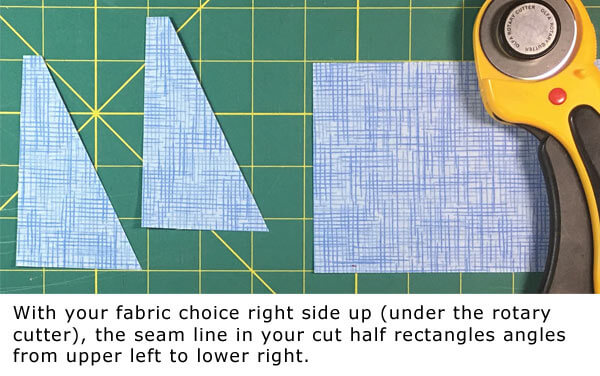
Because the unit isn't perfectly symmetrical, you must pay attention to the position of the strips when you cut.
Seam: Upper left to lower right
All strips RIGHT sides up
Seam: Lower left to upper right
All strips WRONG side up
Both angles in one cut
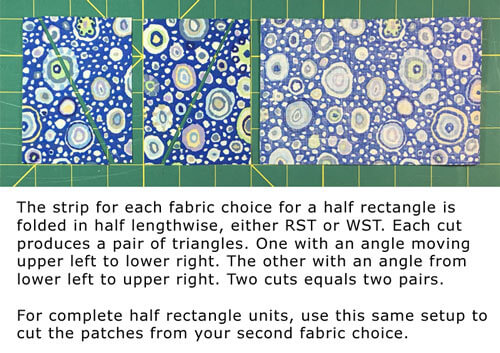
Each strip is folded in half lengthwise, either right- or wrong sides together for pairs of mirror-image patches
Our sample half rectangle unit
Our sample Split Rects unit has its SA running from upper left to lower right so our strips are placed on the cutting mat both right sides UP.
Before cutting your first pair of patches, square off the ends of the two strips.
Now align the "#1 Edge of Strip" line on the ruler with the short cut edge of your strip (blue arrow below).
The "Finished Unit" marking is at the bottom of the strip (pink arrow) and short blunt edge of the ruler at the top.
After everything is exactly aligned, cut along the unmarked edge.
 Strip is right side up
For the next pair of patches, flip the ruler 180°. The short "2nd Trim" marking (pink arrow) is at the bottom edge. The diagonal "Common Diagonal Seam Line/Second Trim Guideline" is along the previous cut (blue arrow).
Again. After everything is aligned, cut along the unmarked straight side.

When you cut the strips either both right-side up or both right sides down, you end up with matching units...only the direction of the seam line changes in the finished half rectangle triangles.
If each strip is folded right- or wrong-sides together and then cut, you get mirror-imaged pairs of patches with each cut.
 Four like units cut from strips with their wrong sides up during cutting.
Step 2: Sewing
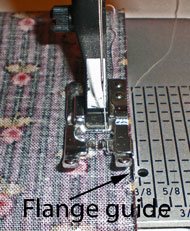
Install your favorite quarter inch foot on your sewing machine. I prefer my presser foot with a guide on the righthand side and then adjust the needle position for my quarter inch seam allowance.
Starched quilt fabric makes the sewing even easier—this tip isn't shared in the instructions that come with your ruler. However, it makes for even more accurate units. The super skinny points are fragile, but are less likely to stretch out of shape as you stitch and press.
Set your stitch length for everyday piecing—mine is set at 1.6mm.
That's it.
With right sides together, align the long bias edges. A bit of the patch will extend on either side (blue arrows). As long as those little 'extendy' bits are about the same size, you're good to go.
'About' is as close as you need to get. No need to be anymore exact than that. Seriously.
Whew! That's a big time saver and a lot less headache.
 Good enough. That was quick!
Stitch a 1/4" from the cut edge.
Backstitching?
Nope. Not needed.
 Since you're sewing from edge to edge you can chain piece the patches.
After stitching, take the patches to your ironing board
Shown below is my new favorite quilting tool—The Magic Pressing Mat. It really is magic! Read my view here.
Press the Split Rects in the closed position—first to set the seam and meddle the fibers of the threads into the fabric.
Then press the units open with the seam allowance towards the dark, the light or open. Whichever you prefer or as your pattern instructs.
I am finding that as I use half rectangles more that I prefer to have the seams pressed open. Less bulk and they don't usually nest with anything else.
 Here the seam allowances are pressed toward the darker fabric.
Step 3: Trimming to Perfection with the Split Rects Ruler
The Secret Sauce!
With the Split Rects unit right side up on the cutting mat, position the diagonal line (blue arrow) directly over the top of the seam line. A bit of fabric should extend past the top and right-hand side of the ruler. (The top and left-hand side if you're a lefty. Again, good left-hand instructions are included with the ruler.)
Trim the exposed two exposed edges.
 After trimming the top and right side
Rotate the patch so the the cut edges are now on the bottom (closest to you) and on the left. (For lefties...on the bottom and to the right).
Again align the diagonal line with the seam. For this trim you'll also align the marked unfinished block size on the ruler with the previously cut edges (pink arrows).
Trim the exposed sides.

That's it! You have a perfect half rectangle triangle unit.
Do you need a Split Rects Ruler in your tool box?
Previously, I'd made my half rectangles with my Tri Recs ruler.
Great for cutting, but not so much for measuring and checking for accuracy after sewing. Certainly not any good for trimming oversized patches to perfection.
I've also paper pieced them—so much easier to trim to size. But not everyone likes paper piecing.
Templates? Not really my cup of tea. And again, no good way to quickly check for accuracy.
The Split Rects ruler solves the problem. With this one ruler you can make eight different finished sizes. From 1/2" x 1" through 4" x 8" (increasing in 1/2" increments). That's handy.
Sew...
DON'T buy this ruler if:
- You're happy with the way you currently make half rectangle triangles
- You don't make quilts with this unit
DO buy the Split Rects Ruler if:
- You use or see half rectangles in your future piecing
- Your current piecing method doesn't provide the results you need
- You're a 'Gadget Gal' and rulers are your thing! :D
Is a Split Rects ruler right for you?
Not quite decided?
Check out any reviews for this quilting ruler on Amazon and Fat Quarter Shop.


By Julie Baird
Copyright © 2008-2026 Generation Quilt Patterns, LLC
All Rights Reserved
Generations-quilt-patterns.com does not sell any personal information. (See Privacy Policy)