This post contains affiliate links for which I receive compensation
Thread for free motion quilting and embroidery
I want to do free motion stitching/quilting that will really stand out and add a design element to the piece.
I will not be stitching through batting. I want the stitching to be an embellishment. I would like to use a heavier weight thread if possible. I have Coats and Clark heavy weight thread now, but I can't get the tension correct.
Do you have any ideas for what type of thread to use in the bobbin?
Do you have any suggestions for alternative threads to achieve the same effect?
Needle size/type?
Thanks!
Reply
Man, oh man, are you gonna have fun!First off, what you are proposing to do is really free motion embroidery. Because these stitches aren't quilted into the quilt, they will visually come forward. You'll just need to add enough quilting to hold the layers together when you quilt it.
There are several different techniques for embellishing your fabric with free motion stitching. But first you'll need to prepare your fabric.
Stabilize it!
One of the most crucial steps to successful free motion embroidery is to stabilize your fabric before you do any stitching.This will keep the stitches from irretrievably puckering your fabric. We don't stabilize quilts when we intend to add a lot of quilting stitches because the batting 'acts' as a stabilizer.
You can buy stabilizers either packaged or by the yard at the big box stores like Joann's or Hancock's.
If your local quilt store is also a sewing machine dealer, you'll likely have a huge selection of stabilizers to choose from because fancy computerized embroidery machines need stabilizers.
Stabilizers are sticky or not, tearaway or water soluble or water dis-solvable. You can turn a non-sticky into a sticky with a spray adhesive like KK2000 or 505 Spray.
Depending on how much stitching you plan to do, you may even be able to heavily starch your quilt fabric to stabilize it. And I mean heavy...stiff like card stock. It'll depend on just how heavy your thread choices are.
Which should you choose?
That part is up to you.
Are you willing to remove the stabilizer by hand or will/can you wash your quilt? Knowing the answers to these questions will help you decide which stabilizer to choose. From there it is a matter of choice and what is available to you.
As always test your fabric, thread, tension settings and stabilizer combinations until you are satisfied with the results.
Personally, I use Rinsaway water-soluble stabilizer and some 505 spray. Use just enough to adhere the fabric and stabilizer together—don't overspray. I don't want anything shifting when I stitch. Because I do have an embroidery machine, these products are always in my studio.
What thread to choose?
Again, it's your choice.Anything you can fit through the needle works. As you use the larger threads, remember to match the needle size to the thread size (i.e. thicker thread, larger needle).
Metallic and top stitching needles both have eyes that are 2mm regardless of the size of the needle. Both good choices.
Otherwise go to a 90/14 needle if you are having problems with the thread shredding. Possibly larger if the thread requires it.
For use with thicker threads, I recommend a quality 50-60 wt 100% cotton thread. You will need to adjust your tension to accommodate the extra thickness. And test until you are satisfied.
What happens if your thread is too thick to go through your sewing machine? Or you'd prefer to use ribbon or some of those snazzy new yarns?
Don't worry! There are several techniques for thicker decorative threads.
Bobbin drawing...
...is a technique to consider if the thread is extra thick (like Superior's 'Razzle Dazzle') and too big for your sewing machine to handle properly.For this technique, you'll wind a bobbin with the thicker thread and stitch from the back of your fabric. Use the same 50-60 wt cotton recommended above.
You may need to hand wind the bobbin. And check your sewing machine instruction manual to see if there is a specialty bobbin case for thicker threads. (Viking makes one for my D1.)
Bobbin drawing creates stitches that look as if they been couched onto the fabric. Which reminds me that...
Couching...
...is another way to use particularly thick threads, or even yarns, on the top of your fabric.To couch a thread, lay it out on top of the fabric and stitch over it. This stitching is usually with a tiny zig zag to capture and hold the thicker thread. Matching, contrasting or invisible thread is used for the zig zag stitch. The choice depends on the look you are after.
You don't need any specialty equipment to couch, but I do advise slowing down the speed of your machine. More control and less ripping that way.
If you expect to use this technique more than once, then look into what your sewing machine dealer offers in terms of stitching aids.

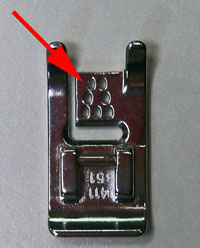
7 hole cord presser foot
Your feed dogs are up for this method. You choose the needle thread according to whether or not you want this stitching to show.
I used this technique on my 'Mask Quilt' to actually join the sections together.
Because the hole in the foot is oval-shaped you can use any of your machine's decorative stitches to attach the yarn or decorative thread to the fabric.
Another possible aid is a gimping guide or attachment (also called a braid or trim guide) that would help you feed the yarn directly to the needle. Usually it is used to feed a cord (gimp) under satin stitching to create a 'raised' satin stitch. It would work just as well to feed yarn. Depending on your machine's manufacturer, this may be a foot instead of an attachment and then you would need to keep the feed dogs up.

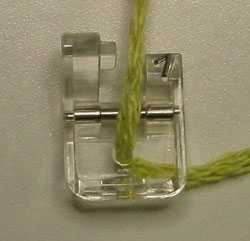
Thread the foot first

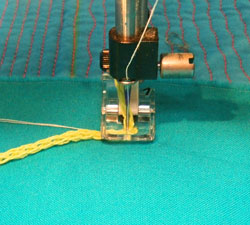
Install it on the machine

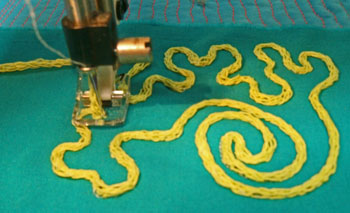
Free motion stitch as usual
Leave a long enough tail on the thicker thread. Thicker fibers have a tendency to shred or fluff when cut. Pull them to the back at the beginning and end of a line of stitching. Then either either knot or weave them through the stitching on the back.
Straight stitches were used because the opening on this foot was too small for anything else. (See Fig. 4)
An advantage of couching is that your machine is set up with standard needle and bobbin threads (cotton and cotton or monofilament and cotton) so that tension adjustments are straight forward.
If you choose to couch over super thick threads or yarns, you may want to use a 'cording foot'. This presser foot has a groove in the bottom of it that both helps the foot 'ride' over the thickness and guides the cording. Check your accessories case, this foot may have come with your machine if it is a newer model.
When it comes to free motion embroidery and embellishment, the sky really is the limit. You need only open your imagination!
Thank you for your question. I hope I've been able to help and point you in the right direction.
Readers, do you have suggestions or tips about free motion embroidery? Please share them using the 'Comments' link just below.
Piecefully,
Julie Barid
Editor


