- Home
- Quilt Design Inspiration
- Quilt Designs
Learn to Deconstruct Quilt Designs
Or how to design a quilt the way YOU want to make it!
This post contains affiliate links, for which I receive compensation.
In Part 1, we started with two quilt designs based on the same antique, exactly alike except that one was rotated an 1/8 turn.
Mindful that there's usually more than one way to make a quilt, on this page we'll use standard setting options to discover clues to recreate the pattern.
Three piecing options are explored.
Click here to download and print a worksheet of the quit designs so that you can look for your own piecing solutions as we go along.
Remember that all the seamlines have been deleted so that only the design created by the patchwork shows.
Let's get started.
Solution #1: Quilt designs without Sashing
The simplest quilt designs are when blocks are set edge-to-edge with no sashing.
To locate a block, look for repeats and mirror images. These occur at the edges of these patchwork units.
Take a look at the quilt design below.
Can you see a single, recognizable pattern, repeated over and over with no sashing? (Remember, there are no seamlines showing in the image. Some of those solid patches of color could be recreated using seams.)
It'll appear in a second or two.
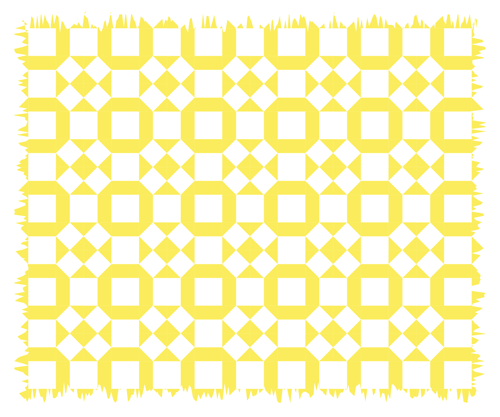
This is the Broken Wheel.
You might see it called
'Peek-A-Boo' or 'Mrs. Miller's Favorite', too. Though I've taken some liberty
with color placement, the basic structure is still the same.
 Broken Wheel
The image to the right shows the placement of light and dark values.
This is the part where knowing yourself as a quilter comes in.
Remember, there are no 'right' or 'wrong' ways to piece quilt designs—only the way that works best for YOU.
Since my piecing time is limited and usually happens at the end of a day, I rely on paperpiecing to compensate for being tired and having little concentration.
My preference is to paperpiece the square-in-a-square units in the corners.
No matter how tired I am, they come out perfect every time without a lot of wasted fabric. (Another quilter might choose to use Connector Corners to make these units—either way works just fine!)

Furthermore, I'll quilt this on a home sewing machine. No allover designs like stippling or pantographs for this re-creation. I'll use lots of stitch in the ditch to stabilize the sandwich.
Now those paperpieced units get lumpy at the points. They'll still be lumpy if I use Connector Corners.
With either method, there's a lot of seam allowance pressed under at the points.
And there's four of them to match(red circles) at each corner of the block. That's a lot of lumpiness to ditch quilt through.
Hmmm. Let's see if there's another way to piece this antique quilt design.
Solution #2: Quilt designs with sashing
This time we look for a unit that repeats, surrounded on four sides by another unit(s) that repeats (the sashing).
Refer to the design again. Can you see a repeat?
Is it surrounded by another repeating unit?
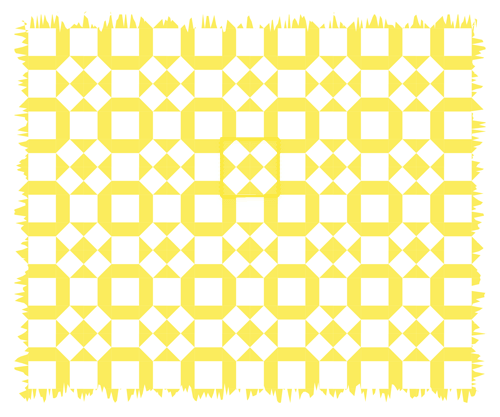
The four repeating sides plus square cornerstones create a grid that is
the sashing.
In our patchwork, the cornerstone is a solid square, the sashing is strip-pieced, and the block is called 'Mosaic #3'—while the structure of the block is the same, I've again taken liberty with the fabric placement and reversed the lights and darks.
 Mosaic #3 with lights and darks reversed
 Sashing
 Cornerstone
The lumpiness in Solution #1, Broken Wheel, is gone, except we've
traded the 'lumpies' for Mosaic #3, something that might be a pain to piece. 'Especially if there's a lot of them!
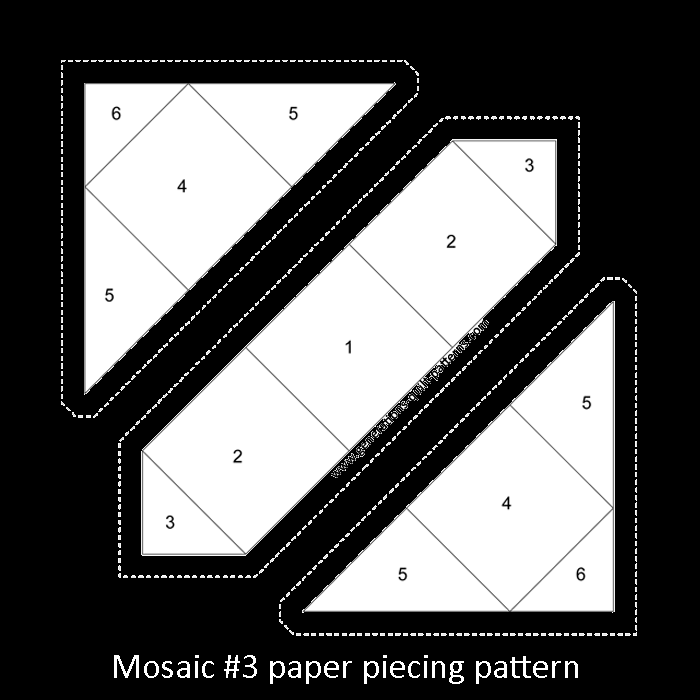
A paper pieced pattern is easy to draw in Electric Quilt.
Unfortunately, it needs to be put together in 3 sections.

That's a lot of monkeying around for something so simple looking. So my usual fall-back—paper piecing— is out for this one.
Now, the math for those squares on point isn't terribly rotary cutter friendly. There'll be some rounding before cutting the patches. If I'm going to take the time to sew an accurate 1/4" seam, rounding the numbers for Mosaic #3 seems a lot like taking two steps back in the accuracy department.
However, I do have a new ruler—'On Point Ruler' by Donna Lynn Thomas (shown right)—to test out that might make it easier. (Donna's the author of Quilting Essentials I and Quilting Essentials II for beginning quilters.)
Another way to piece Mosaic #3 is to use templates to cut the patches. I can draft and print them quite easily with Electric Quilt 7.
Many don't care to use templates (unless forced to) because it's extra work.
If I didn't have EQ7, I'd be hard-pressed to spend my time drafting templates. Don't worry—I've got you covered—if there's any templates used on this website, I always provide links to downloads for you!
If the ruler works out, I suspect Solution #2 will be better than #1. There's less bulk where I intend to quilt due to the simple sashing.
Which option matches your preferences best?
Let's see if there's another possibility.
Solution #3: Alternating block designs
Quilters use an alternate blocks setting to:
- Make piecing more interesting and reduce the monotony of making the same designs over and over, and to
- Create intriguing secondary patterns where the blocks meet.
Let's look at the design after it's been rotated an 1/8 turn. Can you see two alternating patterns?

See how easy it was to discover another option, simply by looking at the patchwork pattern from another direction?
 Shoo Fly
This design is made using a simple Shoo Fly block and one that looks like an 'O'—we'll just call it 'O' because I haven't found a name for it yet.
The Shoo Fly is, in a word, Easy-Peasey!
It's a simple 9-patch-based block drawn on a 3x3 grid.
Four half square triangles and five solid squares are all it takes.
Our 'O' design is another story.
That square on-point in the center can make for some not-so-friendly rotary cutting.
 "O" Quilt Block
For a 6" finished block, that #1 square should be cut 3.329" or 4" divided by the Magic Number, 1.414, plus 1/2" for seam allowances. That's not much fun to rotary cut.
You must round up or down or guesstimate the cut. I prefer more precision in my cutting. All that time perfecting your quarter inch seam is wasted when the patches are cut this way.
This time, thankfully, the block IS
easy to convert to paper piecing.
It's simple to piece
in one unit, unlike the separate sections in the Mosaic #3. The
numbers in the drawing show the order the patches are added and stitched.
To insure the points match exactly where they should, this 'O' block is drawn on a 3x3 grid, just like Shoo Fly.
Choose the best option for YOU!
Each piecing alternative has its pros and cons based on your own preferences and skills. I've shared my own preferences only as an illustration, not a the definitive way to make your choice.
As you deconstruct the antique quilt designs you see, the ultimate way to determine which piecing method is best is to actually piece a few sample blocks.
To be honest, I HATE the work involved in making these extra blocks, but I LOVE the results. There is no better way than to try to know how smoothly—or not—they will go together.
These samples needn't be wasted. They can always be pieced into your quilt's backing to show how your quilt came to be.
What now?
In Part 3 of this series, we'll explore the idea of creating blocks in sizes that appeal to your skill level and how the block size affects your time, fabric and money constraints.
Tools to make quilt designing easier...
Click any image for more information, reviews, and pricing.


By Julie Baird
Copyright © 2008-2026 Generation Quilt Patterns, LLC
All Rights Reserved
Generations-quilt-patterns.com does not sell any personal information. (See Privacy Policy)