- Home
- Quilt Design Inspiration
- Quilt Block Design
Drafting a quilt block design
The first step to designing your own quilt patterns
This post contains affiliate links for which I receive compensation
A reader recently asked if we could identify the quilt block design used in this quilt...
Linda G. wrote and asked...
I saw this quilt at the Sisters, Oregon outdoor quilt show in 2013.
Unfortunately, my picture of the quilt doesn't clearly show the description or the name of the quilt block.
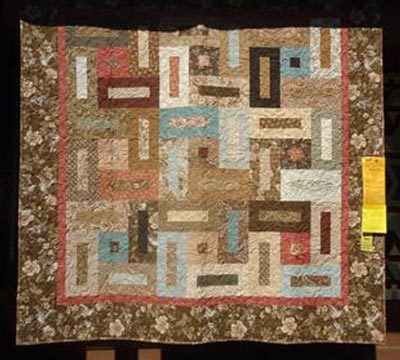
Does anyone know the name of this block?
It also appears that it cannot be stitched without a couple of "Y" seams. Is that what you see?"
It is a terrific block to illustrate how to draft a quilt block design. The piecing is fairly simple so it doesn't distract from the steps of this beginning drafting lesson.
Let's get started.
Tools to make quilt designing easier...
Click any image for more information, reviews, and pricing.


3 Steps to Drafting a Quilt Block Design
You'll need a few simple supplies to get started:
- Graph paper
- Pencil and eraser
- Ruler
- Inspiration
- Possibly a calculator
In this example, our inspiration is a photograph of a quilt.
If you have Electric Quilt software (it comes in a Mac version, too) you can substitute it for the graph paper, pencil and eraser.
I'm currently using EQ7, but occasionally I revert back to good ol' paper and pencil...sometimes that's just plain easier!
Step 1: Identify the grid the block is drawn on
To draft the block you need to identify what 'grid' it is drawn on. Though it isn't measured in inches or centimeters, identifying the grid is a necessary part of determining what sizes to cut your patches.
Think of a grid as the squares on a sheet of graph paper.
Once the block is drafted on a grid, it's quite easy to change block sizes as you will see.
If you choose one that is rotary cutter friendly, you won't need to redraft the block, but simply do a different set of simple math calculations.

This particular design is a variation on the simple block called 'Bright Hopes' (shown right) where pieced rectangular units are swapped in for the solid ones (shown below).
In the actual picture of the quilt, it looks like there are
three of these blocks across in each row.
When drafted, the block from the quilt looks like this...
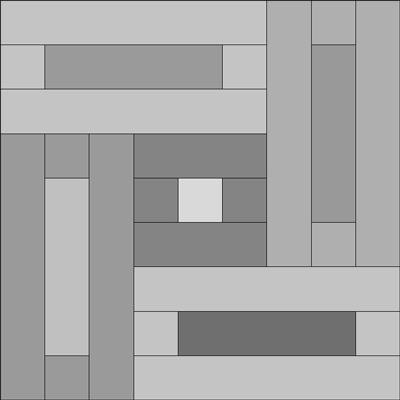
I've used different shades of gray to represent the 'scrappiness' of the block without diverting your attention by using colors or fabrics.
Now look for the smallest patch. (This is usually the easiest way to figure the grid.) In this instance the smallest patch is the center square.
Now count how many center squares it would take to go across and up and down the design...for our example it's 9 units which makes it a 9x9 grid.
Step 2: Identify the units within the quilt block design
The majority of patchwork designs are made up of repeated, common units.
Break down the design into these components.This one contains two related, but different, sub-blocks.
The center one is made up of a center patch, 2 side and 2 top/bottom patches and creates a square that is 3x3 grid units...

The pieced center is surrounded by four rectangular units that are also made of a center with two side and two top/bottom patches, though some of the patch sizes differ.
This rectangle is 6x3 grid-units.

Step 3: Choose the finished block size and calculate the patch dimensions
Choose a finished block dimensions. Then divide this number by the number of grid units (GU).
For our example block, let's say we want a 9" finished block. So divide 9" (finished) by 9 (the number of GU) and we get a 1" GU.
When this number is a rotary cutter friendly number, all that's left to do is calculate the patch dimensions. There's no need to draft a life-sized block.
Use this simple formula to determine patch sizes for squares and rectangles:
Finished Size + 1/2"
To arrive at the Finished Size, simply multiply the GU by the its size.
In our example, for a patch with dimensions of 3x1 GUs and each is 1" square, using the formula above, we calculate:
The Finished Size is (3 x 1") by (1 x 1") or 3" by 1"
Add a 1/2" seam allowance to each dimension and the patch should be cut:
3-1/2" x 1-1/2"
The table below shows the patch dimensions for blocks using a 1", 1-1/2" and 2" GUs.
| Cut Patches for a Grid Size of: | ||||
|---|---|---|---|---|
| Unit | Grid Units | 1” | 1-1/2” | 2” |
| Center Square | 3x3 | -- | -- | -- |
| Center | 1x1 | 1-1/2” x 1-1/2” | 2” x 2” | 2-1/2” x 2-1/2” |
| Sides | 1x1 | 1-1/2” x 1-1/2” | 2” x 2” | 2-1/2” x 2-1/2” |
| Top/Bottom | 3x1 | 3-1/2” x 1-1/2” | 5” x 2” | 6-1/2” x 2-1/2” |
| After piecing this unit (unfinished) measures: | 3-1/2” x 3-1/2” | 5” x 5” | 6-1/2” x 6-12” | |
| Rectangles | 6x3 | -- | -- | -- |
| Center | 4x1 | 4-1/2” x 1-1/2” | 6-1/2” x 2” | 8-1/2” x 2-1/2” |
| Sides | 1x1 | 1-1/2” x 1-1/2” | 2” x 2” | 2-1/2” x 2-1/2” |
| Top/Bottom | 6x1 | 6-1/2” x 1-1/2” | 9-1/2” x 2” | 12-1/2” x 2-1/2” |
| After piecing this unit (unfinished) measures: | 6-1/2” x 3-1/2” | 9-1/2” x 5” | 12-1/2” x 6-1/2” | |
| After piecing, the unfinished size is | 9-1/2” x 9-1/2” | 14” x 14” | 18-1/2” x 18-1/2” | |
| Finished Block Size | 9” x 9” | 13-1/2” x 13-1/2” | 18” x 18” | |
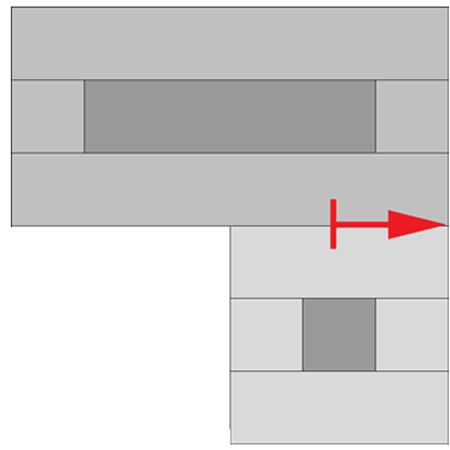
A word on puzzle or partial seams piecing...
In her question, Linda asked if there were y-seams in this quilt block design. The answer is no. Y-seams are used in some Attic Window, LeMoyne Star and Lone Star quilt patterns.
This block utilizes a technique called puzzle or partial seams.
In it, the first seam is only partially sewn to create the complete edge the next unit will be sewn to.
Stitch starting at the perpendicular red line (below) to the edge of the block. I find it helpful to do a few back stitches to start this seam and then sew to the edge of the block.
To see this technique on actual blocks check out our instructions for the Bright Hopes or Double Star or Night Vision quilt blocks.


By Julie Baird
Copyright © 2008-2026 Generation Quilt Patterns, LLC
All Rights Reserved
Generations-quilt-patterns.com does not sell any personal information. (See Privacy Policy)