- Home
- Free Quilt Block Patterns
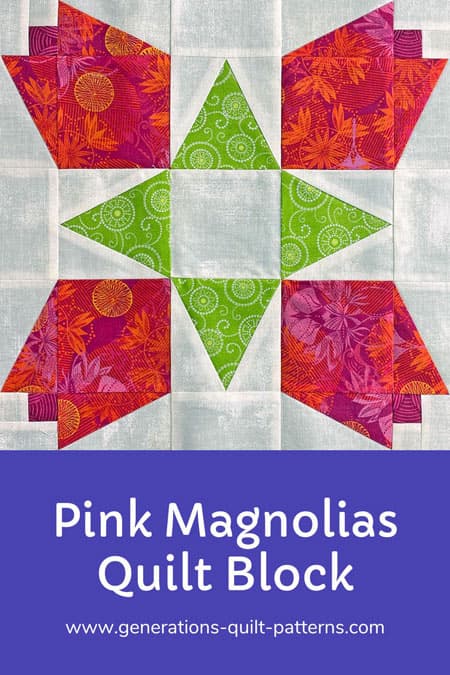
- Pink Magnolias Quilt Block
🌸 Pink Magnolias
Quilt Block: Blossom into a Piecing Pro! 🧵
From our Free Quilt Block Patterns Library
This post contains affiliate links, for which I receive compensation.
Calling all quilt gardeners with a penchant for pink! Our Pink Magnolias quilt block tutorial is here to help you cultivate a garden of perfectly pieced petals.
Intimidated by Half Rectangle Triangles?
Not anymore!
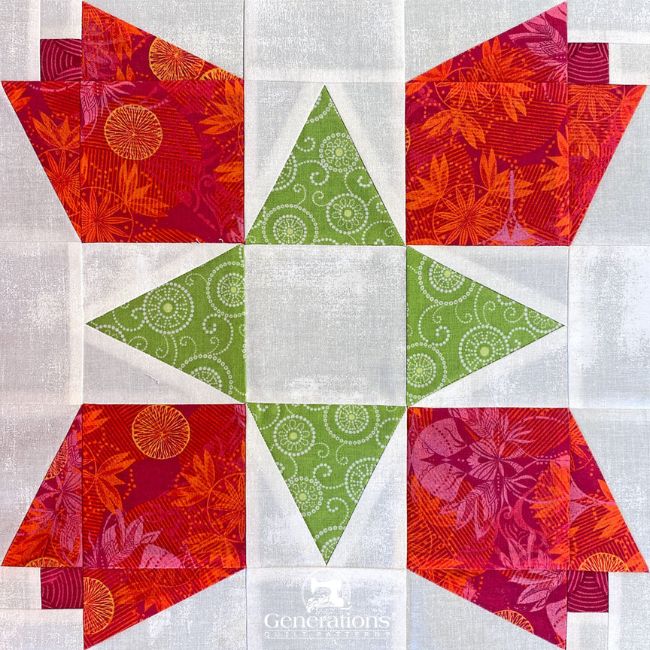
We've cracked the code 🕵️♀️💡 on sewing accurate HRTs, making block assembly sew much easier you'll think it's magic🪄.
Grab our free paper piecing patterns, and watch your quilting skills blossom like never before!
Navigate through our Pink Magnolias quilt block tutorial with ease
Use these quick links to jump to the section you need. Whether you're ready to start cutting or eager to see the final assembly, we've got you covered. Happy quilting!
- A cutting chart in four sizes, with downloads of the chart and block design
Cut. Sew. Press. Watch your quilting skills BLOSSOM!
📋General Instructions
Several abbreviations are used on this page. They are:
- SA - seam allowance
- RST - right sides together
- HRT - Half Rectangle Triangle
- TiaS - Triangle in a Square
A 1/4" SA is used in this tutorial.
Highlighted in yellow, pressing instructions are easy to spot.
To press, first press the patches in the closed position as they came off your sewing machine. This sets the seam, melding the fibers of the threads into the fibers of the fabric.
Then press the SA to the dark unless otherwise noted.
Download and print the paper piecing pattern
To download the pattern, use the most current version of Adobe.
For accurate results, on Adobe's Print Menu page, under 'Page Size and Handling' set 'Custom Scale' to 100%. Then print.
Click here to see what it looks like on the Print Menu page.
Find your finished block size from the chart below. For each block you want to make, print the corresponding number of copies for a total of:
- Four TiaS
- Four pairs of HRT-A/B
Download and Print | |||||
|---|---|---|---|---|---|
| Finished Block Size | HRT-A & B | TiaS | |||
| # of Copies to Print | Size | # of Copies to Print | Size | Template (print 1 copy) | |
| 8" | 1 | 1" x 2" | 1 | 2" | 2",3", and 4" |
| 12" | 2 | 1½" x 3" | 1 | 3" | |
| 16" | 2 | 2" x 4" | 2 | 4" | |
| 24" | 4 | 3" x 6" | 4 | 6" | 6" |
After printing, use the 1" square graphic on the printed page(s) to double check that your patterns printed at the correct size.
Then cut out the required number of patterns from your copies. A rough cut is good enough—an 1/8"-1/4"-ish away from the outside dashed square.

Not sure which paper to use?
Take a look at my review of several of the most popular brands available to us quilters on the market.
You want a super-easy paper to tear away—less stress on the stitches.
✂️Cutting patches for a Pink Magnolias quilt block
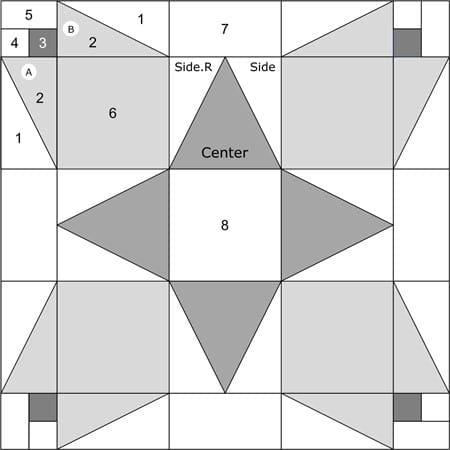 Pink Magnolias design
Sample Block Size: 12" finished / 12½" unfinished
Grid: 8x8
Attribution: Nancy Cabot
AKA: Magnolia Bud (Nancy Cabot)
Design Type: Uneven 9-patch, small center | Paper piecing
Please label all your patches. We use their numbers throughout this tutorial.
 | Cutting Chart for a~ Paper & Traditional Piecing ~ | ||||||
|---|---|---|---|---|---|---|---|
| Patch | Fabric | Qty | Finished Block Size | Sub Cut | |||
| 8'' | 12'' | 16'' | 24'' | ||||
| A/B 1, Side, Side.R | Bac | 8 | 2⅞'' x 3¼'' | 3⅜'' x 4¼'' | 3⅞'' x 5¼'' | 4⅞'' x 7¼'' | yes |
| A/B 2 | Light | 4 | 2⅞'' x 3¼'' | 3⅜'' x 4¼'' | 3⅞'' x 5¼'' | 4⅞'' x 7¼'' | yes |
| TiaS.1 | Med | 4 | 3" x 2¾'' | 4" x 3¾'' | 5" x 4¾'' | 7" x 6¾'' | yes |
| 3 | Dark | 4 | 1'' x 1'' | 1¼'' x 1¼'' | 1½'' x 1½'' | 2'' x 2'' | --- |
| 4 | Bac | 4 | 1'' x 1'' | 1¼'' x 1¼'' | 1½'' x 1½'' | 2'' x 2'' | --- |
| 5 | Bac | 4 | 1'' x 1½'' | 1¼'' x 2'' | 1½'' x 2½'' | 2'' x 3½'' | --- |
| 6 | Light | 4 | 2½'' x 2½'' | 3½'' x 3½'' | 4½'' x 4½'' | 6½'' 6½'' | --- |
| 7 | Bac | 4 | 1½'' x 2½'' | 2" x 3½'' | 2½'' x 4½'' | 3½'' 6½'' | --- |
| 8 | Bac | 1 | 2½'' x 2½'' | 3½'' x 3½'' | 4½'' x 4½'' | 6½'' 6½'' | --- |
| Unfinished Block Size | 8½'' | 12½'' | 16½'' | 24½'' | na | ||
| Grid Size | 1 | 1½" | 2" | 3" | na | ||
Subcutting
Arrange your A/B2s in a stack of pairs, RST.

These must be in pairs of RST so that we get the mirror-image patches we need.
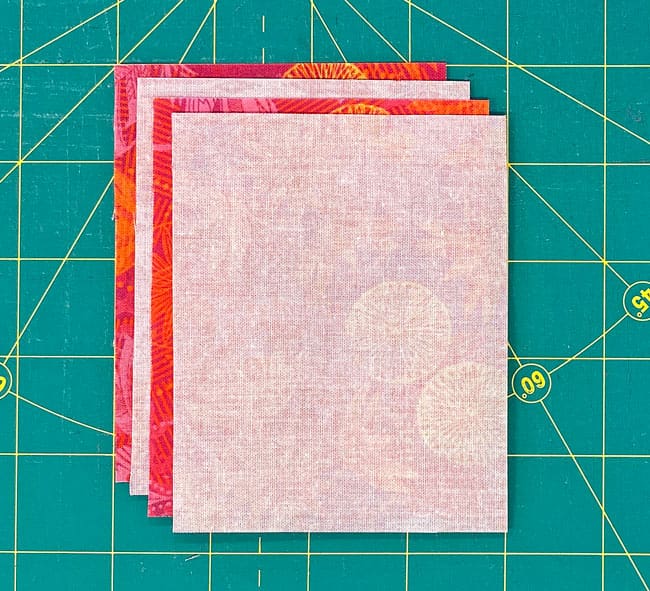
Align the edges.
Make a mark on the top edge 5/8" in from the left side and on the bottom edge 5/8" from the right side.
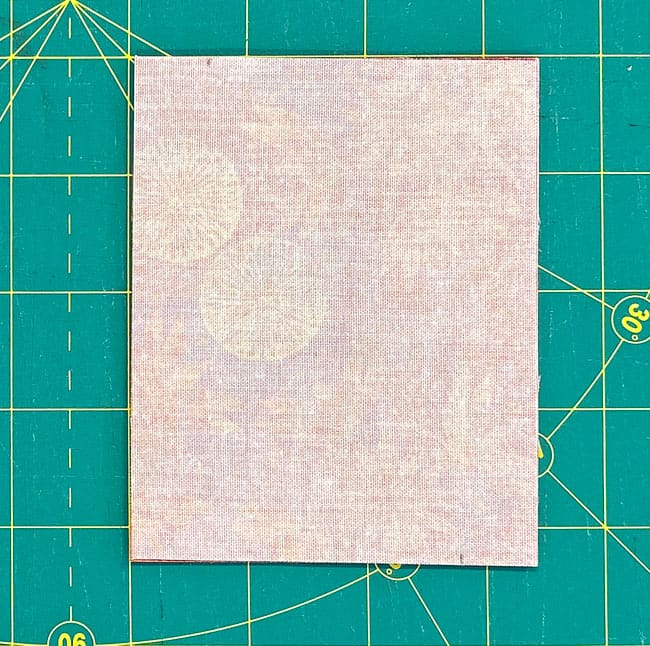
Align your ruler with these marks at the edge and cut the stack in half.
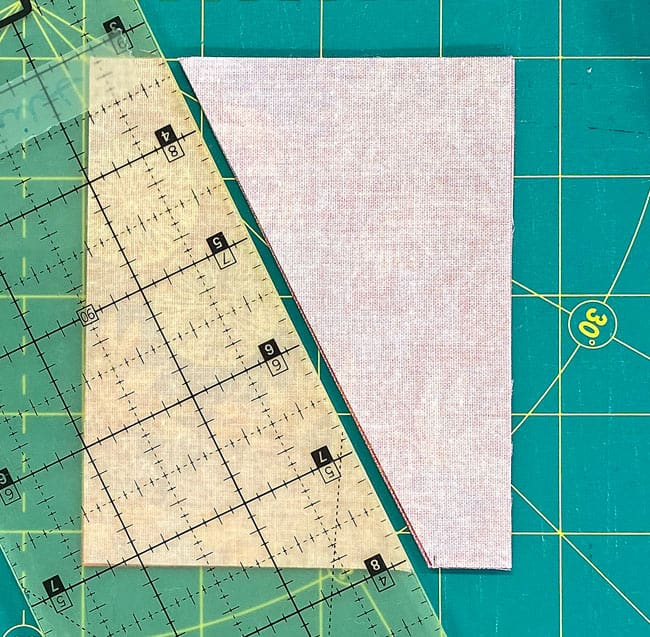
Repeat for the A/B1 and Side/Side.R, rectangles stacked in pairs of RST, just like the previous stacks.
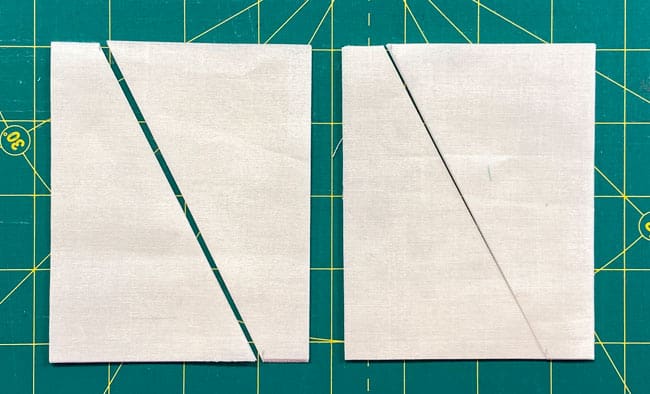
Stack your TiaS.1 rectangles. This time, it doesn't matter if they're right side up or back side up.
Cut out the Center template you printed. Position it on the stack of squares, top and bottom edge all even. (The top and bottom of the template match the top and bottom of the rectangles when they're positioned correctly on your mat.)
Cut away the excess fabric from both sides.
If the fabric moves on you as you cut, try taping it to your cutting mat. (I like Scotch Brand's Magic Tape for this.) Peel the tape off your mat when you finish.
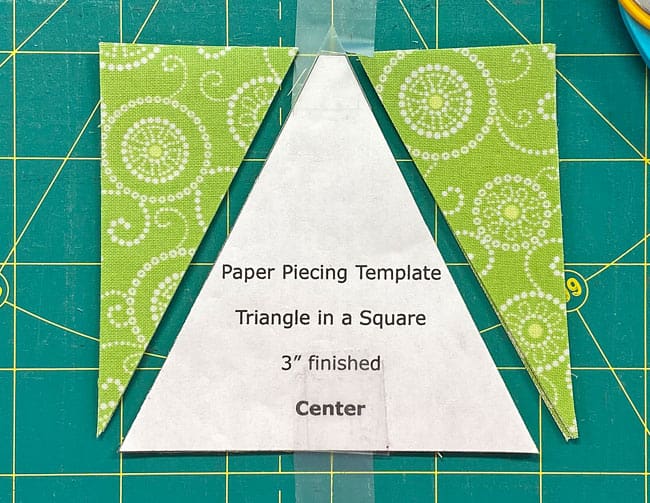
After all that subcutting, these are your patches for your quilt block.
Do you see the pins through the neutral Grunge patches?
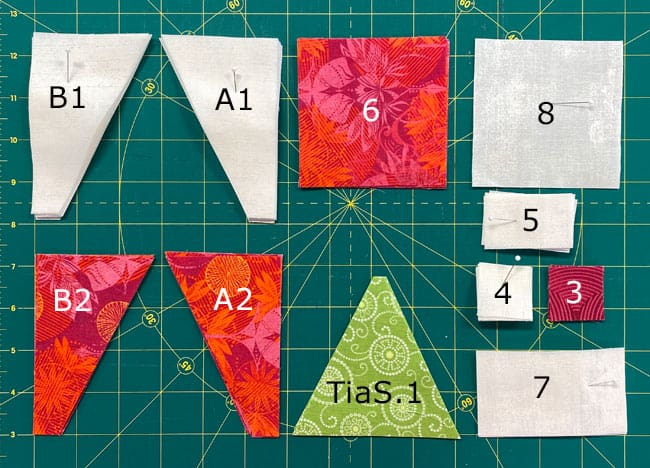
Some fabrics are difficult to tell the front from the back. Right after cutting, I stack each unique shape front side up and put a pin through the top.
That way I always know which side is up.
🪡Create the units for your Pink Magnolias quilt block
To make piecing easier, use the tiniest dot of Elmer's Washable Glue Stick to hold the first patch in position—the backside of the patch to the unprinted side of the pattern.
Those dashed lines make positioning virtually foolproof—and fast,
 Position #1 on both HRT-A and HRT-B units
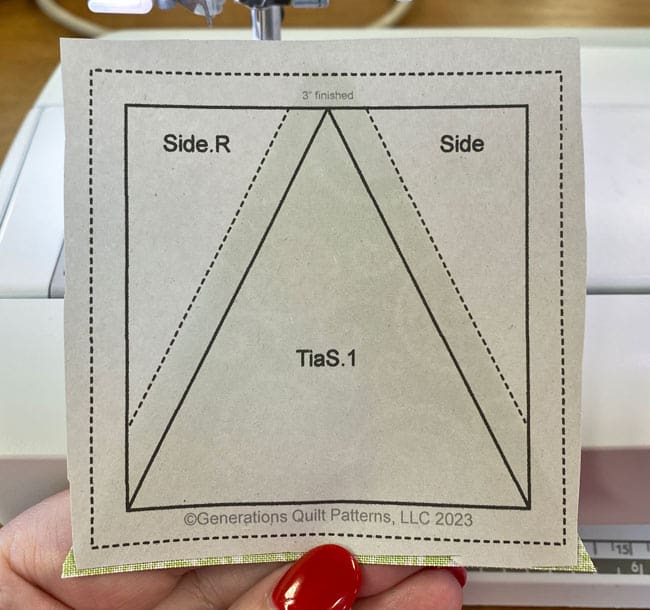 Position TiaS.1 on the TiaS pattern
The glue stick can be put away now, it's no longer needed.
We need to make a few adjustments to our sewing machine settings to paper piece.
- Reduce your stitch length to 16–20 stitches per inch (1.3-1.6 mm). This perforates the paper and stabilizes the seam when you remove the pattern. [Learn more about stitch length here.]
- Reduce your machine's speed or just plain slow down. Sew only as fast as you can AND stay on the solid stitching line.
- Install an open toe appliqué foot (sometimes called an 'embroidery' or 'satin stitch' foot) if you have one (it makes it easier to see where you're stitching).
- Use a larger needle (90/14) IF you have problems removing the pattern. Personally, I use an 80/12 Microtex Sharp for paper piecing without any issues.
Triangle in a Square (TiaS)
Make 4
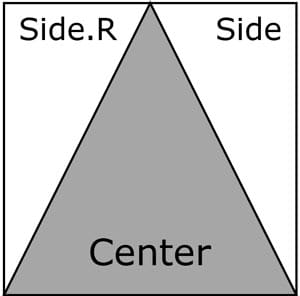
With RST, match the long bias edge of one of the sides to the TiaS.1. It makes no difference which side you start on.
Quick Tip: For TiaS, always match the wide end of the patch to the point/narrow end.
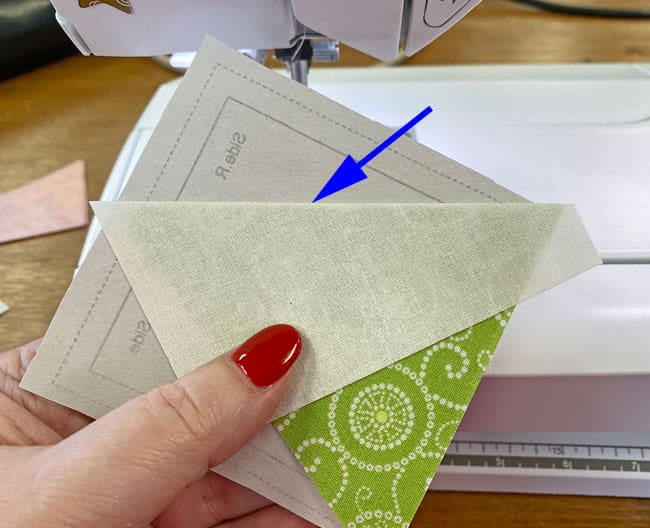
Sew this seam on the solid line, starting and ending past the outside dashed line.
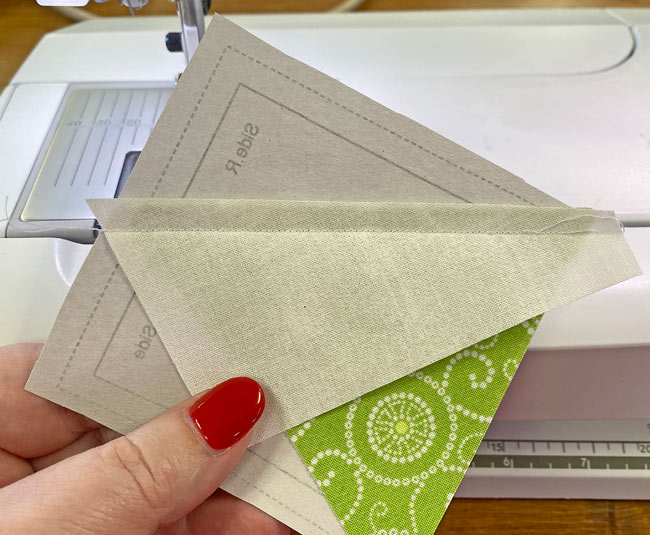
Press.
Repeat the process for the second Side patch.
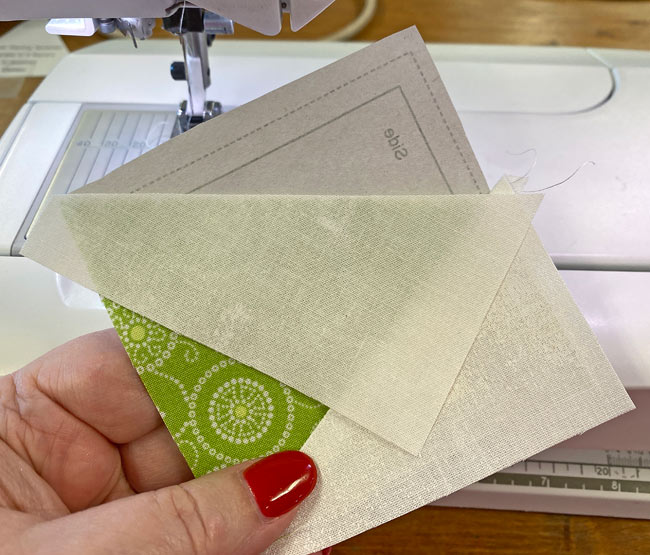
After all the seams are sewn, trim the TiaSs to size.
It's easiest if you lay the 1/4" line on your ruler with one of the solid lines at the edge of the TiaS. Trim away the excess with your rotary cutter, rotating a 1/4 turn and trimming for the four sides of the four TiaSs.
Here is the result. TiaS with its point 1/4" away from the edge, the angles on the sides hitting the 1/4" mark, and all the edges on straight of grain.
Voila!

HRTs - A & B
Make 4 ea
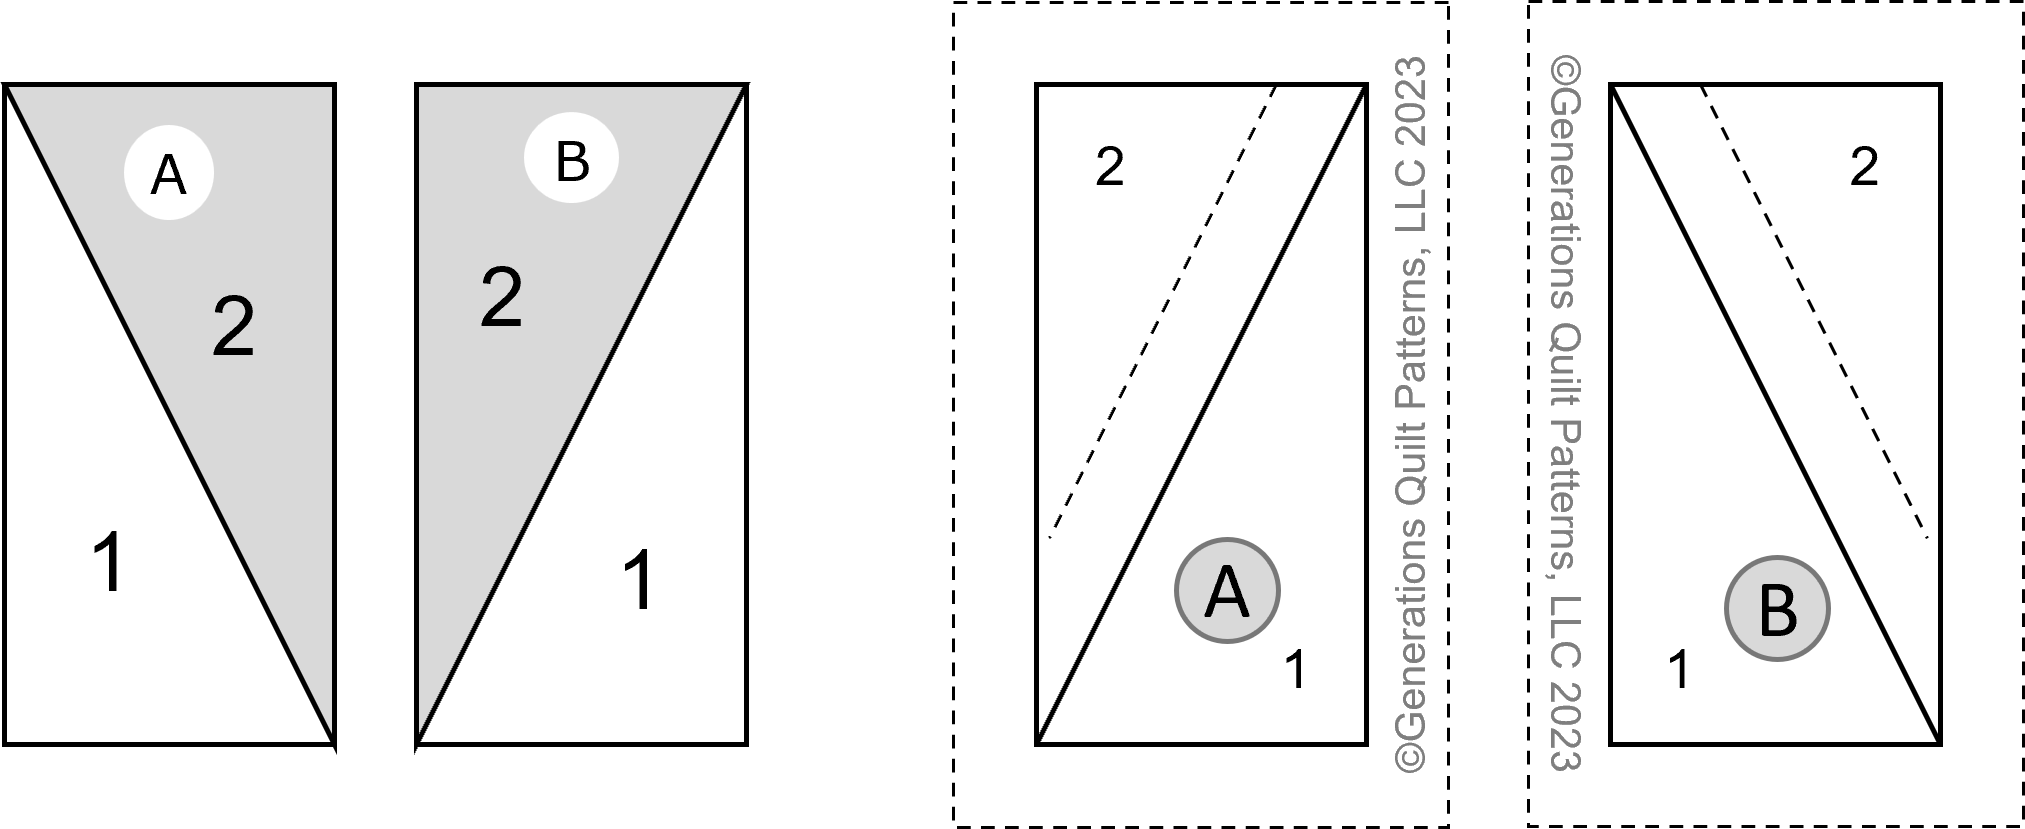 HRTs from the fabric side (left) and from the pattern side (right)
With RST, position the #2 on the HRT-A or HRT-B.
Quick Tip: For HRT-A and B (just like the previous TiaS), always match the wide end of the patch to the point/narrow end.
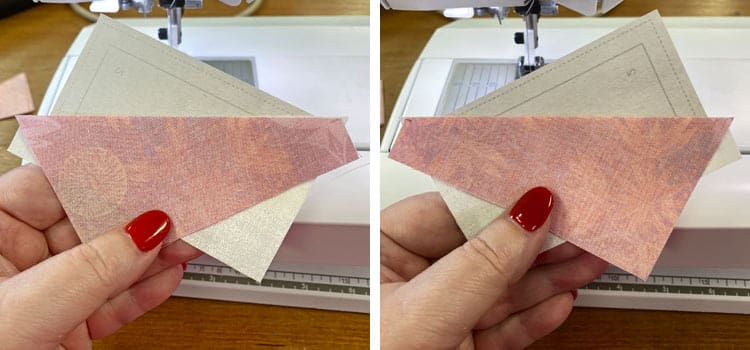
Sew the seam on the solid line, starting and stopping past the outside dashed lines. (blue arrows)
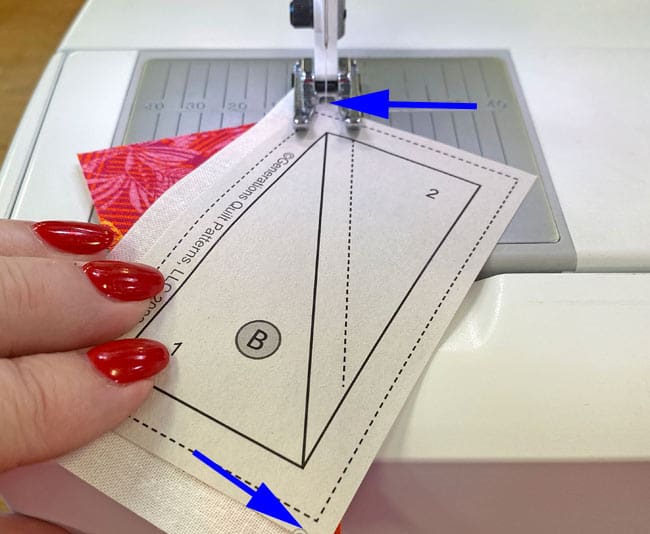
Trim to size, just like you did the TiaSs.
Here are all the As and Bs.

Why Paper Piece a Single Seam? Here's the Scoop! 🕵️♀️🧵
Okay, quilting detectives, let's crack this case wide open! 🔍
- Fancy rulers? More like fancy paperweights at $25+! 💸
- Other methods? They're as slippery as a greased pig with those bias edges!
- Fiddling with cuts? Ain't nobody got time for that! ⏰
Let's face it, quilters: Our brains are bursting with quilt ideas! 🧠💡 (Your "to-quilt" list probably rivals your fabric stash, am I right? 😉)
So why waste precious stitching time wrestling with wonky HRTs? 🤼♀️ Paper piecing is like the superhero of quilting—swooping in to save the day (and your sanity)! 🦸♀️
Remember: Life's too short for fussy cutting. Let's piece it and release it! 🎉🧵
Paper Begone!
All the paper piecing's finished. It's time to remove the paper.
All the outside edges are on straight of grain, so it's no different piecing with these units than ones that've been traditionally pieced.

The paper piecing is complete. From this point forward, return your stitch length to the one you regularly use for piecing and install your favorite 1/4" presser foot.
Side Units
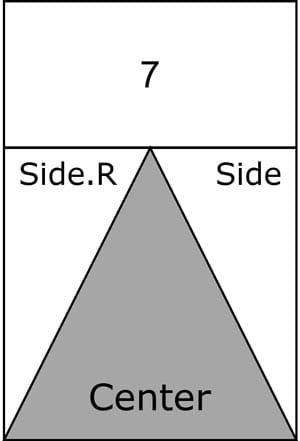
Make 4
With RST, stitch a #4 rectangle to a trimmed TiaS.
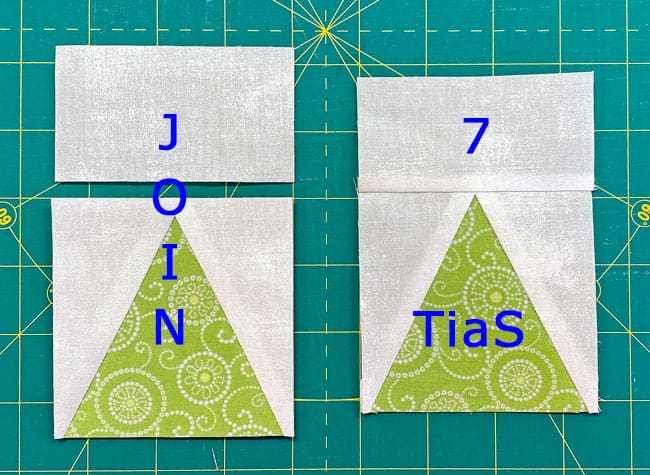
📏Check for Accuracy
For this 12" finished sample, this Side measures 3½" x 5".
After sewing, Side units measure... | |
|---|---|
| Finished Block Size | Edge-to-edge Measurement |
| 8" | 2½" x 3½" |
| 12" | 3½"" x 5" |
| 16" | 4½" x 6½" |
| 24" | 6½" x 9½" |
Bloom Center
Make 4
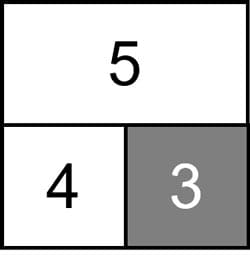
You're about to create the heart of your flower.
With RST, sew #3 to #4. Press this seam open. (below left)
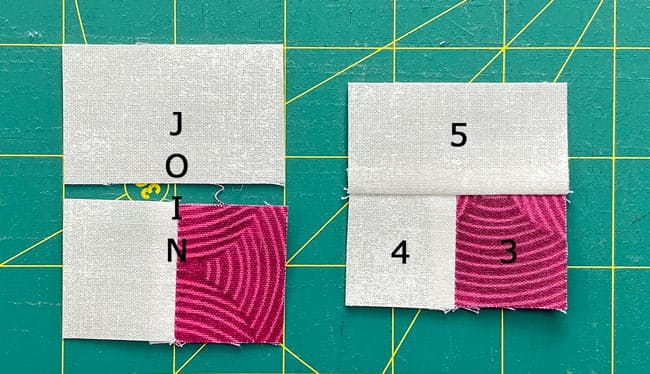
With RST, stitch #3/#4 to #5, pressing this SA toward #5. (above right)
📏Check for accuracy
For our 12" sample, our bloom center measures 2" x 2".
After sewing, Bloom Centers measure... | |
|---|---|
| Finished Block Size | Edge-to-edge Measurement |
| 8" | 1½" x 1½" |
| 12" | 2" x 2" |
| 16" | 2½" x 2½" |
| 24" | 3½" x 3½" |
Bring your Flower unit to life
Make 4
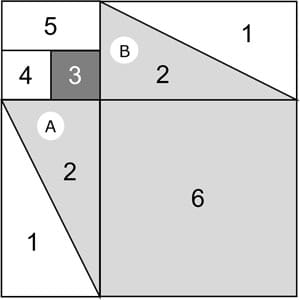 Flower design
Arrange your stitched and cut patches into the Flower design.
Sew the pairs of units into rows. Pinning, of course, as needed to keep the edges and sides even.
These SAs are pressed away from the HRTs.
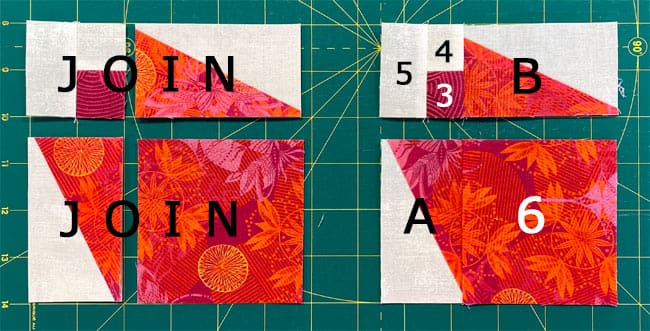
Join the two rows together. Pin as needed. The seam in the center nests to make matching easier.
This last SA is pressed away from the HRTs and toward #6.
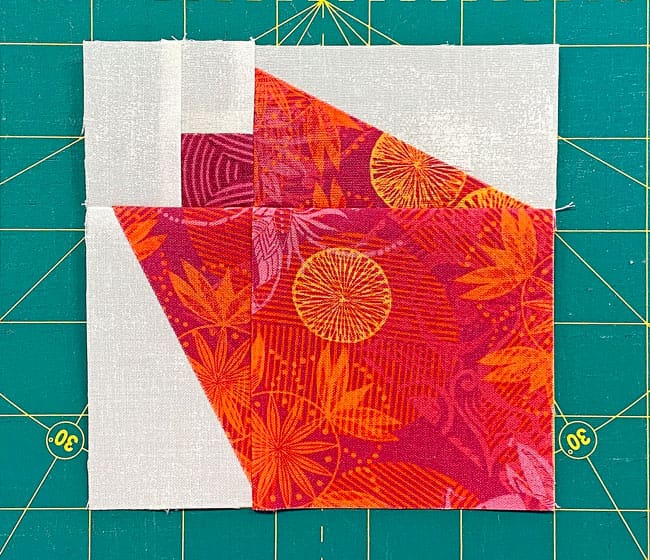
🧩Final Assembly of your Pink Magnolias quilt block
You're in the home stretch now—let's bring your beautiful block to life!
Arrange your patches:
- Flowers bloom from the center
- TiaS units point outward on all sides
- Solid square sits pretty in the middle
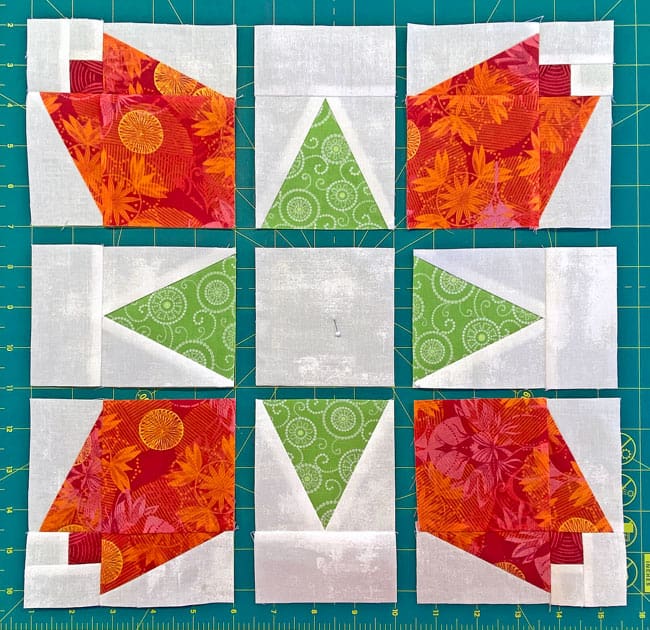
Stitch the patches together into rows.
SAs are pressed toward the TiaSs in each row.
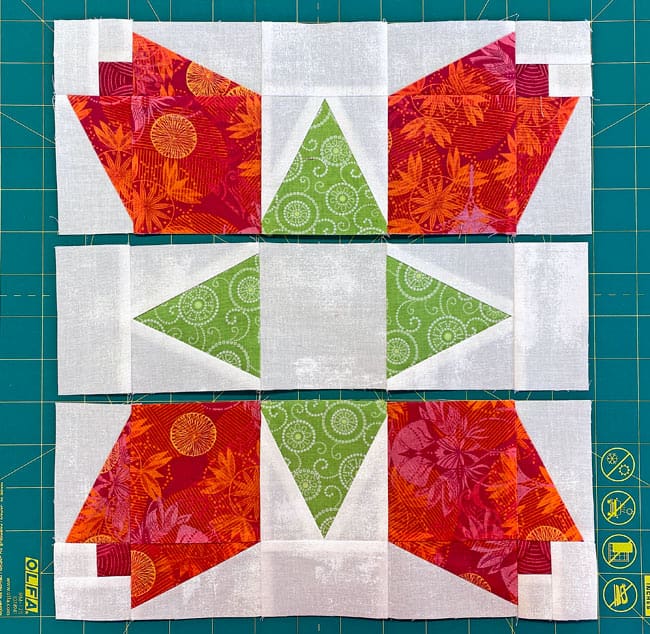
At last, stitch the rows together, matching SAs.
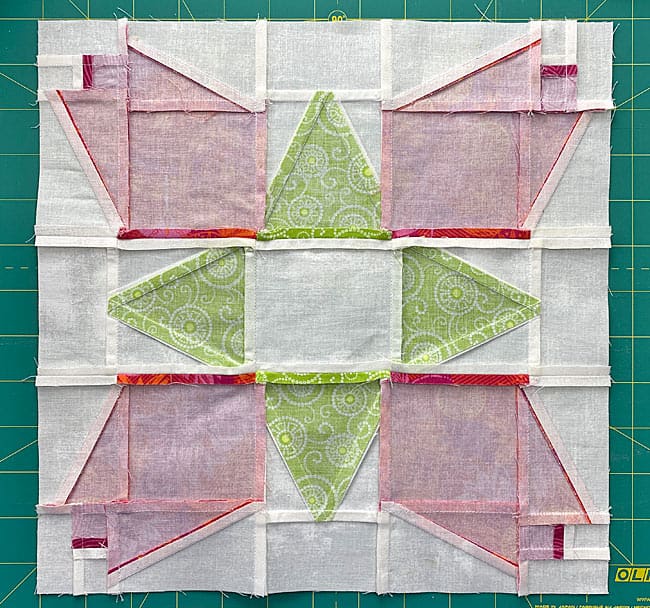
Let's check the backside to see how all our pressed SAs work to eliminate as much bulk as possible.
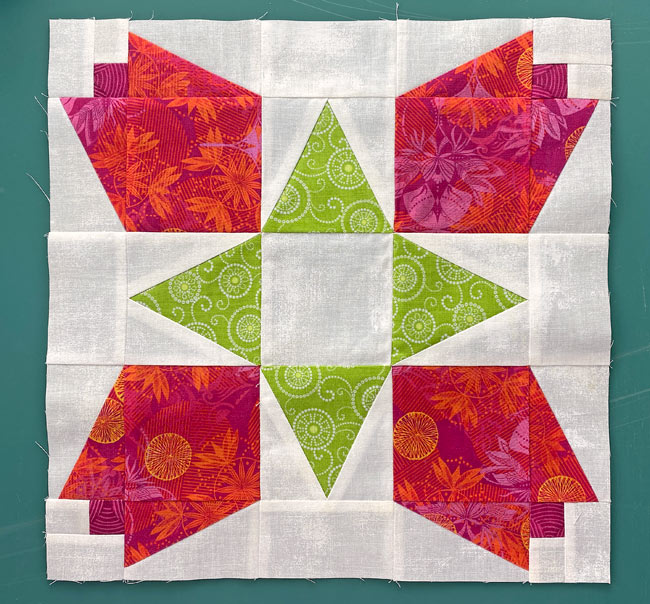
Easy-peasy, lemon-squeezy! Your Pink Magnolias quilt block is blossoming before your eyes. Stand back and admire your work,
You've earned it! 🌺
Craving a touch of spring in your quilts?📌
Pin this Petal-Perfect Magnolias tutorial and let your creativity flourish! Save now, sew a garden of quilts later. 🌸📌
For even MORE blocks to make… 🧩🎨

...visit our Free Quilt Block Pattern Library, with over 260+ blocks to choose from in multiple sizes.
Free downloads are included in all sizes for any blocks require paper piecing patterns or templates.
- Home
- Free Quilt Block Patterns
- Pink Magnolias Quilt Block

