- Home
- Beginner Quilt Blocks
- Nine Patch - Strip Pieced
Strip Piecing A Single Nine Patch Quilt Block
YES! You can!
This post contains affiliate links, for which I receive compensation.
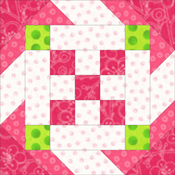
Sometimes a single nine patch quilt block is all that's needed in a block like the Daisy Chain, Heart or Mrs. Keller's Nine Patch shown below.
Other times a super scrappy pattern calls for lots of nine-patches...and they are all SUPPOSED TO BE DIFFERENT.
Who wants to cut all those individual squares???

Not me, that's for sure!
And I bet you don't either.
With a little ingenuity and our handy M.A.T.H. cutting chart, you'll be strip piecing these little bite size wonders in no time.
The Technique
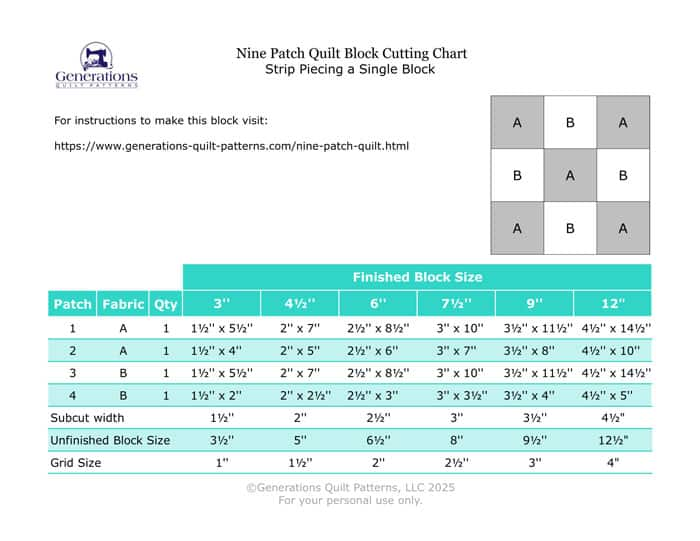
You can either use the formulas below, or just print the cutting chart at the bottom of this page and choose your finished block size.
I'll run through an example to show you that the formula only looks icky...it's not really though...promise!
It's all based on the grid size of the block, adding seam allowance, and then adding a little wiggle room for trimming.
The Formula
The cut Strip Width (SW) is:
Finished block size divided by 3 plus 1/2" for seam allowances (SA)
Cut one each of the following lengths:
From Fabric A (corners and center squares)
- ( 3 x SW ) + 1"
- ( 2 x SW ) + 1"
From Fabric B (4 side squares)
- ( 3 x SW ) + 1"
- ( 1 x SW ) + 1/2"
I suggest that you write down your calculations for the steps as you do them. It's easier to keep track of the calculations and much faster to double-check your math.
Not Every Size Plays Nice: Understanding the Formula's Limitations
This strip piecing formula works beautifully when the finished block size divided by 3 results in a measurement you can easily make with your rotary cutter and ruler — specifically, measurements that end in whole numbers, halves, quarters, or eighths of an inch.
Over the years, many quilters have asked me for cutting instructions for blocks that finish at sizes like 14" (14½" unfinished) or 4" (4½" unfinished).
Here's the challenge: when you divide these measurements by 3, you get 4⅔" and 1⅓" respectively. These aren't measurements most of us can easily mark on our rulers!
If you really want to create nine-patch blocks in these dimensions, you'd need to either:
- Draft a paper piecing pattern for your strip sets, or
- Cut individual squares using templates you've created yourself
Personally, I find both options more complicated than I prefer for what should be a straightforward block. I recommend adjusting your block size to one that divides more neatly, saving you time and potential frustration!
Step 1: Calculate/cut your patches
 Nine patch design
For this example, we'll create a 4-1/2" finished block.
The calculations are...
Finished Block Size = 4.5"
Grid Size for block = 4.5" ÷ 3 = 1.5"
SW = 1.5" + 0.5" = 2"
For a 4-1/2" finished nine-patch, cut 2" wide strips from two fabrics. To calculate the lengths for each fabric, substitute 2" into the equations for SW.
For Fabric A, corner and center squares (white print below):
- ( 3 x 2" ) + 1.0" = 7"
- ( 2 x 2" ) + 1.0" = 5"
For Fabric B, the center side squares (blue fabric below):
- ( 3 x 2" ) + 1.0" = 7"
- ( 1 x 2" ) + 0.5" = 2.5"
If you print the cutting chart, you'll find these same numbers under the 4.5" finished block size.
These are the patches for this block laid out the way they'll be sewn. The white/black is my 'A'; the blue is my 'B'.

Step 2: First two strips
With right sides together (RST) stitch with a 1/4" seam the long edges of two 7" A and B strips. (All SAs are 1/4" for this block.)
Press, first flat to set the seam and then open with the seam allowance (SA) towards the darker fabric (white arrow). In this example, the darker one is the B fabric.

Step 3: Finish complete the stripset
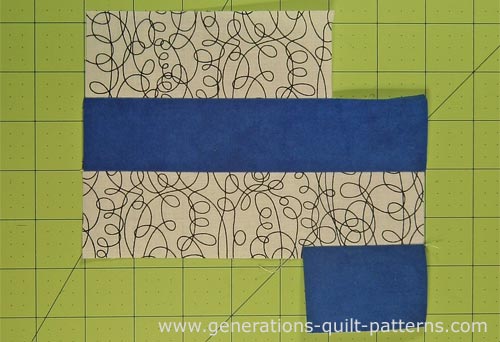
With RST, aligning the short side and one long edge, stitch the remaining B patch to the A side(white and black print).
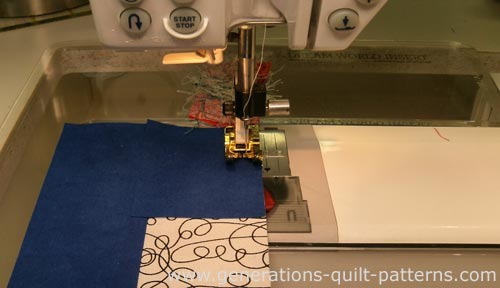
Press as before.
With RST, and again aligning the short edges and one longer edge, stitch the remaining A to the longest B side of the strip set. Press as before.
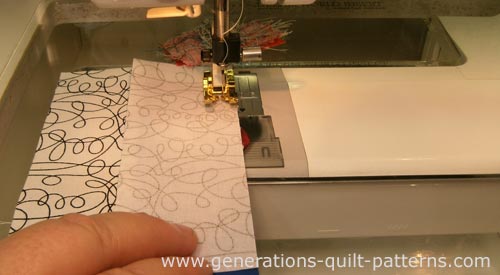
The resulting unit looks rather strange, don't you think?
But it's correct!
Step 4: Create the nine patch
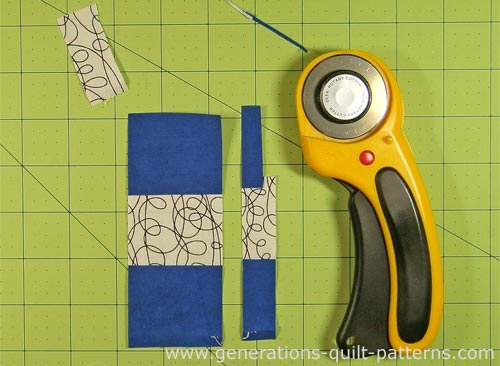
Square up the short edge made up of two As and one B by aligning a line on your ruler (white arrow) with one of the seam lines. Trim with your rotary cutter.

Flip the block (or the cutting mat if you're using a small one) 180 degrees so that the strip-set is in the proper position and cut two units from the left hand side that are the 2" wide or the SW (we calculated this number in Step 1).
If you're working with the cutting chart, you'll find this number in the last row marked "Sub-cut/SW".

Those four white/black squares are the outside corners of this unit.
Now remove (white arrow below) that scrap of white from the remainder of the unit. The white circle shows the remaining straggly threads.
Straighten one of its long edges, just like we did before with your rotary cutter.

Cut this down to a 2" wide unit.
Step 5: Stitch the nine patch quilt block together
The units are all ready for assembling. The waste is on the right below. As you practice this method, you may find that you can add a bit less than the 1" and 1/2" to the formula for squaring up and trimming.
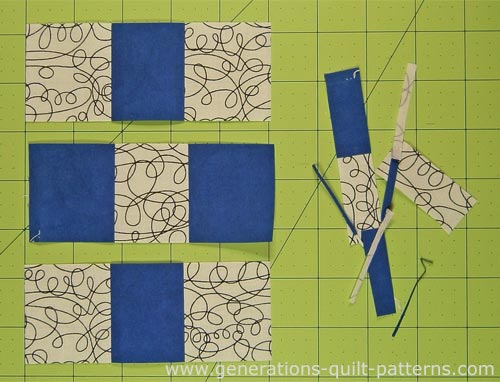
Because we've pressed to the dark, the seams nest to make matching a breeze. Use pins as you need to (I do!).
The finished nine patch quilt block in all its glory!

The promised cutting chart...!
If you prefer a printed cutting chart instead of referring to your phone or tablet at your cutting table, here's the downloadable cutting chart.
Click on the image above to download it. Cutting instructions for finished block sizes: 3", 4-1/2", 6" 7-1/2", 9" and 12" are included.
For even MORE blocks to make... 🧩🎨

...visit our Free Quilt Block Pattern Library, with over 230+ blocks to choose from in multiple sizes.
Free downloads are included in all sizes for any blocks require paper piecing patterns or templates.
- Home
- Beginner Quilt Blocks
- Nine Patch - Strip Pieced
