- Home
- Free Quilt Block Patterns
- Brave World Quilt Block
Brave World Quilt Block Tutorial: 4", 5", 6" and 8" finished blocks
From our Free Quilt Block Patterns Library
This post contains affiliate links for which I receive compensation.
Skill Level: Confident beginner
Technique:Foundation Piecing or traditional piecing
The Brave World quilt block—a variation of a Pinwheel— is a three fabric patchwork design made from one unit repeated four times and rotated a quarter turn as it makes its way around the block.
'Brave World' is also known as 'Brown World'.

This unit is used in many other blocks (none of which look anything like a Pinwheel) including…


On this page, you'll find:
If you find this tutorial helpful, please 'Like' it at the bottom of this page.
Let's get busy quilting!
Hate Paper Piecing?
Not to worry.
Click here for instructions for traditional piecing techniques to make this block.
General Instructions
Several abbreviations are used in this tutorial:
- BW - Brave World
- SA - seam allowance
- RST - right sides together
- HST - half square triangle
When you are instructed to press, first press the pieced unit flat to set the seam. Then open the patch, pressing from the front. Paper pieced patches are always pressed toward the patch last added.
Sometimes I use steam; sometimes I don't. Just know that if you do, the steam has a tendency to curl the paper pattern.
I also like to use our Best Technique for Pressing Quilt Blocks. The results are the absolute flattest (even with the paper) blocks that you'll ever see.
And that's a promise!
Highlighted in yellow, pressing instructions are easy to spot.
First press the patches in the closed position as they came off your sewing machine. This sets the seam, melding the fibers of the threads into the fibers of the fabric.
Paper pieced seams are always pressed towards the last patch added.
Step 1: Download paper piecing patterns
You'll need the most current version of Adobe installed on your computer to download the pattern.
On the Adobe Print Menu page, under 'Page Size and Handling' set 'Custom Scale' to 100% before printing for accurate results. Click here to see what it looks like on the Print Menu page.
Choose your Finished Block Size from the chart below and print the number of copies needed for a total of 4 Brave World units.
Print the Brave World Paper Piecing Units | ||
|---|---|---|
| Finished Block Size | Finished Unit Size | Print this many copies for each block |
| 4" | 2" | 1 |
| 5" | 2½" | 1 |
| 6" | 3" | 1 |
| 8" | 4" | 2 |
After printing, use the 1" square graphic on the printed pages to confirm they are printed accurately.
Not sure which paper piecing paper to use?
Click here for "Does it really matter which paper piecing paper you use?" to help you make the best decision for your needs.
New quilt fabrics to tickle your fancy...
Click the images below to see the full collection. We share any commercial and/or free patterns that showcase them, too. (For inspiration, of course!)


Step 2: Cutting for a Brave World quilt block
 Brave World design
Sample Size: 6" finished / 6-½" unfinished
Grid: 4×4
Attribution: Farm Journal
AKA: Brown World (Nancy Cabot)
Design Type: Pinwheel | Basic quilt block unit | Paper Piecing
Three fabrics—a light, a medium, and a dark are all you'll need to complete this block.
As always, make sure there's enough contrast between the fabrics so that the points in your piecing show.
Label your patches. We refer to them throughout the tutorial.
Download the block design and paper piecing cutting chart here.
 | Cutting Chart for a~Paper Piecing ~ | ||||||
|---|---|---|---|---|---|---|---|
| Patch | Fabric | Qty | Finished Block Size | Sub Cut | |||
| 4" | 5" | 6" | 8" | ||||
| BW1 | Med | 4 | 1¾" x 1¾" | 2" x 2" | 2¼" x 2¼" | 2¾" x 2¾" | --- |
| BW2, BW3 | Light | 4 | 2⅜" x 2⅜" | 2⅝" x 2⅝" | 2⅞" x 2⅞" | 3⅜" x 3⅜" | |
| BW4 | Dark | 2 | 3⅜" x 3⅜" | 3⅞" x 3⅞" | 4⅜" x 4⅜" | 5⅜" x 5⅜" | |
| Unfinished Block Size | 4½" | 5½" | 6½" | 8½" | --- | ||
| Grid Size | 1" | 1¼" | 1½" | 2" | --- | ||

Step 3: Paperpiece the Brave World units
General Sewing Machine Setup for Paperpiecing
- Reduce your stitch length to 16–20 stitches per inch (1.3-1.6 mm). This perforates the paper and stabilizes the seam when you remove the pattern. [Learn more about stitch length here.]
- Reduce your machine's speed or just plain slow down. Sew only as fast as you can stay on the stitching lines.
- Install an open toe appliqué foot (sometimes called an 'embroidery' or 'satin stitch' foot) if you have one (it's easier to see where you're stitching with one installed).
- Use a larger needle (90/14) if you have problems removing the pattern.
- If your machine has a needle stop up, use it. The stitching goes faster when you don't have to lift the presser foot with every seam.
- As you stitch each seam, start and stop a generous 1/4” before and after the solid stitching lines. ALWAYS. Future lines of stitching secure the ends.
After adding each patch, press the unit as it was sewn to set the seam and then open. The SA is automatically pressed towards the last patch added.
Before adding the next patch, take a look to make sure the one you just added covers the space plus seam allowance that it is supposed to.
Steam is optional and usually curls the pattern.
If that bothers you, don't use steam. Sometimes I do. Sometimes I don't.
It truly depends on my mood.
Remember, as you follow this paper piecing tutorial, the printed and the fabric sides of this block are mirror-images of each other.
At last!
Let's sew!
Cut the pattern into individual blocks. This is a rough cut, don't worry about cutting exactly on the line. You'll do that when you trim your blocks to size.
Use the dashed lines inside the block to position Patch BW-1 (turquoise). This positioning automatically creates a quarter inch seam allowance—perfect for positioning BW-2 (black&white).
I use a little dab of Elmer's Glue Stick (the kind that goes on purple and dries clear) to hold BW-1 in place.
 If you think the image is curved a bit—you're right—this patch is on top of my lighted magnifying glass so that you can see the fabric! :D
With right sides together (RST), layer BW-2 with the cut edge of BW-1, aligning the edges as shown below.

Stitch starting before and ending after the solid stitching line. These stitches will be secured by the next line of stitching that crosses them.

Press. Repeat for Patch BW-3 (black&white).

Press.
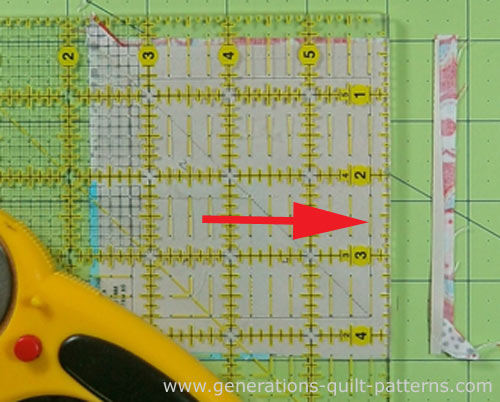
Now we'll trim the diagonal edges to create a line to align our next patch with.
Match the edge of your ruler with the solid, diagonal line separating Patch BW-4 from the rest of the block.

Use the ruler edge to crease the pattern along this line. You will need to free some of the stitches in your seam allowance from the paper to do this. Just give them a little tug.
Helpful Hint:
If you accidentally rip the paper in a big way—and I do every once in a while—you can repair the tear with Magic Tape® (Scotch Brand).
You won't ever press from the paper side so there's no worry about melting it. The Magic Tape® seems to hold up nicely, though, to the heat of the iron.
For small tears, most times you won't need the tape. The tear doesn't effect the accuracy of your piecing.
Fold the pattern back along this creased line.
Now align the 1/4" line of your ruler with this fold and cut with your rotary cutter.

You've now created a quarter inch seam allowance.
Align Patch BW-4 (red print), RST with this cut edge and stitch.
 Align the cut edge of Patch 4 with the edge you just trimmed
Press.
Trim the unit to size by matching the 1/4" line on your ruler with the solid outline of the block. Cut. Repeat for the three remaining sides.
Remove the paper and press.

The paper piecing is complete. From this point forward, return your stitch length to the one you regularly use for piecing and install your favorite 1/4" presser foot.
Step 4: Assemble your Brave World quilt block
Lay out the trimmed units. Each Brave World unit is rotated a quarter turn as you go around the block.

Stitch into rows. The SAs of the HST nest making it easier to match the triangle points in the center.

Press.
Stitch the two rows together. Again, the seam allowances nest making it easier to get a nice match in the center of the block.
For an even flatter center, I've twirled the seam allowances to reduce the bulk.

Your Brave World Quilt Block is finished!
 Our Brave World is complete!
A variation on the color placement...

The Spinner
The color placement has all been switched. It looks like a basic Pinwheel quilt block decorated with rick-rack, don't you think?
🌀More playful pinwheel quilt blocks to stitch!

You've finished your pinwheel quilt block, and you're ready for more!
Our pinwheel quilt blocks are a delightful blend of playful interlocking patterns and vivid, eye-catching color. The interlocking patterns dazzle your eyes and inspire your creativity, while our step-by-step instruction ensures that you can create these stunning blocks with ease.
Click here to dive in and turn your fabric into MAGIC!
For even MORE blocks to make… 🧩🎨
...visit our Free Quilt Block Pattern Library, with over 260+ blocks to choose from in multiple sizes.
Free downloads are included in all sizes for any blocks require paper piecing patterns or templates.
- Home
- Free Quilt Block Patterns
- Brave World Quilt Block


Yummy fabrics
to drool over
Click any image below to see the full collection and find pricing and ordering information.


By Julie Baird
Copyright © 2008-2026 Generation Quilt Patterns, LLC
All Rights Reserved
Generations-quilt-patterns.com does not sell any personal information. (See Privacy Policy)