- Home
- Quilting Tools/Supplies
- Corner Beam Ruler
The Corner Beam Ruler, Part 2
Painless. Pointy Perfection. Our tutorial and review continue...
This post contains affiliate links, for which I receive compensation.
Our Corner Beam unit is cut and stitched. All that's left is to trim it to perfection.
Let's get back to work!
Use these links to quickly move to different parts of our Corner Beam Ruler tutorial and review.
Step 3: Trimming
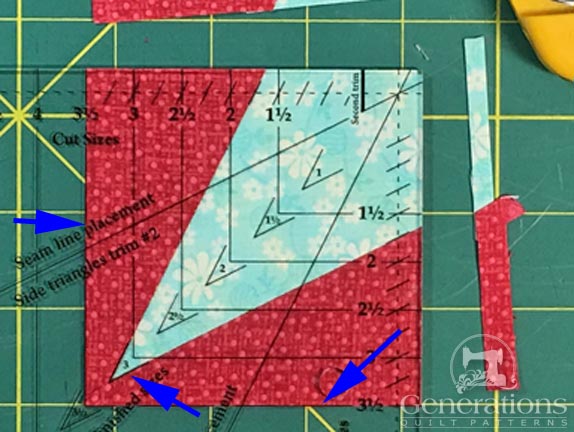
At your cutting mat, align the large 'V' marking with seamlines of the turquoise center, point in the upper righthand corner for righthanders. Upper left for lefthanders.
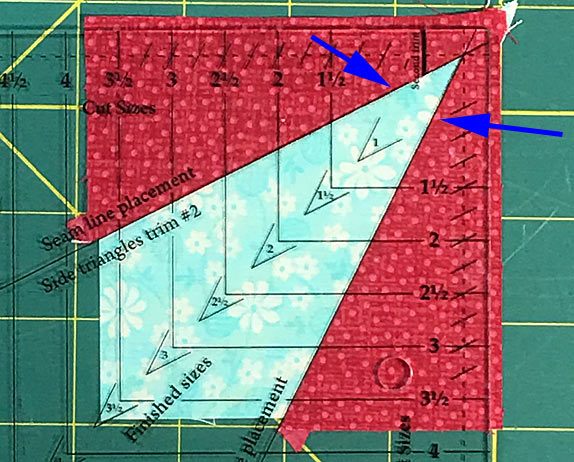
With your rotary cutter trim the right and top sides.
Lift the ruler and flip the block so the pointy trimmed side in in the lower left-hand corner.
Find the marks on the Corner Beam ruler that correspond to the unfinished or cut size (3-1/2" for our sample) and align with the trimmed edges.
Align the acute angle labelled with the FSIZE with the pointy point.
Trim the remaining two sides.
And here it is. Painless. Pointy. Perfection.
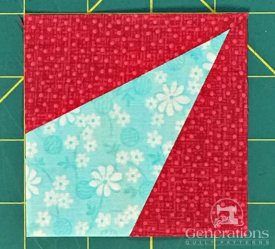
An accurate angle, with its point perfectly positioned a 1/4" from both edges. A Beam that's widest edge is perfectly halfway between the two sides at the seam line.
Nice straight outside edges that make piecing it to another unit a breeze.
All that's left to decide is do you NEED this ruler?
What to do with the leftover scraps?
As mentioned previously, the scraps from cutting the Center patch are not large enough to use in the same size block.
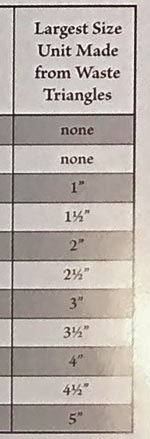 Last column of the cutting chart
If you're a scrap quilter, they needn't go to waste.
Cut them down using the 'Side Triangle Trim #' line on the ruler and the last column of the cutting chart.
Label a Ziploc bag and store the newly sized units for future use.
To sweeten the deal, these patches can be used in several other blocks:
- Triangle in a Squares
- Split or Half Rectangles
- The diamond shape in a Storm at Sea blocks
Don't have the accompanying Studio 180 rulers for those blocks?
Not to worry.
Those same patches can be used with the corresponding free paper piecing patterns on this site. The angles are cut just right and there's straight of grain on the outside edge.
It doesn't get much better than that...
...except that you've also eliminated virtually all of the waste.
Awesome Sauce!
My Recommendation
The Corner Beam Ruler does EXACTLY as promised.
Use good rotary cutting technique (and we all use good technique) and the patches are cut accurately.
The true genius of this fabulous quilting tool is that you trim the unit to the perfection with the same ruler after stitching.
If you've used any of the free block tutorials on this site, you already know that makes my own quiltmaking philosophy—perfect patches are just plain easier to piece with.
All the markings you need are directly on the ruler. The lines/markings are thin to improve accuracy
Now the question is do YOU need this ruler?
If you've got blocks to make that use this unit AND you hate paperpiecing, hate using templates and it's in your budget, then YES.
Unequivocally, YES!
It's that good (in my humble opinion—and I'm NOT a gadget gal.)
If you're only need a few of these units, then either paperpiecing or templates will be more economical. You can find both on this website.
The final decision comes down to what's your time worth to you and does it at least justify the initial cost of the ruler.
Is a Corner Beam ruler in your future?
Still undecided?
Check out reviews for this quilting ruler on Amazon.com.
Blocks using the Corner Beam ruler
To date only one block, the Autumn Leaf, currently on the site uses the Corner Beam ruler.
Quite simply, up until now I hadn't found the easiest way to make these units and relied on both paper piecing and templates.
Both are perfectly good methods, but both require a bit of monkeying around.
Since purchasing this ruler, I stitched several more blocks using the Corner Beam. All that's left is to write and edit the tutorials.
Watch this space for links to them as they are published.
More rulers from Studio 180
Intrigued?
Tucker Trimmer rulers by Studio 180 are all used to trim HSTs, QSTs and Flying Geese.
Click the image below to learn more, read reviews and find pricing/purchasing information.
- Home
- Quilting Tools/Supplies
- Corner Beam Ruler
