- Home
- Free Quilt Block Patterns
- Jack in the Box Quilt Block
Pop Open Your Creativity with the Jack in the Box Quilt Block Tutorial 🎁💥🧵
Thinking outside the box, stitching on the lines 📐✨
This post contains affiliate links, for which I receive compensation.
Skill Level: Beginner
The Jack in the Box quilt block is simple to make using either the Connector Corners technique or paper piecing for perfect pointy points.
You'll find both techniques available on this page in three different sizes.
As always, if you choose to paper piece, the pattern downloads are free and located on this page, too!
Let's get started!
🧭Ready to unbox specific parts of this quilting adventure?
Use these handy links to jump straight to the section you need. Let's make navigation as smooth as your favorite rotary cutter! 🧭✂️
- A cutting chart in 5 sizes with a download of the chart and block design
- A download of the paper piecing patterns and templates for each size
Cut. Sew. Press. Spring into action with Jack-in-the-Box magic!
📋 General Instructions
When you are instructed to press, first press the pieced unit flat to set the seam. Then open the patch, pressing from the front. Seam allowances are pressed to the dark fabric unless otherwise noted.
Regardless of the technique you choose, try our favorite method for getting flatter blocks. Click here to learn about this simple and effective pressing technique.
New quilt fabrics to tickle your fancy...
Click the images below to see the full collection. We share any commercial and/or free patterns that showcase them, too. (For inspiration, of course!)


✂️Choose a technique, a size and then cut your patches

Sample Size: 7½" finished / 8" unfinished
Grid: 5x5
Attribution: Ruby McKim
AKA: Whirligig (Carrie Hall and Rose Kretsinger)
Design Type: Uneven 9-patch, small center, Pinwheel
The blue chart is for paper pieced Jack in the Box quilt blocks.
The green chart further below is for blocks using the Folded Corners technique and traditional piecing.
Download and print your paper piecing pattern
You'll need the most current version of Adobe installed on your computer to download the paperpiecing pattern.
On the Adobe Print Menu page, under 'Page Size and Handling' set 'Custom Scale' to 100% before printing for accurate results.
Click here to see what it looks like on the Print Menu page.
Download and Print the Paper Piecing Pattern | ||
|---|---|---|
| Finished Block Size | # of copies to print | PDF Download |
| 5" | 1 | 2" |
| 7½" | 1 | 3" |
| 10" | 2 | 4" |
| 12½" | 4 | 5" |
| 15" | 4 | 6" |
There is a 1" square on the page to help you confirm it is printed correctly.
Note, too, that the 'Patch #'s' are sometimes words. This is to make it easier to keep track of the units between both methods.
The green chart is for the Folded Corners technique and traditional piecing.
Choose your method and cut from the appropriate chart.
Set yourself up for success by labeling each patch. This simple step will make navigating the tutorial as easy as pie.
Paper piecing
 | Cutting Chart for a~ Includes Paper Piecing ~ | |||||||
|---|---|---|---|---|---|---|---|---|
| Patch | Fabric | Qty | Finished Block Size | Sub Cut | ||||
| 5'' | 7½'' | 10'' | 12½'' | 15'' | ||||
| 1 | A | 4 | 1⅝'' x 2¾'' | 2⅛'' x 3¾'' | 2⅝'' x 4¾'' | 3⅛'' x 5¾'' | 3⅝'' x 6¾'' | --- |
| 2, Sky | B | 8 | 2⅜'' x 2⅜'' | 2⅞'' x 2⅞'' | 3⅜'' x 3⅜'' | 3⅞'' x 3⅞'' | 4⅜'' x 4⅜'' | |
| Goose | A | 1 | 3⅝'' x 3⅝'' | 4⅝'' x 4⅝'' | 5⅝'' x 5⅝'' | 6⅝'' x 6⅝'' | 7⅝'' x 7⅝'' | |
| 5 | A | 4 | 1½'' x 2½'' | 2'' x 3½'' | 2½'' x 4½'' | 3'' x 5½'' | 3½'' x 6½'' | --- |
| Center | B | 1 | 1½'' x 1½'' | 2'' x 2'' | 2½'' x 2½'' | 3'' x 3'' | 3½'' x 3½'' | --- |
| Unfinished Block Size | 5½'' | 8'' | 10½'' | 13'' | 15½'' | na | ||
| Grid Size | 1 '' | 1½'' | 2'' | 2½'' | 3'' | na | ||
Folded Corners with traditional piecing
 | Cutting Chart for a~ Traditional Piecing ~ | ||||||
|---|---|---|---|---|---|---|---|
| Patch | Fabric | Qty | Finished Block Size | ||||
| 5'' | 7½'' | 10'' | 12½'' | 15'' | |||
| 1, Goose | A | 8 | 1½'' x 2½'' | 2'' x 3½'' | 2½'' x 4½'' | 3'' x 5½'' | 3½'' x 6½'' |
| 2, Sky | B | 16 | 1½'' x 1½'' | 2'' x 2'' | 2½'' x 2½'' | 3'' x 3'' | 3½'' x 3½'' |
| 5 | A | 4 | 1½'' x 2½'' | 2'' x 3½'' | 2½'' x 4½'' | 3'' x 5½'' | 3½'' x 6½'' |
| Center | B | 1 | 1½'' x 1½'' | 2'' x 2'' | 2½'' x 2½'' | 3'' x 3'' | 3½'' x 3½'' |
| Unfinished Block Size | 5½'' | 8'' | 10½'' | 13'' | 15½'' | ||
| Grid Size | 1'' | 1½'' | 2'' | 2½'' | 3'' | ||

🪡Assemble the Jack in the Box unit
Make 4

Folded Corners ~ Traditionally pieced
Click here for detailed instructions using Folded corners to make the units.
When you are finished, click the 'Back' button on your browser bar to return here.
Paper piecing
 and from the fabric side (right)") The paper pieced unit from the pattern side (left) and from the fabric side (right)
The paper pieced unit from the pattern side (left) and from the fabric side (right)We need to make a few adjustments to our sewing machine settings to paper piece.
- Reduce your stitch length to 16–20 stitches per inch (1.3-1.6 mm). This perforates the paper and stabilizes the seam when you remove the pattern. [Learn more about stitch length here.]
- Reduce your machine's speed or just plain slow down. Sew only as fast as you can AND stay on the solid stitching line.
- Install an open toe appliqué foot (sometimes called an 'embroidery' or 'satin stitch' foot) if you have one (it makes it easier to see where you're stitching).
- Use a larger needle (90/14) IF you have problems removing the pattern. Personally, I use an 80/12 Microtex Sharp for paper piecing without any issues.
Cut the four patterns from the downloaded page(s) just outside the dotted lines.
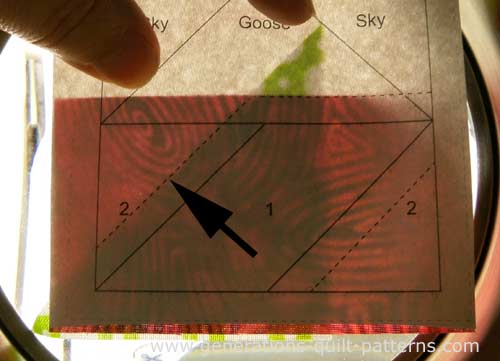
With a dab of Elmer's Washable Glue Stick, the one that goes on purple and dries clear, stick the back side of #1 to the unprinted side of the pattern. Use the dashed placement line that runs through the Goose patch (black arr0w) to position it.

This patch should extend approximately an 1/8" past the outside edges of the unfinished block.
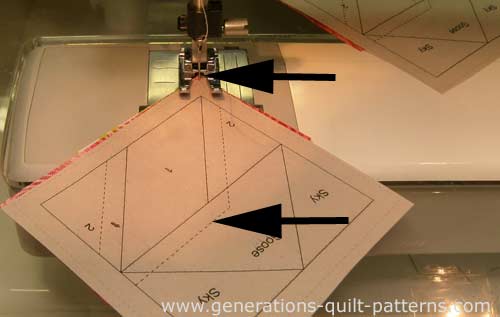
With RST add a #2. It doesn't matter which side is first. Just be consistent. That way if you've making a boatload of these blocks, you can get a rhythm going. You should be able to see through the pattern to use the dashed placement line.
Stitch, starting and stopping a good 1/4" before and after the solid line. (see arrows)
Press.
Add the second #2 and press.
Add a 'goose' triangle. Use the placement line to help you position it.
Stitch, starting and stopping past the edge of the unfinished block.
Trim to a quarter inch seam. In the photo below, just the excess green dot fabric will be trimmed away.

Press the Goose.
Add the Sky triangles one at a time, pressing and then trimming away any excess after each is added.
Before trimming, the Jack in the Box unit looks like this...

To trim, align the 1/4" mark of your ruler with the solid outline of the block. Trim with your rotary cutter. Repeat for all sides.

Repeat to make the three remaining units.
Go ahead and remove the paper from your trimmed units. It no longer serves a purpose.

The paper piecing is complete. From this point forward, return your stitch length to the one you regularly use for piecing and install your favorite 1/4" presser foot.

🧩Assemble your Jack in the Box quilt block
Lay out the Jack in the Box units and cut patches into rows like this. Pay careful attention to rotate the pieced units a quarter turn clockwise as you move around the block. The geese point out from the center.

With a 1/4" seam allowance, stitch the patches into rows. Press with SAs in the direction of the arrows, away from the pieced Jack in the Box units.

Sew the rows together with a 1/4" seam. After one final press, your finished Jack in the Box quilt block looks like this!

Maybe it's because I'm making this at Christmastime, but this block really reminds me of a bow? You, too?
Common Variations
There are a few variations on the basic design. The one thing that doesn't change is the strong movement created by the central pinwheel motif.

Colorado Beauty
In this first variation, the unit is the same, but the cut square and rectangles are removed.
Click here for instructions to make a Colorado Beauty block.

Seesaw
The rectangle has lost a HST.
Click here for instructions to make a Seesaw quilt block.

Land of Lincoln
The pieced rectangle is flipped end to end and the goose has lost one of it's sky patches.

Lucky Pieces
Two HSTs are substituted in for the goose!
Same name, different block...

This version of the Jack in the Box quilt block is closely related to ours—the only difference being the HSTs that have replaced the pieced rectangles.
From Box to Block: Jack's Quilting Metamorphosis 🐛📦🦋
The Jack in the Box quilt block is now part of your quilting arsenal. 🧰 From choosing your technique to pressing that final seam, you've unlocked a new level of creativity. 🔓
Remember, every block is a chance to think outside the box and stitch on the lines. 📐
Until next time, keep popping with creativity, and happy quilting! 🎁💥🧵
📌Unbox this tutorial anytime by pinning it now!
Pin this tutorial and have a quilting adventure ready whenever you are! 🧭 💡

For even MORE blocks to make… 🧩🎨
...visit our Free Quilt Block Pattern Library, with over 260+ blocks to choose from in multiple sizes.
Free downloads are included in all sizes for any blocks require paper piecing patterns or templates.
- Home
- Free Quilt Block Patterns
- Jack in the Box Quilt Block


Yummy fabrics
to drool over
Click any image below to see the full collection and find pricing and ordering information.


By Julie Baird
Copyright © 2008-2026 Generation Quilt Patterns, LLC
All Rights Reserved
Generations-quilt-patterns.com does not sell any personal information. (See Privacy Policy)