This post contains affiliate links for which I receive compensation
Square in a Square quilt block problems
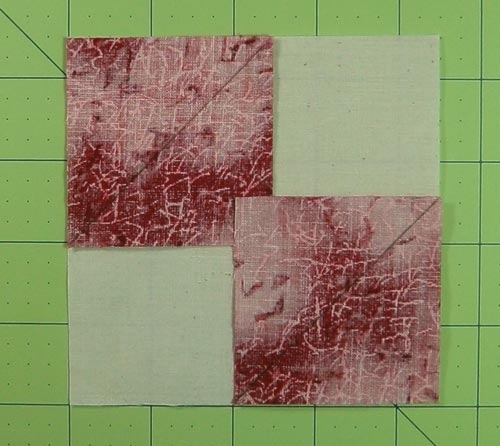
When making a square in a square quilt block you cut a 4 1/2" square and four 2-1/2" squares and put the squares onto all 4 corners of the 4 /1/2 block.
How do you not loose the centre points when you stitch the finished blocks together???
Do you understand what I mean??
Reply
Yes, I understand your question.You have, indeed, cut your pieces correctly to end up with a 4-1/2" unfinished (4" finished) square in a square quilt block.
The 'trick' is where you sew to make this block.
Below are the steps to make a square in a square quilt block. The shirting fabric is cut 4-1/2" square, the red squares are cut at 2-1/2".
Step 1: Mark a diagonal line on the backs of the smaller cream squares. This is your sewing line. As long as you sew on this line and not 1/4" away from it, your blocks will work out every time.
I've used a Sharpie here so that the lines will shown up in the picture. In real life I would mark with either a chalk pencil or a graphite pencil...depending on which was handy. Make the lines just dark enough to see.
A couple of times I've marked with too much 'gusto'—the lines were too dark and shadowed through the seamline. Remember, the lines are your sewing lines and not an integral part of the block.
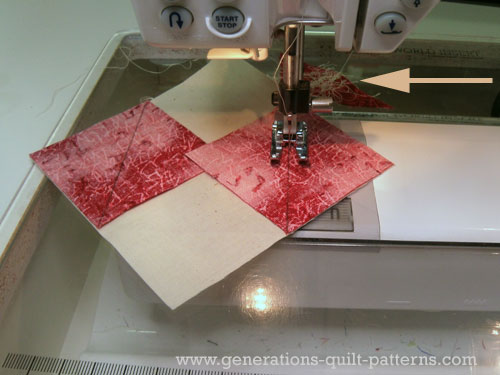
Step 2: Sew one red square in each of two opposite corners of the shirting square, beginning and ending at the outside edges. The arrow points to my anchor cloth. I start my stitching on that so my sewing machine doesn't eat the corner of my patch.
Step 3: Press flat to set the seam allowances. Then press the red square back on itself towards the outside edge.
Step 4: Trim away the excess red fabric leaving behind a quarter inch seam allowance. Notice that I didn't cut away any of the larger, cream-colored fabric.

There are two schools of thought on this. Many quilters do it this way and trim away the excess from the smaller square. I like this because the original 4-1/2" square was cut the exact size needed. Sometimes my sewing on the diagonal isn't as 'exact' as it should be. Leaving the larger square intact means that the sewn unit will be correct regardless of my sewing skills. This method dictates that the seam allowances are pressed away from the center square.
Others choose to remove both the excess cream AND red fabric to reduce bulk, especially if the quilt will be hand quilted.
An added benefit of removing both layers in this second method is YOU control the direction the seam allowances are pressed.
Step 5: Layer the two remaining red patches in the remaining opposite corners.
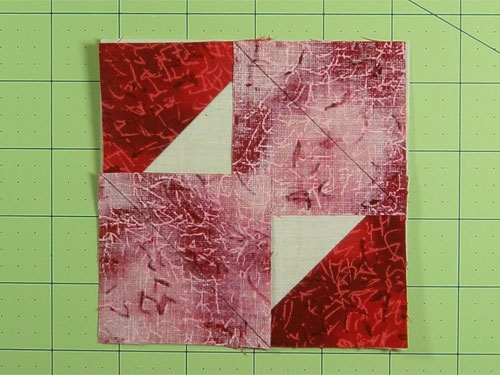
Stitch on the line, press and trim as you previously did in Steps 3 and 4.
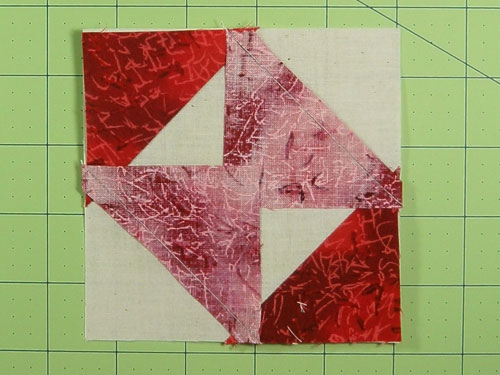
One final press and you're done.
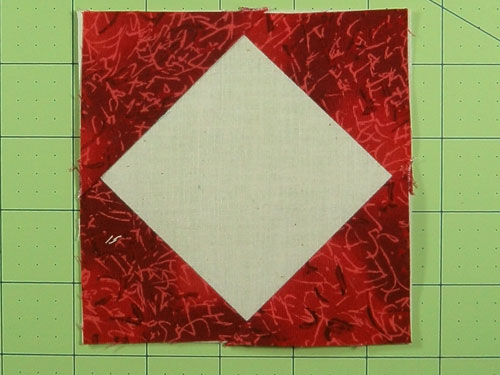
If any of the corner square fabric sticks out past the 4-1/2" square, trim it even with the bottom patch, because it was cut the exact size to begin with.
For instructions for paper piecing this block and a chart of cutting dimensions for the technique described above please go to Square In a Square Quilt Blocks.
Piecefully,
Julie Baird
Editor


Nifty Notions


By Julie Baird
Copyright © 2008-2026 Generation Quilt Patterns, LLC
All Rights Reserved
Generations-quilt-patterns.com does not sell any personal information. (See Privacy Policy)