Sewing Machine Troubleshooting Guide
This post contains affiliate links, for which I receive compensation.
Sewing machine troubleshooting can and should be learned by anyone who owns and uses a sewing machine.
Not only will you save time by eliminating unnecessary trips to the repairman, but you'll save money on unneeded repair bills.
Learn by doing. Troubleshoot by thinking logically about the common problems you'll face during your sewing time.

The purpose of this troubleshooting guide is twofold.
- First you'll learn some simple preventative maintenance to perform on your own machine.
- Breaking needles, breaking threads, or unbalanced tension. are the next problems you'll learn how to conquer.
Follow these simple steps to avoid time spent troubleshooting instead of contentedly sewing along.
If you haven't had the opportunity to look inside a sewing machine to see just how a stitch is formed, please take a minute to watch the video on our page Learn How Sewing Machines Work. (This link opens in a new window to make it easy to come back here.)
The first step to a happy sewing machine
Before beginning, locate the instruction manual that came with your domestic sewing machine.
Find a place to keep it handy when you are sewing. It is an invaluable aid to diagnose problems and likely has a directory of problems and fixes indexed in the back.
For myself, I keep my manual in my Tutto sewing machine carrying case. Between bee and retreats, my sewing machine travels away from home at least twice a month.
Keep it clean to prevent the need for troubleshooting
I can't stress it enough: keep your machine clean.
Personally I pull out the bobbin case and brush everything out at least every other bobbin...usually.
This is what happens when you don't...
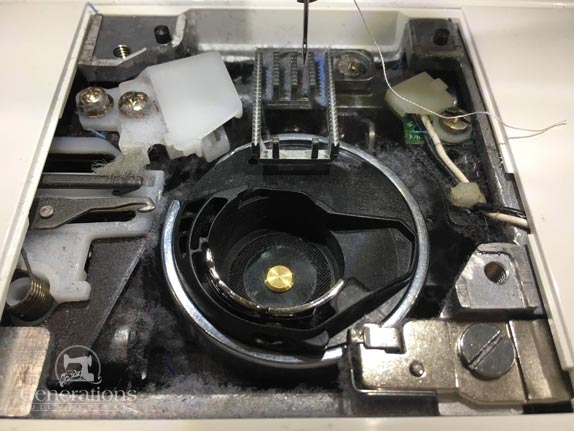
Seriously.
I was a bad quilter. Bad. Bad. Bad.
This is my new machine and after a few days at retreat I realized I hadn't cleaned out the bobbin area once.
My bad.
All that lint robs your machine of lubrication.

It can get stuck in the tension spring on your bobbin case and cause all kinds of tension problems.
Periodically (when I'm in my right mind) I'll vacuum out the inside of the bobbin area.
I have one of these micro vacuum attachment packages and use it with my standard vacuum cleaner. Works like a charm.
Canned air?
Please don't use it...for two reasons:
- Because your machine is closed (not open like a serger) the air blows the lint back into the workings of your sewing machine, where you can't reach it...only your repairman can, and...
- The chemicals in the product can cause condensation and that isn't good for the metal parts
Keeping your sewing machine clean is one of the best ways to prevent troubleshooting excursions.
The importance of needles
Sewing machine needles are such little insignificant things. Or are they?
This tiny piece of metal is at the root of so many problems. ‘Good thing it's so easy to change. For almost every problem listed in this guide, it is the first thing to check.
Troubleshooting needles
- If the problem just started, insert a new needle. Keep in mind that just because it is new and fresh from it's package, doesn't mean it's perfect.
- Change it if you hit a pin. (Friends don't let friends sew over pins!) Same goes for a one that you've been using for several hours. The smallest amount of damage to its tip will affect stitch quality.
- A bent needle? Of course, you'd change it!
- Make sure to insert it completely. A needle that extends just a tiny bit longer will be in the wrong position to form a stitch.
- Choose the correct needle to handle your thread choice.
Now to learn more about simple preventative sewing machine maintenance, click here.

Sewing machine troubleshooting topics
We have covered a number of common troubleshooting situations. Find yours in the list below and click on the name. Remember that if you feel uncomfortable with any of the adjustments consult you dealer for more information.


By Julie Baird
Copyright © 2008-2026 Generation Quilt Patterns, LLC
All Rights Reserved
Generations-quilt-patterns.com does not sell any personal information. (See Privacy Policy)