- Home
- Best Sewing Machine
- Sewing Machine Maintenance
You can do your own
Preventative Sewing Machine Maintenance
YOU are key to a well running machine!
This post contains affiliate links, for which I receive compensation.
When it comes to sewing machine maintenance, the saying “...An ounce of prevention is worth a pound of cure...” is so very, very true.
Many of your sewing machine's problems can be avoided by simply following these simple maintenance tips.
At the end of this page, you'll also find troubleshooting help for specific sewing machine problems.
So grab your instruction manual and let's get started!
Keep your sewing machine in good repair
Take your machine in for ‘well baby' or annual sewing machine maintenance visits.
Your machine will be cleaned inside and the timing checked. (Some dealers do not clean the outside of the machine during this cleaning and the returned machine is dirty. Do check with your dealer ahead of time so your understand what general work will be done.)
If you are having any problems, to prevent any miscommunication write the specifics down and put this list under the presser foot.
This is helpful
to the technician especially if the problem is intermittent (like
skipped stitches occurring when you are free motioning in one
direction only).
If the technician doesn't know exactly what maintenance issues you're having, they can be easily missed, causing you to make another trip to the dealer.
What a waste, you could have been quilting!
Once your machine is home again, take it out and sew on it.
I've known too many quilters who've brought their machine in for fixing and a month later, when they finally got it out to play, the problem was still there.
It's then difficult to go back to the dealer and say they didn't fix the problem.
Too much time had passed.
New Project + New Needle = Fewer Problems

- Choose your threads first, then match your needles to these choices.
- Remember as needles go, just because it's new, doesn't mean it's flawless. Needles the cheapest part on the sewing machine and yet the chief suspect in so many problems.
- If you find you change needles frequently, and the replaced one still has a lot of useful life in it, use a tomato pin cushion to organize store these 'still good' needles. (shown here) Way easier than trying to read the tiny print on the needle!
Insert the needle into its proper position.
- If it isn't inserted all the way into the needle clamp, the sewing machine cannot create its stitch at the optimal time.
- When the needle is installed correctly, the groove in the needle faces you.
Check out How Sewing Machine Work to see just how a stitch is formed to illustrate how important it is for the needle to be properly seated.
Clean your machine regularly to remove lint, dust and dirt
- When changing spools, cut the thread close to the spool and pull the tail out through the needle so that you don't pull any lint back up into the tension disks.
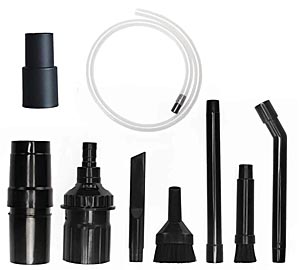
- Use a vacuum attachment made especially for sewing machines to suck the dirt out. Don't use the canned air. It is meant to be used on open workings—like that of a serger. It will blow the dirt and fuzz back into your machine.
- Make it a practice to brush out your bobbin case after each bobbin.
- Make sure there's no dirt or thread tails caught in the tension spring in the bobbin case, too.
DO NOT used canned air on a sewing machine. It pushes the lint back further into the machine and can also introduce condensation into the machine itself, causing rusting of parts.
Cover your sewing machine when it's not in use.
This prevents the buildup of dust and dirt.
It also protects against accidental spills.
Lubricate your machine in accordance with the directions in your manual
For newer machines this lubrication may be done by your dealer at the annual checkup.
Or the parts themselves may be infused with their own lubrication.
Not just any oil will do, so for older machines check that you are using the correct oil.
Threading your machine properly.
- Consult your manual for threading instructions.
- Always thread the machine with the presser foot up. The tension disks are open and the strand will lay in between them. If the presser foot is down, the tension disks are closed or ‘engaged’ and you will not be able to get thread 'threaded' through the tension disks.
- Another common problem is that the take up lever or arm is missed when you are threading your machine. Or the thread comes out of the take up lever while you are stitching. A quick, noticeable change in your stitch tension is the clue.
Make these simple sewing machine maintenance steps a habit to help prevent many of the annoying situations that occur during sewing.


By Julie Baird
Copyright © 2008-2026 Generation Quilt Patterns, LLC
All Rights Reserved
Generations-quilt-patterns.com does not sell any personal information. (See Privacy Policy)