- Home
- Beginner Quilt Blocks
- Rail Fence Quilt Block
Rail Fence Quilt Block Pattern
Technique #1 Strip-Piecing
This post contains affiliate links, for which I receive compensation.
The Rail Fence quilt block (aka Fence Post quilt block) is classically simple—strips are sewn together into blocks which are then alternated.
If you can sew a good quarter inch seam, you're ready to go.
If you can't, this is the place to build your skill set because the block is so forgiving.

On this page, you'll learn how to make a standard Rail Fence with a strip-piecing technique.
Further down the page are:
- A cutting chart to help you determine how many segments to cut and how wide they should be and,
- Even more inspiration if you're ready to jump right in and start a Rail Fence quilt, there are links to commercial patterns and books.
Let's get started!
Make a Rail Fence Quilt Block
To start, choose either a finished block size or a finished strip size.
The great thing about a Rail Fence quilt is that you are in charge of the complexity, simple though it may be!
You need to watch out for one thing.
The width of the strip must be a
'rotary-cutter' friendly number.
Divide the finished block size by the number of strips you plan to use. If that number is in whole numbers or fourths or eighths, you're ready to start cutting.
Now let's get busy.
 Rail Fence block
Woven Effects variation
For this example, we'll make a Rail Fence quilt block that finishes 5" in the Woven Effects layout of the block with the dark fabric on the outside.
Further down on this page is a downloadable cutting chart that shows the number of strips and how wide to cut them for a variety of block-sizes.
Using the information on the chart, a 5" block (5-1/2" unfinished) can be made from the following rotary-friendly combinations of quantity/finished strip width.
- Ten / 1/2"
- Five / 1"
- Four / 1-1/4"
- Two / 2-1/2"
Let's use the five 1" finished strips.
Cut two 1-1/2" segments from both the dark and medium fabrics and one at 1-1/2" from the lightest fabric. Remember we need to add seam allowances—¼" to both sides of the strip.
Rarely will a quilt block require just one Rail Fence unit.
To economize on fabric cut your strips to a length equal to the unfinished block size times the number of units you need. Then add an extra 1/2" to 1" for squaring up the strip set.
In our example, we'll make four 5-1/2" unfinished Rail Fence blocks. We will cut our pieces:
Step 1
Calculate how long your strips need to be.
5½" x 4 = 22"
22" + ½" to 1" = 22½" to 23" long not including selvedges

Helpful Tip for Fabric Selection
Audition your fabrics by taping a swatch of your light, medium and dark fabric choices to the wall. Then step back.
You should be able to see the three distinct fabrics. If the fabrics blend into each other, your finished quilt design will be rather 'mushy'.
Step 2
With right sides together (RST) stitch a dark to a medium segment and repeat.
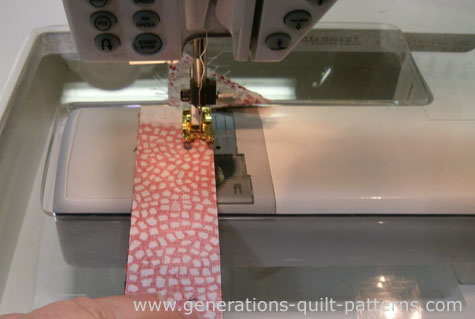
Press each of the strip sets (SS) in the closed position to set the seam. Then press the seam allowance (SA) towards the darker fabric.
Since the only seams to match are at the intersection of the blocks—it really doesn't matter which direction they are pressed in.
However, here pressing to the dark means there's no chance one fabric will shadow through the other.
By pressing as you go, there's less tendency to press a tuck into the strip set. It's much easier to get at the seam with your iron.
Step 3
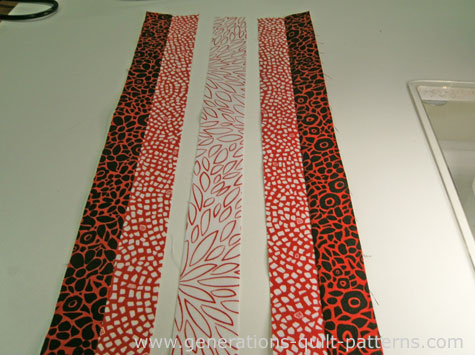
With RST, stitch the light strip to the medium fabric of one of the SS.
As you did in Step 2 press first to set the seam and then with the SA towards the medium fabric to avoid shadowing.
With RST, stitch the medium fabric of the second strip set to the other side of the light strip, pressing as before.
At this point, the pieced unit is 5-1/2" wide (the medium and light strips are 1", and the dark strips are 1-1/4").
If it's just a wee bit wider than 5-1/2" you can trim it down with your rotary cutter. If it is significantly larger or smaller, use your ruler to identify the problem and resolve it.
If your seam allowance is too small, your block will be too big. If it is to big, your Rail Fence quilt block will be too small.
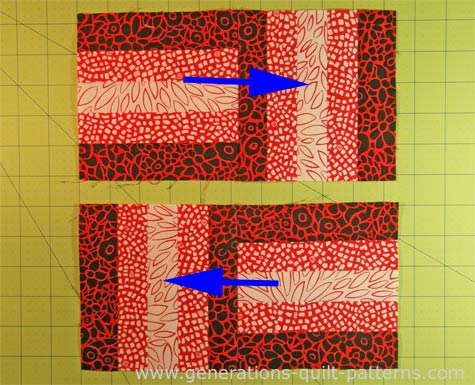
Step 4
Lay your pressed strip set on your cutting mat. Line up a line on your ruler with one of the seam lines (blue arrow). Trim to straighten one end with rotary ruler and cutter.
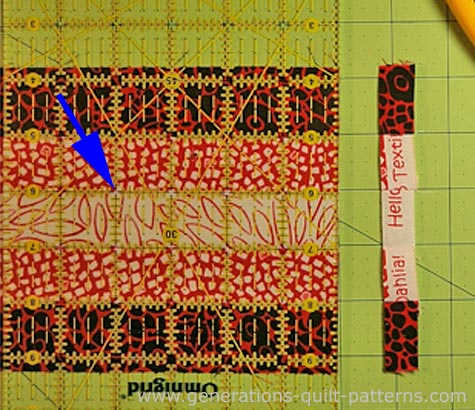
Now cut the unit into four 5-1/2" wide blocks.
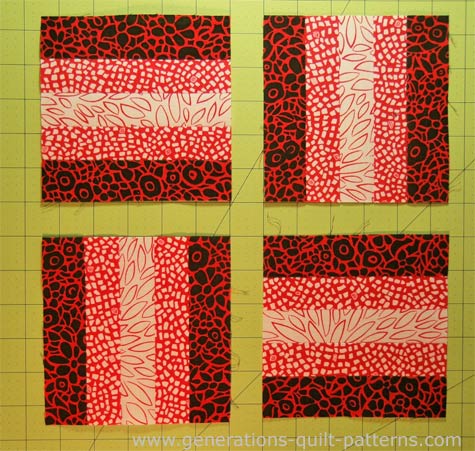
The four Rail Fence quilt blocks are finished and look like this.
Tips for Pressing—Straight, Not Bowed—Units
A frequent problem quilters encounter is that their strip sets (SS) bow (as in rainbow shape) as they press.
Pressing as you go helps minimize this because you don't need to manhandle the SS to get at the seam allowances.
The following tips are also helpful:
- Pin a tape measure to the surface of your ironing board to create a long straight line. Align the edge of your strip set with it as you press. If your ironing board cover is printed with lines, use one of them instead. Or...
- Press with your SS positioned perpendicularly to the length of your ironing board. It's easier to keep everything straight over this shorten length.
Blocks can be stitched together into rows with the seam allowances pressed towards the solid vertical patch like this...
Download your Cutting Chart

Click on the 'Stamp Out Math' image to the right to download your free Rail Fence quilt block cutting chart to help you easily identify strip widths and numbers of strips to cut for a variety of finished block sizes.
You need to have Adobe installed on your computer to complete the download.
If you don't have it, click here to go to the Adobe website. Follow their instructions for installing their software.
For more on the Rail Fence:
Visit these pages to learn more about creating and designing with this patchwork design.
The Basic Building Blocks of Quilting

Click here for instructions for more beginner-friendly quilt blocks and units in our basic building blocks of quilting series.
You'll find multiple methods for all of these basic units:
Rail Fence, Half Square Triangles, Quarter Square Triangles, 4-Patch, 9-Patch, Square in a Square, Triangle in a Square, Corner Beams, Half Rectangle Triangles, and Flying Geese.
Choose the technique that works best for your skill set and your project.
For even MORE blocks to make… 🧩🎨

...visit our Free Quilt Block Pattern Library, with over 260+ blocks to choose from in multiple sizes.
Free downloads are included in all sizes for any blocks require paper piecing patterns or templates.


By Julie Baird
Copyright © 2008-2026 Generation Quilt Patterns, LLC
All Rights Reserved
Generations-quilt-patterns.com does not sell any personal information. (See Privacy Policy)