- Home
- Free Motion Quilting 101
- Quilting Room
Set Up Your Quilting Room or Workspace
Make it your 'Happy Place'!
This post contains affiliate links, for which I receive compensation.
When you plan the set up of your quilting room or studio take into account both comfort and ambiance.
Your room should be comfortable so that you can quilt for extended periods of time without strain or fatigue—that's body, eye and brain.
Ambiance, well that means something different to everyone.
Sometimes it's the little knickknacks that remind us of time spent with our quilting buddies. Maybe it's the perfect candle scent for a long, restful day of piecing.
Or maybe it's that bag of Dove Dark Chocolate hidden in the back of a drawer. (I'll never tell!)
It all depends on what works for YOU!
For the purposes of free motion machine quilting (FMQ), you'll need the following equipment for your quilting workspace or studio.
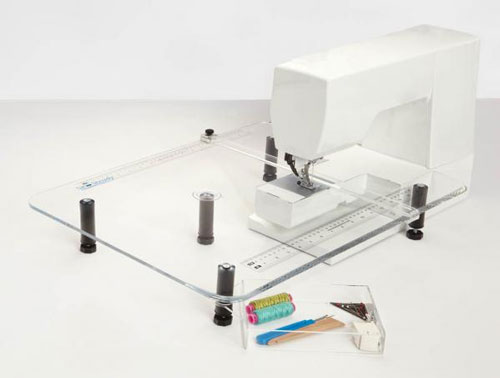
A sewing machine table to provide room for your hands
Use a plexiglass extension table like the Sew Steady, a portable table like the Sew Ezi or a full size sewing cabinet such as one from Tracey's Tables.
I own and use all three with the Sew Steady being the least expensive and the full size cabinet the most.
Click here for more general information on the Sew Steady table.
Click here to learn more about Sew Steady tables for your Featherweight.
My personal favorites are the Sew Ezi for taking to class and bee treats and vending. The one from Tracey's is perfect for my quilting room.
I do have a warning about the Sew Ezi. It's almost too handy to have around.
When bee meets at my house, the Sew Ezi gets set up in the living room where we meet. Unfortunately, a month later that darned table is still standing in my living room...thread and fabric everywhere.
Could it be ‘sew
ezi’ to use? Just might be!
For all of these options your sewing machine sits even with the tabletop and provides the necessary room for your hands and support for the quilt.
Set up additional lights
Ceiling lights are not enough.
It is hard to see thread that blends into your top.
As you age you need more light. That's a fact.
Try a number of lighting set ups for your room.
Mine includes a goose neck, floor Ott light behind my machine and a small, table Ott light in front and to the right.
Trudy's Viking Designer Diamond has an awesome light system. Even though she sews in front of a daylight window, she still uses additional Ott lights.
Use an adjustable height chair with good support
It's helpful to sit a bit higher to have a better view while you're FMQing. An adjustable chair makes this easy.
The perfect chair for you is:
- Stable. Five legs, not four so it doesn't tip over as you move.
- Adjustable. It's nice to sit a bit higher so that you can easily see your stitching. You're knees should be bent at a 90° angle for comfort. Your feet should be flat on the floor—not dangling.
- Arms or not. Sometime arms will 'hook' underneath the edge of your table or cabinet and then 'pop' up as you move back. All my chairs have arms. Honestly, I wish they didn't.
- Wheels. It just plain makes it easier to move.
- Comfortable. You're going to be sitting a lot to finish that queen sized quilt. Sit in it before you buy!
Check the placement of your chair
Sit directly in front of the needle so that hips, waist and shoulders are properly aligned. No leaning.
This helps minimize fatigue.
Provide ample support for the quilt
It is imperative that the quilt does move on its own while you are quilting.
There should be enough horizontal room to your left for support. At least half of the quilt is to the left of the needle at all times.
Additional horizontal surfaces behind your machine are necessary for large quilts.
My preference is for folding banquet tables (found at Costco and the like). They have the plastic top so they are light enough for me to set up and move on my own.
Trudy has an extra large cabinet with all the bells and whistles. But even so, she had her husband install a two inch high fence at the back edge of the gate leg table top to help corral the quilt.
While an ironing board is often recommended in lieu of a table (because it's handy), it is not stable enough in my opinion.
Use a metal—not plastic—thread stand for cones
These days many of the luscious threads are sold on cones.
A metal stand doesn't create the static electricity that a plastic one does. It is heavier and sturdier than plastic.
And those cones are typically crosswound.
Crosswound thread should come off the end of the cone so that it doesn't create any extra friction and mess up your tension.
A metal thread stand ensures that and it doesn't take up much room on your cabinet.
To provide enough stability for the thread before it reaches my first thread guide, note the safety pin which has been taped to my machine. You may already have additional guides for use with a thread stand.
Keep your notions handy
A wire shelf unit with four shelves is directly behind me as I stitch so that any notions are no more than an arm's length away.
I also keep my instruction manual on this shelf for easy reference.
Personalize Your Quilting Room
Make your quilting room an inviting space to work and dream in.
For ambiance add music, TV, a DVD player or computer for watching those online classes you've purchased, scented candles (my favorite is Yankee Candle's 'Rose'), a good cup of something hot or cold.
My room/studio is in the basement. And it gets COLD in the winter. Yes, there's a nice space heater down there now.
Have a space to hang your current or favorite quilt to inspire you.
Do whatever it takes to make this a quilting room that you can't wait to get to and hate to leave.


