- Home
- Machine Quilting 101
- Quilt Marking Tools
Quilt Marking Tools ~ An Introduction
Beginning Machine Quilting 101 continues...
This post contains affiliate links, for which I receive compensation.
Quilt marking tools come in a wide variety. Thank goodness!
Every quilting project has its own unique steps.
Some quilts need no marking. Some are marked after the quilt is layered in a sandwich. While others call out for extra special quilting that is planned and marked before basting the quilt.
No one single tool for quilt marking works for every situation. We'll discuss the following ones:
Use the links to skip to the information you want or just keep reading for the whole kit and caboodle!
Blue Washout Marker
Love it...hate it...there seems to be no in-between with this quilt marking tool.
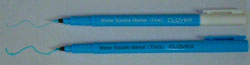
This water soluble marking pen comes with either a fine or regular tip, though it's been hard lately to find the 'fine'. (And it's my favorite!)
It's easy to see on many fabrics and washes out with cool water.
You use a light box to transfer the design to the quilt top, so mark the design BEFORE you baste your quilt.
Since the marks need to be washed out, test for bleeding fabric before using this marker.
How to Use
You will need a light box or light source (i.e. sliding glass door) to mark the design onto your quilt top.
- Lay the paper quilt design on top of your light box and tape it down so that it doesn't shift.
- Turn on the light box.
- Lay your quilt top over the design, pinning or taping in place, again so that nothing shifts.
- Trace the quilting lines with the blue washout marker.
- Turn off the light box light to check that all lines are traced and connected.
- Remove the tape and sandwich your quilt.
Light Box Hint - If you are having trouble seeing the design through your fabric, turn off your overhead light, leaving the shades/curtains open in the room.
What to Watch Out For
There are horror stories about blue washout marker marks that just won't go away.
We have used it for almost every quilt in the Generations Quilt Patterns line and have had no marks re-appear in the past seventeen years.
Heat and not completely removing the ink are the culprits when the marks re-appear. (While spritzing with water will make the marks disappear, it doesn't wash the ink out of the quilt.)
Keep your marked quilt away from any heat source. That means no ironing once it's marked. Don't leave it in a hot car. Don't use hot/warm water to remove the marks.
Heat sets the ink.
Storing Your Markers
This type of marker seems to go dry quickly.
I suggest using several during the marking process, rotating markers as needed.
When not in use, store them in a Ziplock bag laying horizontal to 'recharge' the ink.
Washing Instructions
Please read the specific instructions on the blue washout marker you've purchased.
While Clover's are my favorite, there are several brands of blue washout marker on the market.
In general, the marks are washed out with cool water.
Just spritzing them with water will make the blue in the marks disappear, but all you've really done is moved the chemicals to the batting. They're still in your quilt, waiting to reappear with time and heat.
Wash your quilt in cool water, no soap or detergent, to completely remove the marks.
Again, read and follow the instructions that come with your specific pen.
Golden Threads Quilting Paper
This is a golden-colored tracing paper that comes on 12, 18 or 24 inches wide rolls. Handy as-is for long border designs, or cut to size for blocks.
To transfer the quilting design to the paper:
- Trace the design onto a sheet with either a permanent or water soluble marking pen. Use the lightest color pen you can so no ink transfers to your needle thread as you stitch.
- To quickly make multiple copies of the same design, layered your traced copy with several additional sheets; pin together.
- Stitch through all layers with a large, un-threaded sewing machine needle.
- The paper tracing is either pinned or adhered (with a temporary spray adhesive) in place. (I like Clover's Flower Head pins for this because they lay flat.)
- Thread your sewing machine and stitch the design.
- Tear away the paper.
Click here to learn more about quilting paper and its pros and cons.
Chalk Markers
There is a whole other group of quilt marking tools that are made with chalk.
The problem with chalk has been it wears off, making it necessary to mark AFTER the quilt is basted. This is a problem for more intricate quilting designs.
But manufacturers listen. New formulations are available with more staying power.
The benefit to chalk markings is that they tend to be easier to remove. Usually the manipulations during quilting are enough to brush off most of the chalk.
To learn more about chalk-based marking tools go to Chalk Pencils.
Then close that page and you'll still be right here to continue on in this "Beginning Quilting 101" tutorial.
There are many more quilt marking tools on the market. Try them out, share with a friend. See what works best for you!
To learn about my personal favorites are, click here.Table of Contents
for Beginning Machine Quilting 101
Introduction
Beginning Quilting 101: Quilting Instructions for the Beginner
Preparing to Quilt
The Quilt Sandwich
And finally, the Quilting!


The best book for the beginning machine quilter
If you can only have one in your library...this is it!

By Julie Baird
Copyright © 2008-2026 Generation Quilt Patterns, LLC
All Rights Reserved
Generations-quilt-patterns.com does not sell any personal information. (See Privacy Policy)