This post contains affiliate links for which I receive compensation
Free motion quilting for the beginner quilter
by KK
(KY)
I have attempted to free motion quilt but with little success. Is there an easy pattern to start with?
Reply
The sad thing is that so many beginning quilters are told, "Hey! Just stipple it!"In my humble opinion, stippling (or meandering which is just bigger stipple quilting) is one of the harder free motion patterns to start with...
...because not only are you learning how to move the sandwich under the needle, but now you're also trying to manuever it through a complex pattern in which the stitches move in all directions...oh yeah...and try to keep those stitches even.
ARGGGHHH!!! It's a wonder there aren't more bald quilters!
Start with what you know...
When I teach beginning free motion quilting, the first 'pattern' I have my students stitch is their name in cursive (and not worrying about dotting the 'i' and crossing the 't'). Your mind already knows the 'flow' of the design or writing so you can concentrate on moving the quilt evenly in relation to the speed of the sewing machine. You're also not trying to exactly copy the lines drawn in another's hand. The stitching is in a pattern 'natural' to YOU.Once you get the hang of it, chalk in some straight lines across your quilt to use like the lines on notebook paper. Their whole purpose is to keep the words in a straight line.
Then 'journal' across your quilt. Quilted words work great in sashing, too. And if you're willing to do a lot of starts and stops, you can quilt individual words into the backgrounds of blocks. Just remember to tie off (or use micro-stitching) both ends of threads for each word.
Apply what you CAN do to a motif...
The next thing I have my students do is quilt lines moving from left to right and right to left, repeating for awhile and then adding lines moving from top to bottom and bottom to top, and repeating, until they're created a grid. (I use this as a warm-up exercise, myself, because it helps you work on creating even stitches.)Try to keep the lines straight, but DON'T OBSESS over it. The lines will not be perfectly straight and, quite frankly, it's not necessary. A bit of wobble makes them charming.
Practice this for awhile to get the hang of it.
Now take it to the next level. Use this skill to fill in some shapes. Draw some simple hearts or leaves on your quilt sandwich with chalk. Do test the chalk so you're sure you can remove it completely. Now fill in the shape with these lines, but only go in one direction like in the heart shape below.
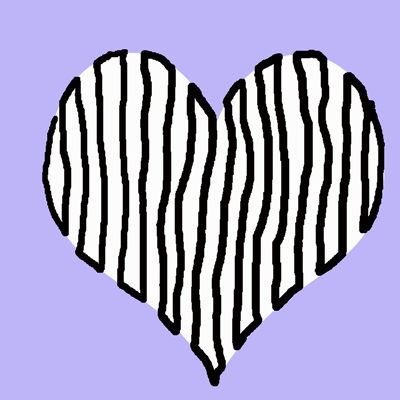
You only need to concentrate on quilting in one direction. When you hit the edge of the heart, you can stop with the needle down in the the fabric and take a breath. Then stitch a bit to the side on the edge of the heart and continue quilting in the opposite direction.
Choose a thread that matches or blends into the fabric to disguise any uneven stitches. The viewer of your quilt will see the texture these stitches create and not the actual stitching. Plus it's a great way to practice your free motion quilting on a real project.
I hope this gives you some ideas and encouragement to continue learning!
Readers...I welcome your suggestions! What do you think is a good pattern for a beginning free motion quilter to use? Just use the comments link below to share. Thanks!
Piecefully,
Julie Baird
Editor


Nifty Notions


By Julie Baird
Copyright © 2008-2024 Generation Quilt Patterns, LLC
All Rights Reserved
Generations-quilt-patterns.com does not sell any personal information. (See Privacy Policy)