This post contains affiliate links for which I receive compensation
Adding embellishment stitches to a quilt
by KT.
(Michigan)
I'm making a wall hanging that includes a scarecrow.
The photo on the package shows hay sticking out his legs, collar, hat, and hands. I'd like to do this but not sure how.
BEFORE sandwiching and quilting the project?...
...or after, on top of the quilting stitches?
If before, should I use some kind of stabilizer on the back of the fabric?
What kind?
I'm thinking that if I do it before sandwich and quilting, I'd avoid all those stitch lines on the back of the finished quilt. I know that as a wall hanging it shouldn't matter, but what if it turns out to be a small quilt for a child?
I really do not want to do any hand-stitching of these hay pieces.
I hope to use something like a machine stem stitch to simulate the hay.
Thanks for your great help!
KT.
Reply
I'm going to take the questions a little bit out of order...First, let's deal with the child issue...if it's possible that this will be for a young child...of the age that you watch out for small parts with...then if it was me, I wouldn't add any three dimensional elements to represent the hay, i.e. not loose threads, yarn, raffia or fabric strips. Kids will put all sorts of things in their mouth to suck on and I wouldn't want to take the risk...especially if it was for someone else's child and not under my watchful eyes. I'm kind of a 'nervous Nelly' in that respect.
Embroidery Suggestions
I would do the embroidery first and then the quilting. I tend to add a lot of quilting to my quilts and think that hand stitching through it would not be fun.Hand Embroidery
You certainly could embroider on the straw, but to get enough, that would be a lot of handwork.
Some find it relaxing (I like to do handwork) but if you don't, then it can become an obstacle to getting this quilt done. That wouldn't be good...I can find all sorts of reasons for procrastinating on finishing a quilt...you should talk to my bee friends...
...but if you enjoy the hand work, I would suggest using a hoop instead of a stabilizer, and then remember not to pull the stitches too tight.
On the Rogaland Rosemaling quilt pictured below, the stem stitch was done all by hand, no stabilizer, no hoop. (I've done a lot of counted cross and didn't use a hoop then so I'm used to the process). When I did the original stabilizing quilting, I stitched around all the applique and in the ditch of the border...
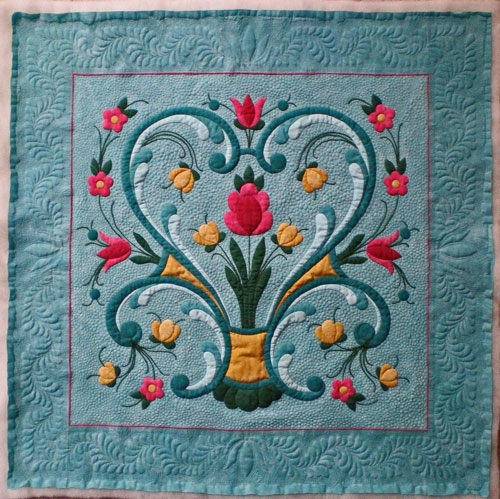
...and stitched around both sides of the embroidered embellishment. What I ended up with was embroidery that looks like it sits on top of the quilt...exactly what I was looking for. A close-up of the quilting is below. You can just barely make out the outline quilting.

Machine Embroidery
Machine embroidery is stitched, just like you would free motion quilting, except you don't create the quilt sandwich until the embroidery is finished. This way the stitching sits on top of the finished quilt and comes forward. If you 'quilted' the lines for the straw into the quilt sandwich, those quilting lines will sink into the quilt sandwich and move back visually.
Now if you wanted to stitch in the straw by machine, then yes, absolutely use a stabilizer. You could use a light tearaway stabilizer held in place with either pins (I like the flower head pins...I've got them on hand and the flat head doesn't distort the area you're working on) or use a light spritz of a temporary spray adhesive like KK2000 or 505 Spray. If you use a light weight tearaway and find it's not thick enough, just add another layer.
You'd need to use a thicker thread like a 30 weight rayon so that the stitching didn't disappear. Sulky got a thread that is too different colors twisted together. That might be a nice effect.
Bobbin Drawing
This would also be the place to try some bobbin drawing.
This technique has you wind your bobbin with the decorative thread...you can use a much thicker thread in the bobbin--just remember you may have to reduce your bobbin tension by turning the bobbin screw to the left--and then return it the original position when you're finished.
Thread your needle with a coordinating 50 wt cotton to blend and then stitch from the back of the quilt top. There are hoops that you can get for machine embroidery if you need one...you may also need a tearaway stabilizer, only testing will tell.
You'll also need to pull your thread tails to the back of the quilt top and secure them.
There's a video at the link below that gives a nice overview of the technique so that you can see if it would interest you.
http://www.thequiltshow.com/os/bernina_videos_view.php/bernina_videos_id/307
Raffia
If the quilt would hang on the wall and not be washed, and it's not an heirloom quilt, you might consider inserting raffia into the seams where there'd be straw and then stitch them closed.Raffia is natural product made from palms. It would look the most like straw. The drawback is that as a natural product it may be acidic and over time that would affect the quilt.
Because it is so pliable, you'd be able to temporarily move it out of the way--pin it or tape it down with masking tape--when you're quilting. I think it'd be a fun effect and easy to do.
Bias Fabric Strips
My final suggestion is to use fabric 'fringe' if the quilt is large enough.Cut a strip of fabric on the bias, twice as wide as you want your fringe to be long plus 1/2" for seam allowance.
Press it in half lengthwise and then stitched about 1/4" from the folded edge to hold things together.
With a scissor, clip to the sewing line about every 1/4". If you cut through the stitches, don't worry about it, just don't do it every time.
Now throw it in the washing machine when you wash coordinating colors. (I threw my muslin sample in with darks and I can tell up close...nuts!) Then dry it.
You've now made fabric 'straw' like this...

You'd have to decide if you need a double layer of the fringe, I'd offset the clips for more coverage. You could probably skip the washing if you wet the clipped fringe and then roughed it up with a toothbrush. Bias strips allow the fabric to get fuzzy on the edges without it all fraying away.
Then sandwich this between the patches for the scarecrow's arm and hand, pressing the seam allowances towards the arm so that the fringe hangs down.
I hope these suggestions have given you some ideas on how to embellish your quilt.
We'd love it you'd share your quilt with us when you're finished!
Good luck to you!
Readers, do you have suggestions on how to make 'straw' embellishments? Please do share using the 'comments' link below. Thank you!
Piecefully,
Julie Baird
Editor


Nifty Notions


By Julie Baird
Copyright © 2008-2026 Generation Quilt Patterns, LLC
All Rights Reserved
Generations-quilt-patterns.com does not sell any personal information. (See Privacy Policy)