- Home
- Free Quilt Block Patterns
- Eccentric Star Quilt Block
The Eccentric Star Quilt Block Pattern
A design from the Friendship Star family
This post contains affiliate links, for which I receive compensation.
Skill Level: Beginner
The Eccentric Star quilt block is a quickie to make, just like its kissin' cousin, the Ribbon Quilt block.
(At the bottom of this page you'll find several other blocks in the Friendship Star family.)
Just make your half square triangles with our 8-at-a-time method. Two squares of fabric, four lines of stitching and a bit of trimming is all it takes. You'll create perfect units every time.
Let's get started!

📋 General Instructions
These abbreviations are used in this tutorial:
- SA - seam allowance
- RST - right sides together
- HST - half square triangle
All seam allowances (SA) are 1/4" and are pressed toward the darker fabric unless otherwise indicated.
I use two different quarter inch presser feet for our Eccentric Star—one with a tick mark on the side and the other with a guide on the right hand side. Watch for them in the photos below.
New quilt fabrics to tickle your fancy...
Click the images below to see the full collection. We share any commercial and/or free patterns that showcase them, too. (For inspiration, of course!)


Step 1: Cutting for an Eccentric Star block
 Eccentric Star design
Sample Size: 7½" finished / 8" unfinished
Grid: 3x3
Attributed to: Nancy Cabot
Design Type: Even 9-patch | Star
Like any star block, choose two fabrics with good contrast so that the points don't get lost.
I've starched my quilt fabric before cutting. The benefits are three-fold:
- My cuts are more accurate
- Ironing the starch dry helps shrink unwashed fabrics
- The starch cut edges ride up nicely next to the guide on my favorite quarter inch presser foot
To keep the Cutting Chart less cluttered, the measurements below are all for squares, i.e. 5 1/4" means to cut a 5 1/4" square.
 |
Cutting Chart for an~ Traditional Piecing ~ | ||||||
|---|---|---|---|---|---|---|---|
| Patch | Fabric | Qty | Finished Block Size | ||||
| 4 1/2" | 6" | 7 1/2" | 9" | 12” | |||
| 1 | D | 1 | 5 1/4” | 6 1/4” | 7 1/4" | 8 1/4” | 10 1/4” |
| 2 | L | 1 | 5 1/4” | 6 1/4” | 7 1/4" | 8 1/4” | 10 1/4” |
| 3 | L | 1 | 2” | 2 1/2” | 3" | 3 1/2” | 4 1/2” |
| Unfinished Block Size | 5" | 6 1/2" | 8" | 9 1/2" | 12 1/2” | ||
| Grid Size | 1 1/2" | 2" | 2 1/2" | 3" | 4” | ||
Step 2: Create half square triangles 8 at a time
First mark two diagonal lines from corner to corner on the back of the light #2 square. A mechanical pencil is perfect for this because the line stays nice and fine. Always.
Next layer the #1 and #2 squares, RST. For this 9" finished sample block the squares are pinned together so that they don't shift while sewing.
Pins are positioned away from the stitching lines.
 Here I use my quarter inch foot with the markings on the side.
Press the sewn unit flat to set the seam.
From the chart below, find the Center/Midpoint Measurement that corresponds to your Finished Block Size.
| Finished Block Size | Center/Midpoint | Trim HST to... |
|---|---|---|
| 4 1/2" | 2 5/8” | 2” |
| 6 " | 3 1/8” | 2 1/2” |
| 7 1/2" | 3 5/8” | 3” |
| 9 " | 4 1/8” | 3 1/2” |
| 12 " | 4 5/8” | 4 1/2” |
Helpful Tip:
If you have a smaller cutting mat use it. It's much easier and more accurate to turn the mat than to move the patches.
At your cutting mat, align this midpoint measurement line on your ruler with the edge of the sewn squares. The opposite side of your ruler should cross through the center of the drawn 'X'. (Pretty close is good enough since we started with generously sized patches.)
Cut the squares in half along the ruler.

Now turn the mat and repeat.
 Cut the #1/#2 in half again to create four squares.
You now should have four equal size pairs of stitched patches.

Cut each in half along the diagonal pencil line.
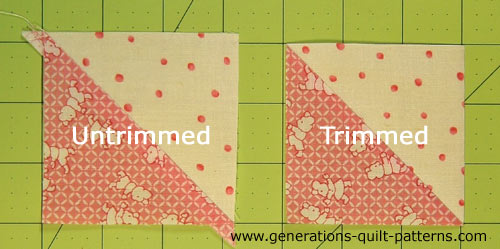
Press the HSTs with the SA toward the darker, #1 fabric. Refer to the chart above and trim the HSTs to the size that corresponds to the Finished Block Size for a total of 8.
Step 3: Assembling the Eccentric Star quilt block
Arrange the patches to create the Eccentric Star design.

Sew the patches in each row together.
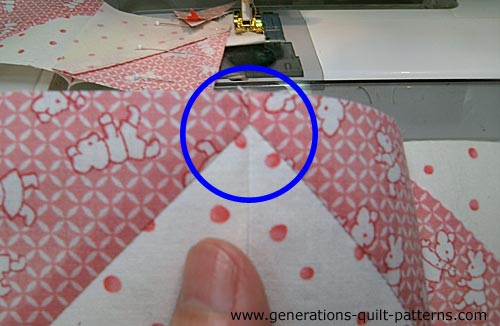
Where a light edge meets a light edge and forms a 'V', I've used a pin to help hold the seam together. The pin isthisclose to the line of stitching.
 To stitch the patches together I've switched to my quarter inch foot that has a guide on the right hand side.
This seam is bulky because both SA are pressed toward the dark.
And this is how the match turned out.
 Whew! It worked the first time!
The trickiest part of this block is keeping the HST oriented correctly and not flipping them accidentally at the machine.
This is how the stitched rows look in their proper position.

To make it less confusing, flip the bottom row of patches. Now it's easy to see that the top and bottom rows are pieced exactly the same.
 SAs are pressed toward the center in the middle row and away from the center in the top and bottom rows.
Return the rows to their proper positions. With RST, stitch them together.
Your finished Eccentric Star quilt block looks like this.

More designs from the Friendship Star family
This family of designs is built on a 3x3 grid with HSTs on the sides that 'pinwheel' around a solid center square.
You'll find cutting and piecing instructions for several variations of this simple patchwork design on this website. Click the image to go to the pattern page.


For more designs, check out our Free Quilt Block Patterns Library.
🔭 Looking for something truly stellar?
You've finished your star quilt block, and you're ready for more!
Browse our collection of 70 stellar star quilt block patterns. All have instructions and cutting charts in multiple sizes. If templates or paper piecing is used in the tutorial, there's a free download for you of those materials.

Eeny. Meenie. Miney. Moe.
Which star quilt block will you sew?
For a star-studded quilting experience, choose from 100+ bedazzling star quilt patterns—for beginners and beyond—click here.
For even MORE blocks to make… 🧩🎨

...visit our Free Quilt Block Pattern Library, with over 260+ blocks to choose from in multiple sizes.
Free downloads are included in all sizes for any blocks require paper piecing patterns or templates.
Ready for More Blocks?

There's plenty more to keep you busy!
Just check out our Free Quilt Block Pattern Library to find blocks for your next quilting creation!
- Home
- Free Quilt Block Patterns
- Eccentric Star Quilt Block


Yummy fabrics
to drool over
Click any image below to see the full collection and find pricing and ordering information.


By Julie Baird
Copyright © 2008-2026 Generation Quilt Patterns, LLC
All Rights Reserved
Generations-quilt-patterns.com does not sell any personal information. (See Privacy Policy)