- Home
- Machine Applique (Invisible)
- Machine Setup and Stitching Techniques
Machine Setup and Stitching Techniques for Invisible Machine Applique
Lesson 4: The Stitch
This post contains affiliate links, for which I receive compensation.
Stitching invisible machine applique is simple, slow and steady. A small zigzag, monofilament thread, good lighting and a properly prepared block are all you need!
Your Machine Setup
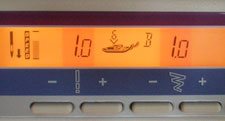
 Set Stitch Length=1 and Stitch Width=1
- Set up your sewing machine to do a small zig zag stitch that is "1.0" long and "1.0" wide.
- Insert a Microtex Sharp needle. I use a size 60/8, but up to a 75/11 will work well. Remember, the bigger the number the bigger the hole left in the fabric.
- Thread the needle with a quality monofilament thread and a 50 or 60 weight cotton in the bobbin. 100 weight silk also works in the bobbin.
- Set "needle stop down" if possible. It's like having an extra hand.
 My practice stitching for the Lily Rosenberry quilt blocks. It's not pretty, but it gets the job done.
- If you can reduce the speed that your sewing machine stitches, do it. You have more control sewing at slower speeds.
- You use different threads in the top and bottom so make the necessary tension adjustments.
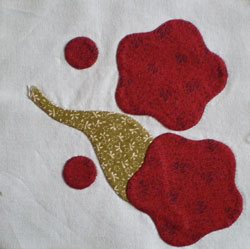
I tested my tension on prepared applique shapes to mimic the exact conditions of my invisible machine applique project(right).
Continue adjusting until satisfied with the stitch. No bobbin thread should show on the top. For more information, click on Adjusting Sewing Machine Tension.
- Once satisfied with your settings, make a note of them to keep by your machine.
This is what your stitches should look like...
 The invisible machine applique stitch
Remember, yours will be stitched with monofilament thread making it virtually invisible.
Invisible Machine Applique...At Last
Place the block underneath the needle of your machine. Because the stitch is so narrow, it can be hard to see if your needle is in the left or right side position. Hand walk the first stitch to place it exactly.
The “zig” hits just inside the fold through the shape.
The “zag” pierces the background fabric and just “kisses” the folded edge of the prepared shape without stitching through it.
Stitches close to these edges are the most invisible.
Stitching around curves
To create smooth lines of stitching around curves use a "pivoting" technique.
Concave Curves
Using our basket example, the inside of the handle is a concave curve. (Think the inside of the letter "C" as in "C"ave).
Zigzag stitch until your needle is close to missing either the edge of the template or the background "thiscloseto" the template.
Stop with NEEDLE DOWN IN THE APPLIQUE TEMPLATE, raise your presser foot and pivot a tiny bit to correct your position.
Convex Curves
The outside of the basket handle is a convex curve. There is a slight change.
Zigzag stitch until your needle is, again, close to missing either the edge of the template or the background right next to the template.
Stop with NEEDLE DOWN IN THE BACKGROUND FABRIC, raise your presser foot and again pivot a tiny bit to correct your position.
A Note About Pivoting
Pivoting with the needle in the correct place makes your invisible machine applique stitches smooth and invisible.
The tighter the curve, the more pivoting you will do.
For the circles on the "Lily Rosenberry" quilt, I would make four stitches then pivot, make four more and pivot. It did create a nice, soothing rhythm to the work.
Boring?
Yeah. Kind of.
But the technique is worth the effort.
Moreover...it is still faster than hand applique, if speed is important for the project you're working on.
Ending your stitches
Once a shape is stitched completely, it's time to decide if you need to tie off your stitches.
If either the end or the beginning of a line of stitching will be covered by another applique template, there is no need to tie off your stitches. The later stitches that cross over them will be enough to hold them in place.
If your stitching ends on the outside edge of a template, continue to sew past your starting point for a few stitches.
Then I reduce my stitch to .5 long and 0 wide and stitch for about 1/4 inch. This change in your zigzag setting creates very tiny, straight stitches just like we use in machine quilting.
With these micro stitches there is no need to tie off your threads.
Or, if you prefer, you can skip all the overlapping stitches and pull all your threads to the back of the background fabric. Tie off all these threads with a hand sewing needle and knot.
Moving on...
With our machine setup correctly for invisible machine applique and an understanding of the techniques we'll use, let's move on to stitching our basket block.
Additional resources
My first introduction in this method of invisible machine applique came in the form of a class taught by Beth Ferrier at my local quilt guild.
She's an amazing teacher. Confident. Steady. And just plain fun to be around. You never know what'll fall out of her mouth next. True words. Plainly spoken. My kind of gal!
Luckily, she's written two books on the subject, shown below.
Click either image to learn more about each book and read their reviews by others who've purchased them.


