- Home
- Quilting Tools/Supplies
- Wonder Ruler Quilting Ruler
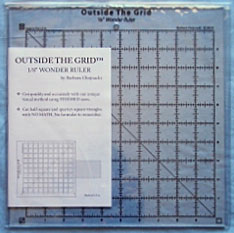
The Wonder Ruler Quilting Ruler
from Outside the Grid™
No more pesky formulas to remember! No triangle paper to remove!
This post contains affiliate links, for which I receive compensation.
Your Wonder Ruler quilting ruler is designed to cut squares and half- and quarter-square triangles.
No paper to remove.
No "magic number" to remember.
All the cutting is based on the finished size of your triangle square unit.
Up Close and Personal
with the Wonder Ruler Quilting Ruler
The first thing you'll observe on these quilting rulers is that the grid lines do not extend to the edge of the acrylic square.
That's because all you need to remember is the finished size of the block or unit you wish to make. All the seam allowances are "outside the grid"!
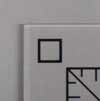
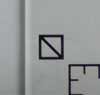
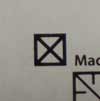
A closer look reveals that the grid isn't quite centered. That's because three of the sides are used to cut three common, but different, patch shapes: squares, half square and quarter square triangles.
Notice
there's a different symbol in three of the four corners of the Wonder
Ruler. An empty square, a square halved by a diagonal line, and a square
quartered by two diagonal lines.
There are two versions of the Wonder Ruler quilting ruler. One with a gird marked in 1/8" increments; the other with 1/6" increments. Both create patches for units up to a 10" finished size.
Now, let's see how this quilt ruler works!
NOTE: For all the instructions below, the corner with the symbol of the shape being cut is in the upper right had corner for right-handed rotary cutting.
If you rotary cut with your left hand, the symbol needs to be in the lower left hand corner. That way your ruler is properly aligned and the correct seam allowance automatically added!
The basic steps are the same, regardless of what shape you are cutting.
Step 1: Cut the strip...
- Square up the fabric to be cut into shapes so you have a straight edge.
- Since the Wonder Ruler quilting ruler is approximately 12" wide, you'll need to fold your fabric once, matching selvedge edges and then fold again, matching the folded edge to the selvedge edge.
- Determine the finished size of the unit you are cutting. For this example, we'll assume a 2-2/3" unit.
- Position this quilt ruler so that the symbol for the shape you are cutting is in the upper right hand corner (If you're left handed, the symbol must be in the lower left hand corner)
- Align the ruler line for 2-2/3" with the straightened cut edge of the fabric.
- Cut the strip with a rotary cutter. Repeat for as many strips as you need.
Step 2: Now sub-cut the strip...
- Open a strip cut in Step 1 above, remove the selvedges with a clean-up cut perpendicular to the long edges of the strip.
- Again, align the 2-2/3" line of the quilting ruler with the short cut edge of the strip. The symbol for the shape you are cutting must be in the upper right hand corner (lower left for left handed cutters).
- Cut with a rotary cutter, continuing until you've cut as many squares as you need.
Step 3: And sub-cut squares into triangles.
- To cut the shapes for half square triangles, align the edge of your ruler with the diagonal corners of the square cut in Step 2 and cut once creating 2 right triangles.
- to cut the shapes for quarter square triangles, align the edge of your ruler with the other pair of diagonal corners and cut again, creating 4 triangles.
To ensure the proper seam allowance is added, it's important to have the correct symbol in the upper right hand corner for the shape you are cutting:
- Empty square for squares
- Halved square for half square triangles
- Quartered square for quarter square triangles
And if you are left handed, then the symbol must be in the lower left corner so that the correct seam allowance is added.
That's it! No math! No magic numbers to remember with the Wonder Ruler quilting ruler!
Easy! Peasey!
The 1/6" Wonder Ruler Quilting Ruler
This is the ONLY ruler on the market today that is marked in 1/6" and 1/3" increments making it the perfect tool for cutting fabric shapes for nine patch and thirty-six patch blocks.
ANY SIZE 9-patch quilt block is just a rotary cut away.
For example, in a recent block exchange, my bee-mates and I decided to exchange 4" finished blocks.

Great! Sounds like fun!
But if I wanted to make a block based on an even 9 patch grid, it was impossible to rotary cut. Each square needed to be 1-1/3" finished, cut at 1-5/6".
My rotary ruler doesn't have that mark. Does yours?
The 1/6" Wonder Ruler does!
Want to make a 5" nine patch? Just align the cut edge with the 1-2/3" line. To make a seven inch block, align the cut edge with the 2-1/3" line.
What freedom!
The Wonder Ruler quilting ruler also comes in an 1/8" version with the grid marked like our traditional quilting ruler in 1/8" and 1/4" increments.
If a picture's worth a 1000 words, then...
...a video is even better. Watch Barbara Chojnacki (creator of Wonder Ruler quilting rulers) as she demonstrates cutting squares, half square and quarter square triangles.
This ruler can be ordered through Barbara's website www.sixgablesdesigns.com.


By Julie Baird
Copyright © 2008-2026 Generation Quilt Patterns, LLC
All Rights Reserved
Generations-quilt-patterns.com does not sell any personal information. (See Privacy Policy)