- Home
- Best Sewing Machine
- Darning Foot
Choose the Best Darning Foot
...for Free Motion Quilting
This post contains affiliate links, for which I receive compensation.
The darning foot (aka quilting foot) is a MUST for free motion quilting.
You may find it called a...
- Free motion foot
- Free motion quilting foot
- Hopping foot, or a...
- Big Foot
There are others, but these are the most common names.
Choose the Best One for You
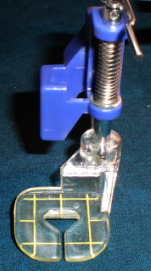
 A 'Big Foot
If you are in the market to purchase a new foot look for one with an open toe and an offset shank.
One that it is engineered specifically for your machine, if possible.
Generic darning feet are available for older models, but you really get the best results with a foot made for your particular machine.
Not sure which to get?
Check with your sewing machine dealer for the correct version for your make and model of sewing machine.
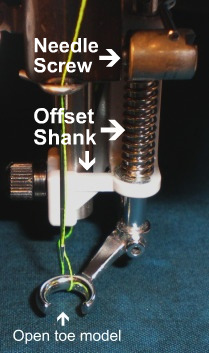
 Darning Foot with an open toe and offset shank
Open Toe
The open toe darning foot helps you free motion quilt a marked design.
Nothing is between your eyes, the marked line and the needle.
Pulling the bobbin thread to the top of your quilt sandwich is easier with the open toe. Getting the thread tail out of the center of the foot is not a struggle
Off-Set Shank
This type of shank provides an open view of the quilt directly behind the needle bar. Truly wonderful regardless of whether you're stitching free motion background fills or marked designs.
Let's Get Setup for Quilting
Find the instructions that came with your foot.
Otherwise follow these general instructions for installation.
Step 1: Install the foot
The darning foot has an ‘arm’ that rides on top of the needle screw to produce a "hopping" movement while you are stitching. The foot moves with the needle.
Try it for yourself. Put a practice quilt sandwich under the presser foot. Put the presser foot down. Use the hand wheel on the right side of your machine to walk through an entire stitch. If the needle is up, the foot is up. Needle down, foot is down.
While you're at your machine take note of one other crucial fact. When the quilt sandwich is under the presser foot and the presser foot is down, you must be able to move the sandwich under the foot.
If it doesn't slide freely, reduce the pressure on the presser foot until it does move. Until it moves, you will be unable to free motion quilt.
Refer to your instruction manual for specifics and suggested presser foot pressure settings.
Step 2: Change Throat Plate
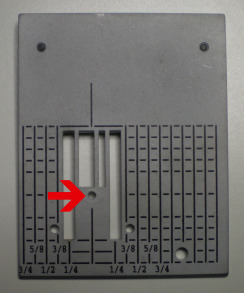
 Single or Straight Stitch Throat Plate
Arrow points to the needle hole
Check your sewing machine accessories to see if you have a single or straight stitch throat plate.
My newest machine, a Juki DX-2000-QVP has a throatplate that will the slide of a button transforms from a standard plate to a straight stitch one. Pretty slick!
This throatplate is especially helpful for really fine, heirloom-type free motion quilting.
It has a single, small, round hole for the needle to pass through.
Your quilt sandwich cannot be pushed into this hole during stitching The result is less puckering in your quilting stitches.
Install it now if you'll be using it. Remember to only use a straight stitch in the center needle position with it. Otherwise you'll be breaking needles.
Step 3: Drop Your Feed Dogs
With free motion quilting, YOU are in control of the stitch speed and stitch length.
Because the feed dogs don't make contact with the darning foot, they do absolutely nothing to physically help you make and control your stitches.
If you leave them up, you may feel a "drag" on your quilt.
Want to prove it to yourself?
Go ahead and...
- Turn off your sewing machine.
- Start with the feed dogs up or uncovered.
- Then remove the needle, you don't want to sew through your finger.
- Next remove the throat plate.
- Put your index finger on the feed dogs.
- With your finger in place hand walk (DO NOT USE THE FOOT CONTROL) through a couple of stitches with the hand wheel.
Could you feel them moving?
The feed dogs are there to move the quilt sandwich through the sewing machine in one direction.
You free motion quilt in all directions.
What does that mean?
In all but one direction of quilting (through the machine) the feed dogs, if left up, will actually be working against you.
Now remember to re-insert the needle and the throatplate.
The Mental Part
I confess!
When I first started machine quilting, once in awhile, I would leave the feed dogs up for free motion quilting.
Did it really make a difference?
Mentally, I believe it did. I don't know if it was the sound of the feed dogs moving, or just knowing that they were there, but the honest truth is that I felt more confident with the them up.
If it helps you to gain confidence in your abilities, go for it. A confident quilter is a good quilter! A quilter who will practice and become even MORE confident.
The Rest of the Story
Time passes and I practice.
Now that I am a more confident quilter, I do not leave them up...ever! Now, they're just in the way!
Step 4: Set Stitch Length
What? Didn't we just say that YOU control of the stitch length?
Yes, but...
Set your stitch length to "0". This saves a bit of wear and tear on your sewing machine because your feed dogs won't move at all during stitching.
And finally...
Check that the quilt sandwich moves freely under your presser foot when the foot is down. Make adjustments as directed by your sewing machine manual.
As you progress in your free motion quilting, you find darning feet are just like potato chips...you can't have just one. As new models are available, try them out!


