- Home
- Machine Applique (Invisible)
- Applique Quilt Blocks
How to Square Up Applique Quilt Blocks
We're almost finished!
This post contains affiliate links, for which I receive compensation.
The Final Step!
Your applique quilt blocks are washed, dried and
pressed. It's time to square them up. Squaring up creates corners with
perfect 90 degree angles. And that makes for easy piecing!
Invest in Square Rulers...
...if you spend much time appliqueing. It is easier to use for this process.
Use one that is as large or larger than the applique blocks you are trimming.
Squaring Blocks with Center Lines Marked
If you marked the horizontal and vertical center lines for your placement marking guides, squaring up is pretty easy.
- Determine the block's Cut Size by adding 1/2" to the finished block size.
- Determine the Halfway measurement by dividing the Cut Size by 2.
- Place your square ruler over your applique block. The "0-corner" of the ruler is at the upper right. The Halfway measurement markings on your ruler match up with the top and right edge of your original centering lines.
- Trim the top and right edge with a rotary cutter, once you are satisfied the appliqued design is sitting in the center of the block and that no applique is less than 1/4" from the cut size edges. You don't want to sew your applique into the seam allowance.
- Remove the ruler. Turn the block 180 degrees and position the ruler with the vertical Cut Size measurement aligned with the left edge of the block. The horizontal Cut Size measurement is aligned with the bottom edge.
- Check that the intersection of two Halfway lines is positioned at the center of the block.
- Trim the top and right edges with a rotary cutter. Your applique quilt block is squared up.
Squaring Up a Block with No Centers Marked
If you used an overlay or light box to position the applique shapes, you may not have marked the horizontal and vertical centers of your block. If you did mark, it's possible that washing the blocks removed the marks. What to do?
Refer back to your original pattern.
- Determine the block's Cut Size by adding 1/2" to the finished block size.
- Determine the Halfway measurement by dividing the Cut Size by 2.
- Now lay your large square ruler over the master pattern. (below)
 The pattern underneath the ruler is 'Lily Rosenberry' by Sue Garman
- Is there a shape in the center to line up the ruler with?
- What shapes are closest to the edge of the block?
- How far from the edge are they?
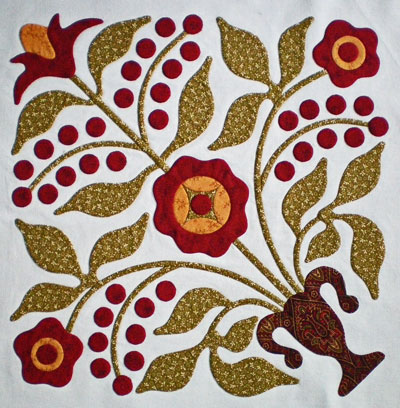 Our Lily Rosenberry block
We'll use these as guides or landmarks to square up our Lily Rosenberry applique quilt blocks. (Click the underlined links below to see a closeup picture.)
- Finished block size is 15"
- Cut Size is 15-1/2"
- Halfway measurement is 7-3/4" (15-1/2 divided by 2)
- The center circle of the center flower is the center of the block.
- The edges of the outside leaves are a scant 1/2" from the outside edge of the unfinished block.
Measure Twice...Cut Once
Position the ruler on the applique block, using all the information above...double and triple checking. You don't want to cut your block too small now!
Trim the top and right edge.
Flip the block 180 degrees.
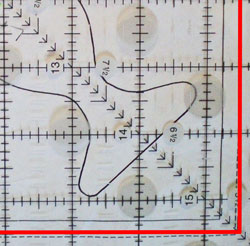
Line up the cut block edges with the 15-1/2" (cut size) lines of the ruler. Check that the 7-3/4" lines cross in the center red circle.
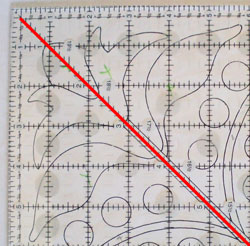
Is the 45 degree ruler line on the center diagonal stem?
Once everything is lined up, the final two edges are trimmed.
Repeat for your remaining blocks and they're ready to be pieced into the quilt top.
Rulers to help square up your blocks
It seems like there's always a specialized ruler for doing things in quilting, and squaring up your blocks is no different.


By Julie Baird
Copyright © 2008-2026 Generation Quilt Patterns, LLC
All Rights Reserved
Generations-quilt-patterns.com does not sell any personal information. (See Privacy Policy)