This post contains affiliate links for which I receive compensation

Quilt design: I need inspiration!

by Elaine DeFoor
(Stuart, Florida)

Phil & Malinda's Wedding Quilt<br /><br />Click on any thumbnail below for a larger image<br /><br />

Phil & Malinda's Wedding Quilt

Click on any thumbnail below for a larger image

I need an idea for a quilt for my daughter's 25th wedding anniversary.

She liked the one I made for her brother and I have included pictures (shown above) so I don't want to make the same for her.

She does not like "quilty quilts" which I take to mean traditional blocks. I would like to do a black to grey with occasional purple and some silver for the 25th.

I saw a log cabin monotone one using beiges to whites with brown and unless one looked closely it was hard to distinguish the blocks. But I don't know how to begin or I need a new idea.

Any help would be appreciated.

I have gotten much help from this website. It is incredible.

Thanks!

Reply

I'm blushing...I'm so glad this website has been helpful to you! Thank you for the compliment, it really means a lot to me.

Now to the business of your next project!

Quilt blocks that don't look like quilt blocks...

I love this quilt pattern, Candy Queen by Lori Allison of Allison Quilt Designs.

It's got that log cabin feel to it (a chevron or half log cabin-like design), yet the blocks don't really stand out from each other. The use of color kind of 'smushes' them together...it's all about color, value and stash.
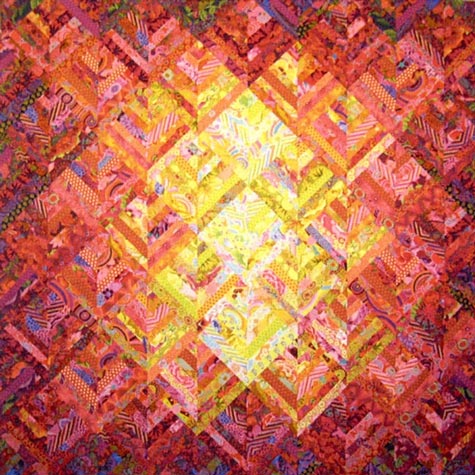
Candy Queen by Lori Allison

"Candy Queen" by Lori Allison
Photo Courtesy of Allison Quilt Designs


To see more of Lori's designs please visit her website at: www.the-sampler.com.

Next up is...

Sanctuary Squares by Cindy Lammon.

Yes, the blocks really do stand out, but it's got a modern feel to it. Clean and graphic. (Notice the simple lines of quilting that Cindy has used...excellent execution in my humble opinion!) This quilt, too, would be a wonderful color study.
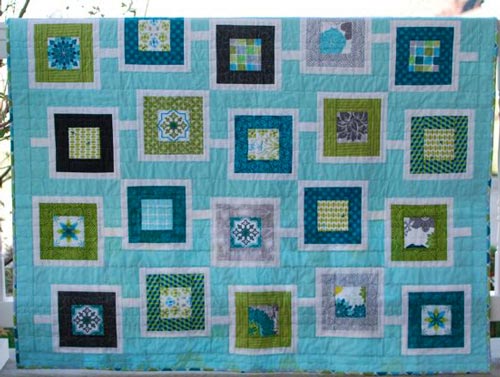
Sanctuary Squares by Cindy Lammon

"Sanctuary Squares" by Cindy Lammon
Photo Courtesy of Hyacinth Quilt Designs

The instructions for this quilt are on a free pdf download (click here) on Cindy's website www.hyacinthquiltdesigns.com.

You might also enjoy Cindy's blog found here...

http://hyacinthquiltdesigns.blogspot.com

...it's a great source of inspiration.

And finally...

This last quilt is one that I've made over and over again. (Yes, you're right, it's not quilted yet!)
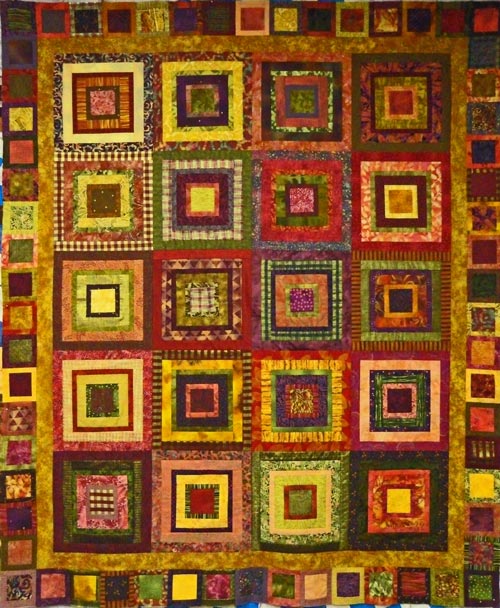
Concentric Squares

"Concentric Squares" by Julie Baird
Generations Quilt Patterns

It is a Courthouse Steps quilt pattern that creates 'concentric squares'. The centers are cut 3". The first and third round of logs are cut at 1"; the second, fourth and fifth rounds are cut at 1-1/2". Click here to find rotary cutting directions for these 'Concentric Squares' Courthouse Steps quilt blocks here.

The gold border is constructed from strips cut 2-1/4" wide. The outer blocks are made with center squares cut 3". The single row of logs around these squares are sewn from strips cut 1" wide. A 'piano key' type of border would work just as well.

While the blocks are clearly evident, the color pull really makes it. Just find a focus fabric that you (or your sister loves) and pulls fabrics that go with it. Perfect matches aren't necessary. Just find fabrics that play nicely together. (This quilt top is based on the same set of fabrics that I used in my 'Fish Quilt'. I describe how I pulled the fabrics here on a page called Scrappy Quilts.

Elaine, I hope this gives you some ideas. Let me now what you decide to create. I'd love to see pictures of the quilt when it's finished!

Piecefully,

Julie Baird
Editor

Comments for Quilt design: I need inspiration!

Click here to add your own comments

problem
by: Mrs. Love

Hello!

I'm just starting a quilt as a graduation gift for my son. I wanted a concentric squares pattern with different widths on the squares and found this page by web search.

I just finished sewing together the first block and I had a terrible amount of waste on each round and the finished block is an inch smaller than what the pattern says: mine is 9 1/2 inches square as opposed to the pattern saying 10 1/2 inches.

At first, I thought I was really sloppy with my seams but looking at the pattern closer I'm wondering if it's because each strip is called for being cut too big. For example, the 2nd round sides (letter H in the pattern) calls for being cut 1 inch by 4 inches and shouldn't it be 1 inch by 3 1/2 inches if I'm starting with a 3 inch square as the pattern states?

I think all the strips from there on out are a half-inch too long and the finished size is actually going to be 9 1/2 inches.

Quilting math is not my forte and I'm a beginner level quilter so I'm very confused.

From the Editor:I've double checked the pattern and the measurement are correct.

Let's get you unconfused and walk through the first round to see how the cut length of the patches is determined.

Our center square is cut 3"x3".

The next strip I must be the same length or 3". Referring to the cutting chart we see that I is cut 1" wide by 3" long.

Sew an I to opposite sides of the center.

After pressing, measure from cut edge to cut edge across all three patches. If your seam allowance is correct this measures 4". Each of the two seams use up 1/2" of fabric (1/4" from each of the two fabrics in the seam).

Patch H is cut long enough to reach across all three patches so it is cut 4" long.

After adding both H's, your sewn patch measures 4" x 4" from cut edge to cut edge.

Adding the logs continues in this fashion.

These are the edge-to-edge measurements for the block after each 'round' of like colored logs is added:


After adding this round of 4 logsEdge-to-edge measurement
I+H4" square
G+F6" square
E+D7" square
C+B9" square
B+A11" square

After the blocks are sewn into a quilt, their finished size is 10-1/2" x 10-1/2".

A good quarter inch seam allowance is essential to making an accurate Log Cabin quilt block. Seam allowance that are bigger than 1/4" result in a too-small block; seams sewn smaller result in a too-big block.

In this design, there are 10 seams in each direction. A seam allowance sewn at 5/16" instead of 1/4" (or 4/16") results in a block that is too small.

A seam sewn at 5/16" means that the block is 2 times 1/16" or 1/8" smaller (each seam has two pieces of fabric in it).

That means that if every seam in this block is stitched 5/16" that the resulting block would be 10 times 1/8" or 1-1/4" smaller than it should be.

I suspect that seam allowance is the culprit.

I hope this helps. This is such a fun pattern to make, I don't want you to miss out on the fun.

Piecefully,

Julie Baird

Thank you! Thank you!
by: Elaine DeFoor

Thank you all for all your suggestions. I really liked the Candy Queen one. I have ordered the pattern and hope to use that one for my daughter's anniversary quilt.

Click here to add your own comments

Return to GQP's Quilting Forum.


This article was printed from Generations-Quilt-Patterns.com

Print Article

Follow Us