- Home
- Quilting Tools/Supplies
- On Point Ruler
The On Point Ruler
This one's a Keeper!
This post contains affiliate links, for which I receive compensation.
The On Point Ruler by Donna Lynn Thomas promises to make quick work of cutting patches for blocks that contain on-point squares, rectangles and half square triangles.
No messy math to memorize. No funky formulas to fiddle with.
No templates to draft and trace.
No mangled paper piecing patterns that are too much work for the result.

While I'll discuss some of the funky math that you'd need if you didn't use this ruler or templates, don't worry.
You're not going to have to remember any of it.
With the On Point, truly, all the messy math is banished!

On this page are:
- Examples of the kind of blocks the ruler is good for
- A quick review of the math can avoid by simply using this tool
- An alternative to the ruler if you're just not into a huge ruler collection (I'm not, but the On Point is a keeper IMHO)
- Links to purchase this ruler if it meets your needs
Let's get started!
But first, a confession
Honestly, I didn't expect to like this ruler.
I've got piles of rulers that were a "fantastic" idea when I bought them. But they never got used.

Or used only once.
Now they just take up space.
LOTS.OF.SPACE.
This ruler does EXACTLY what it says it does.
The only thing to remember is the finished size for a patch. And it looks different enough from your every day rulers so that you won't get it confused.
Now, I'm getting ahead of myself.
Let's find out why this quilting tool is so great!
What kind of blocks is the On Point good for?
Below are some examples of the types of blocks you can cut.
If the name is underlined and goes gray when you run the mouse or your finger over it, click on it to go to instructions for that particular design.


What's the common thread?
They all have patches that are on-point—like a diagonal quilt setting.
To finish each, you'll need to cut side and corner triangles with your standard ruler.
What does the On Point Ruler do?
For this discussion we'll be using the simple Mosaic #3 block.
There are instructions to make it in three sizes on this site. [Click here to go there now.]

In this next section we'll go through the math.
If you'll take my word for it, you can skip down to 'Cutting with the On Point'.
Cutting with a standard ruler
 Mosaic #3 quilt design
If you were making a quilt with ONLY Mosaic blocks, you could simply use your every day ruler to cut the yellow and white squares.
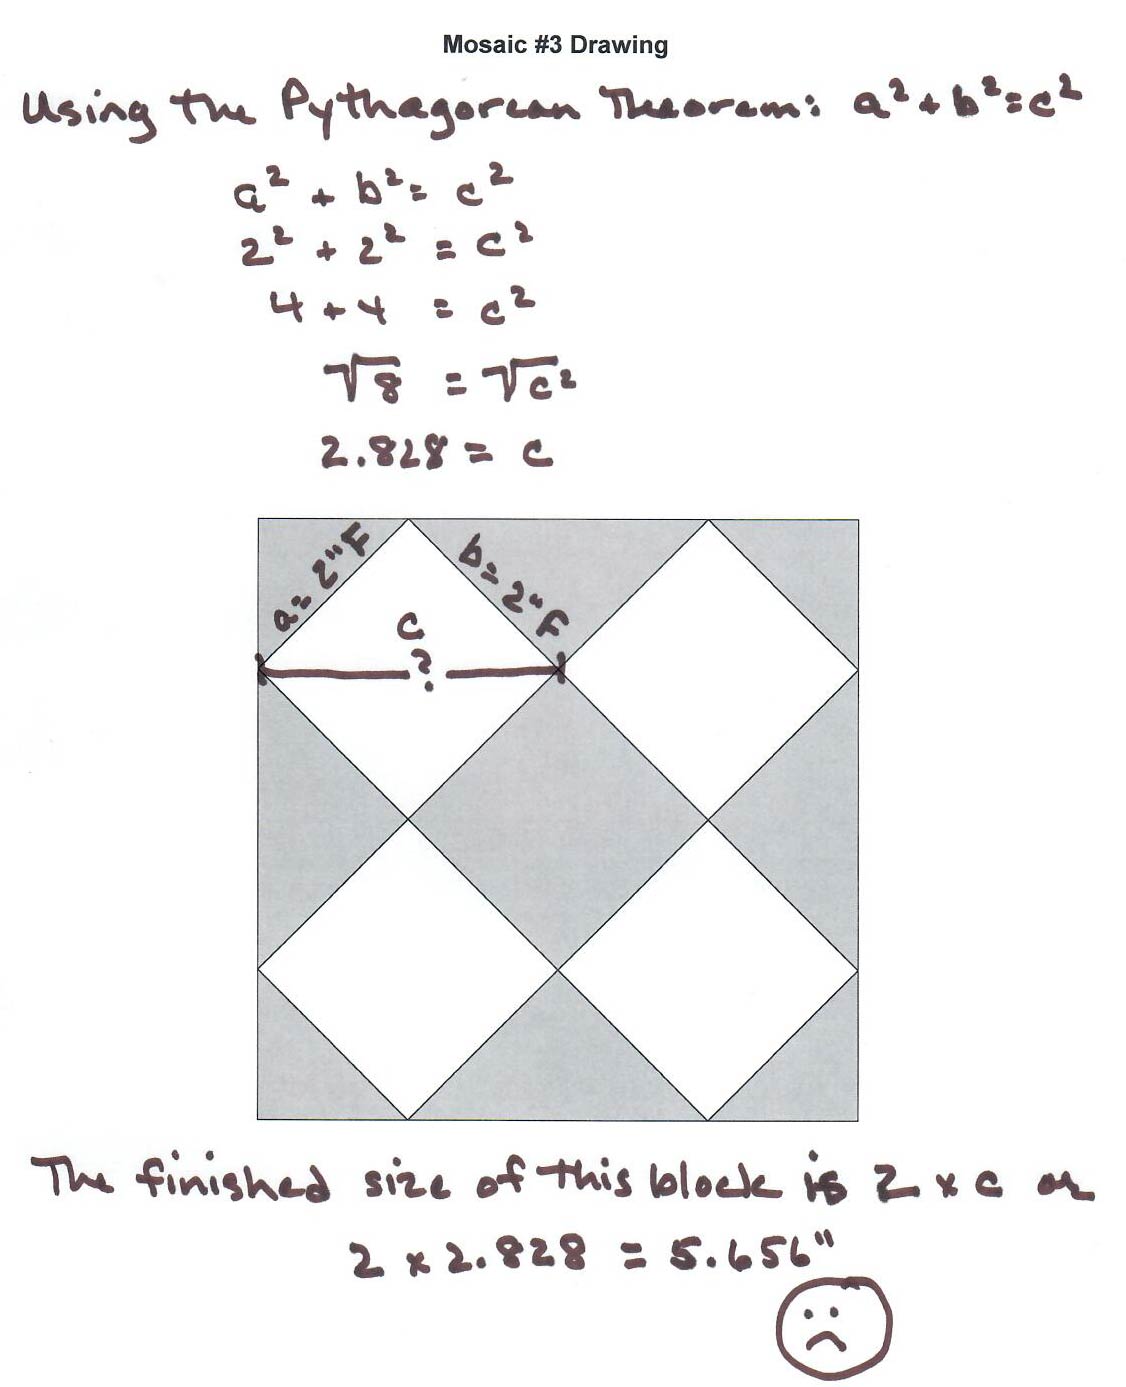
For this example, 2-1/2" cut squares that finish at 2" x 2".
That's because if you sew with an accurate quarter inch seam allowance, the blocks will all come out the same size.
It really doesn't matter what size the patches were cut—just as long as they all started at the same exact size.
All your blocks will fit together.
The resulting block finishes at 5.656" or just a smidgen over 5-5/8" (5.625"). [Click here to see that math.]
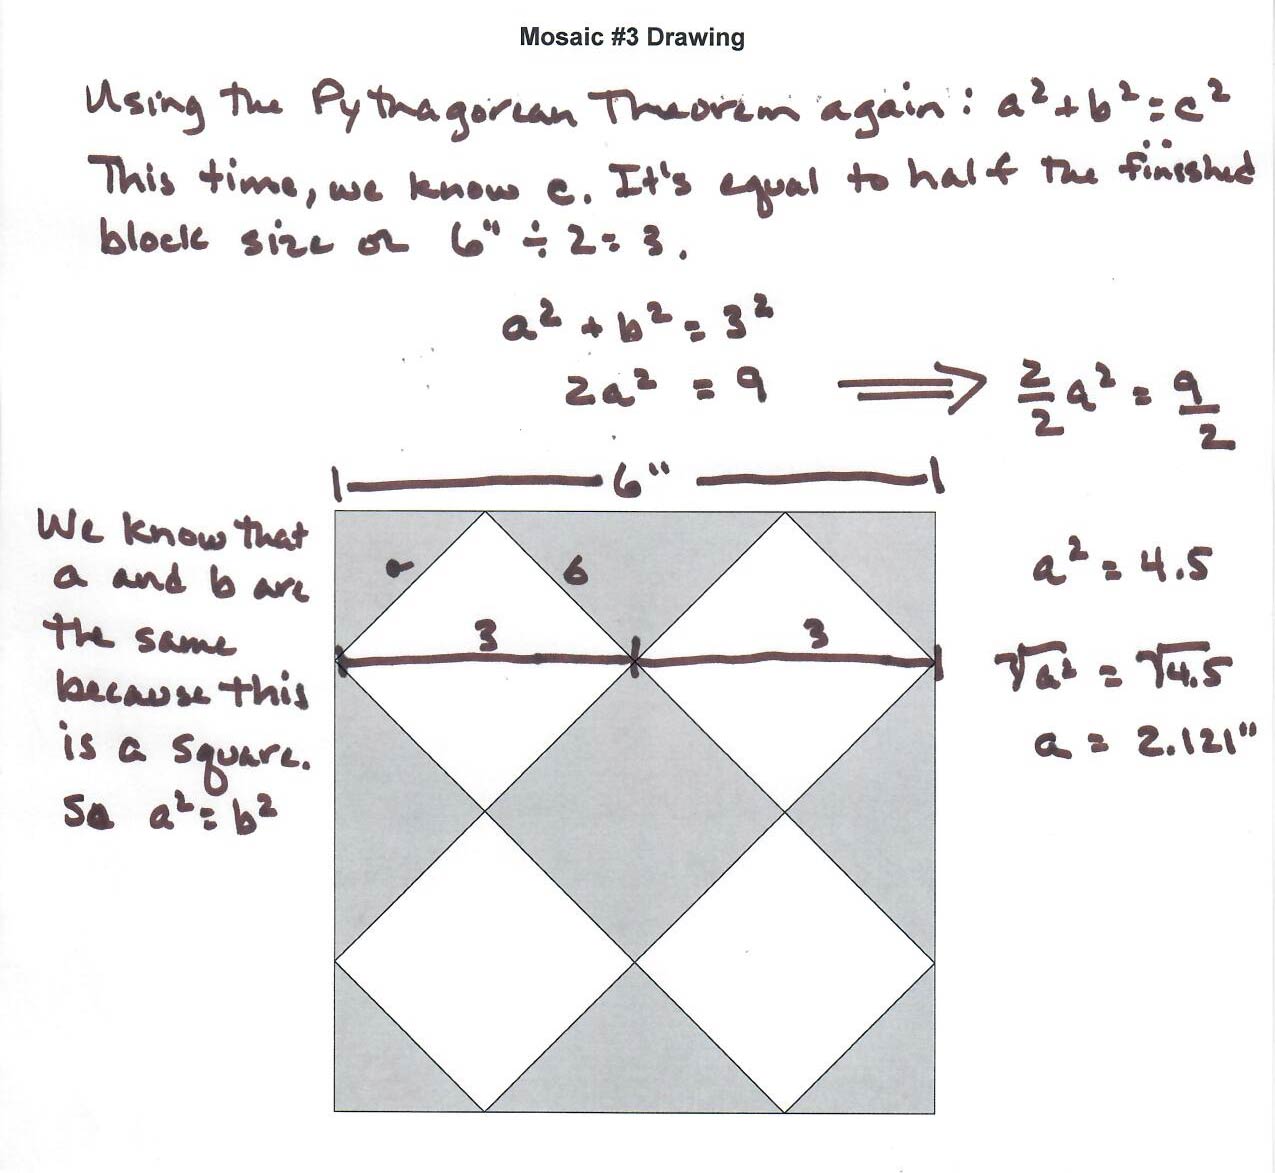
If you wanted a block to finish at 6", you'd have to back into the calculations. The result is squares cut at 2.121" x 2.121" or just a wee bit less than 2-1/8" (2.125"). [Click here to see this calculation.]
The measurements are close, but not quite rotary cutter friendly.
In my humble opinion, when you take the time to sew a good, accurate quarter inch seam and press properly, getting fuzzy with cutting the patches just seems wrong.
Why start with patches that aren't cut exactly?
This is where knowing yourself as a quilter comes in.
For myself, accuracy is a big deal. I enjoy testing my skills. My heart sings when my points match (especially on the first time). The journey of making the quilt is what feeds my soul.
For other quilters, having a finished quilt is most important. That satisfaction drives them to continue.
Whatever drives YOU. Whatever feeds your quilting-soul. That is what's most important. Quilting is how YOU choose to spend your free time.
If this particular ruler helps you wring the most enjoyment from your precious quilting time, then let's continue.
Cutting with the On Point
It's really simple.
All you need to know is the finished size of the patch you're cutting.
Finished size is all important.
All that messy math I showed you earlier on this page. Banish it from your head—if you're using the On Point.
Let's go back to our Mosaic #3.
Mosaic #3 designIf we drawn a line through the center vertically and horizontally (red lines), you can see this block is a 4-patch...whose grid is equal to the length of the diagonal of the white square (green line).

You saw the math for this calculation (if you peeked) in the previous section.
As I promised, there's no more messy math now. Just finished sizes and simple stuff.
If this block is to finish at 6" square, the diagonal measurement of those white squares must 3" or 6 ÷ 2.
Grab your trusty On Point ruler and cut four 3" white squares.
Say what?
Yep. Four 3" white squares.
How can that be?
That's so simple, right?
All you have to remember is to cut them with the On Point Ruler.
Why's it so simple?
The secret is the ruler is designed to measure the diagonal of a square.
Below are your everyday ruler and the On Point side by side.
 On Point ruler (left), standard ruler (right). The blue arrow points to the half inch seam allowance all the way around the ruler.
The squares for the On Point are smaller than we're used to.
That's because this specialty ruler measures the diagonal of our patch. Below is a close-up with the 1" diagonal measurement marked in blue.

To keep everything even, there's a 'blank' half inch around the perimeter for your half inch seam allowance. That's why we always work in finished sizes.
And it works like a charm.
Seriously. It does.
Use it to trim on-point half- and quarter square triangle blocks
 The diagonal line bisects the trim up corner
The On Point Ruler has a trim up corner on both the square and rectangular versions.
Use it just like you use the 45° line on your standard ruler.
Align this diagonal mark (red arrow) with the seamline of your half square triangle and quarter square triangle blocks.
Trim as usual.
All you have to remember is that patches cut with the On Point are trimmed up with it, too.
Templates
You have three alternatives to this ruler:
- Round the measurements of your patches and cut with your standard rotary cutting tools.
- Use templates
- Create paper piecing patterns
On this website, if I've provided instructions in our Free Quilt Block Patterns library to blocks like ones shown on this page, I will be using this ruler to make them.
 Buying tools you don't really want is cents-less!
However, it's my personal belief that you shouldn't be forced to buy a tool just to try out a block.
Rather cents-less, if you ask me.
So for those types of quilt blocks, I also include an alternate way to make them using either templates or a paper piecing pattern.
Those resources are always available as a free download to you.
For more information on using templates and paper piecing patterns from this website, click here.


Nifty Notions


By Julie Baird
Copyright © 2008-2026 Generation Quilt Patterns, LLC
All Rights Reserved
Generations-quilt-patterns.com does not sell any personal information. (See Privacy Policy)