- Home
- Machine Quilting 101
- Layering and Basting a Quilt
Layering and Basting a Quilt Like a Pro
Beginning Machine Quilting 101 continues...
This post contains affiliate links for which I receive compensation
Layering and basting a quilt sandwich is a job that should be done carefully, because it effects the quality of your finished quilt.
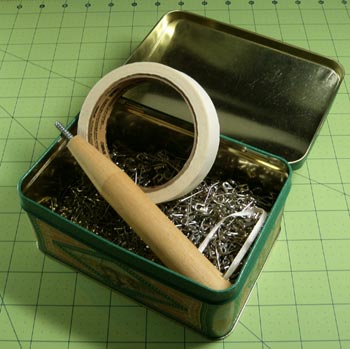
 These are my supplies: curved safety pins, masking tape and a Kwilt Klip
When I first started quilting, I really didn't think it was a big deal but learned (after quilting tucks into the backing) just how important it really is.
There are several ways to baste a quilt.
The first involves safety pins and is detailed on this page. Instructions and videos are also included for using quilt basting spray and then layering and basting a quilt sandwich on boards.
Find the method that works best of YOU and YOUR quilting space.
Pin Basting
This is the method of layering and basting a quilt that I teach in my Beginning Machine Quilting classes. In my opinion it is the most accessible with the fewest amount of 'extras' to have to buy and store.
You'll need a large clean open flat space—I use my kitchen floor. It has 12" ceramic tiles which are useful for keeping the layers straight and centered.
And safety pins...lots and lots of safety pins.
Step 1: Cut or stitch a quilt back
Create your quilt back. Add 6"-8" to both the length and width measurements. (i.e. for a 60"x80" quilt, I'd cut or create a back of 68" - 88").
If the quilt will hang on the wall, do make sure the lengthwise grain runs north to south. This lends stability to the quilt so it hangs better without sagging.
If you must piece your back use a 1/2" seam, pressing it open to distribute bulk.
If you've had trouble moving the quilt sandwich as you quilt, you can starch the fabric for your back. It will slide much easier. Remember, you must wash the quilt after completion to completely remove the starch from your patchwork.
Step 2: Lay out the backing
Lay your backing, seam allowance side up, on a large, flat, clean
surface. Now with masking tape, tape the centers of one pair of opposite
sides. Now tape the other pair of opposite sides.
VERY IMPORTANT: This is the 'secret sauce' of the quilt sandwich...
Pull your fabric taut...
...but not stretched,
as you secure it.
The whole purpose of taping the backing down is to control it after it's covered by the batting and quilt top.
Continue taping, first one set of opposite corners, then the other set of opposite corners. (Once it's covered, you can't see if anything's happened to it. That's the purpose of this step.)
You're probably detecting the pattern now. If you tape in one place, you'll need to next tape it's opposite side. Continue to pull taut. Stretching causes distortion and puckers in your quilt top.
Now fill in all the sides, alternating between opposites, until the backing is securely taped.
Now test your work. Run you palm over the backing fabric, pressing down about as hard as you would to wipe the tears from a child's face.
If a "bubble" appears in front of your hand, you'll need to pull the fabric and retape in that direction.
Again, pull it taut, don't stretch it.
For smaller, wall quilts, you will probably make fewer of these adjustments. For larger quilts, I always have to adjust—multiple times usually. It's just how it is.
Take your time, this is an incredibly important step!
A word about the tape...
I use masking tape, NOT blue painter's tape. The adhesive needs to be sticky enough to hold the fabric to the floor or table without releasing.
My experience is that the adhesive on blue or green stuff isn't quite strong enough for our purposes...especially if you've got a really big backing to contend with.
Step 3: Layering the batting and top
Once you are satisfied your backing is stable, next layer your batting (again cut 6"-8" inches bigger than your top) on the taped backing and smooth. Next center and layer your patchwork. Smooth the layers together with your hands.
If you've used a cotton batting (which I recommend for beginning quilters because the cotton fibers in the batting naturally want to stick to the cotton fabric and there's less slippage. A polyester batting tends to be more slippery to work with.)
Step 4: Pin basting
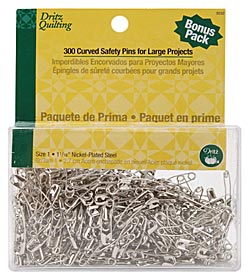
I use short, curved safety pins for basting.
Do you need the curved one—they are more expensive, right?
Yes, they do cost more, but for me, the curved ones are easier to close so I've been slowly switching over to them...especially when there's a good notions sale.
Avoid pinning in the seam lines. You'll most likely ditch quilt or stabilize them first. Don't make more work for yourself.
Start in the center and work your way out to the edges.
For larger quilts—ones that I'll have to crawl on to get to the center—I start in the center and then bring a line of pins out to the left, to the right, to the top and to the bottom to section the quilt top into quadrants. Continue pinning.
When you think you're finished, lay your palm on the quilt top.
You should feel at least two. You certainly can add more (I regularly do). Too few pins lets your quilt top shift as you quilt. That can cause tucks both front and back.
Helpful Hint:
Store your safety pins in a metal box, not a baggy (mine is shown at the top of this page) and store them OPEN.
You use them open so there's no good reason to spend your time closing hundreds of them, when simply using a box that the sharp points can't pierce does the trick!
Step 5: About closing all those pins...
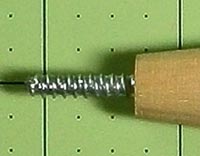
 Kwik Klip close-up
Yep, you've got to do it and it can be a real pain.
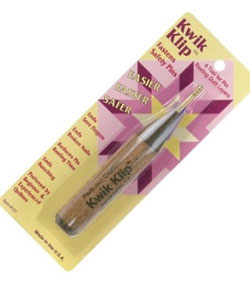
I like to use a tool called the Kwik Klip or Pin Popper (left). It's nothing more than a handle with a screw sticking out the end of it (below, left).
The screw threads 'hold' the safety pin and give you some leverage to make closing them easier.
With something like 500-600 pins (minimum) on a full size quilt, you're saving a lot of wear and tear on your fingers with this silly thing.
And yes, I have literally bloodied my fingers closing all those little beasts in one session. Not a pretty sight!
When your patchwork is completely pinned, I close all the them around the outside edge, and then work my way into the center so as not to stick myself unnecessarily.
Once closed, remove the masking tape and you're ready for quilting.
If the thought of pin basting has you running for the doors...
Next we'll discuss a couple of alternatives to this traditional method of layering and basting a quilt. One is the use of a basting spray instead of the dreaded safety pin.
The other involves using a system of two boards to control the layering while basting.
Both are good alternatives.
Remember...
...what works best for YOU is the best choice! It will have you successfully layering and basting a quilt sandwich in no time!
Table of Contents
for Beginning Machine Quilting 101
Introduction
Beginning Quilting 101: Quilting Instructions for the Beginner


