- Home
- Beginner Quilt Blocks
- Half Square Triangle
How to Make the Perfect Half Square Triangle
Technique #1: Creating Quick Pieced HSTs
This post contains affiliate links for which I receive compensation
The half square triangle is one of the most basic units in quilting.
Also referred to as either 'HST' or 'triangle square', these units are simply a square made from two equal right triangles.
The bias seam is contained within the edges of the unit for stability during construction and use. All outside edges are on the straight of grain.
Here you'll learn to make these units two at a time, either cutting patches to the exact size, or with a little wiggle room.

Then it's time to move onto our second technique which produces 2 units—one exactly the size you need and the other a bonus HST.
Our third method involves sewing around the perimator of a square and then cutting. This technique produces 4 at the same time.
With this method, two equal-sized fabric-squares are marked, sewn and then cut apart to produce two HST units.
Pros:
- This method is perfect for scrappy quilts. It's easy to incorporate a wide selection of fabrics and use up small scraps.
- Your cutting and stitching must be accurate.
Cons:
- Each unit is individually marked.
- If you need to produce a large quantity made from the same two fabrics, there are faster ways.
Now, let's get started!
The Technique
The Formula
Cut two fabric squares equal to the finished size of the HST unit plus 7/8" for seam allowances.
This yields HSTs the exact size needed.
Step 1
For 3" finished HSTs, add 3" plus 7/8". Cut one 3-7/8" square from two contrasting fabrics.
Every two squares will yield 2 half square triangles.
Step 2
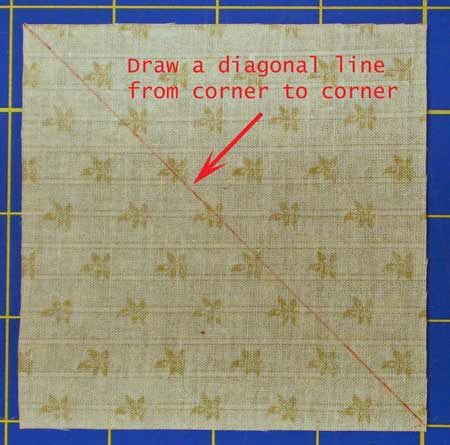
On the back of the lightest fabric, mark a diagonal line from corner to corner. Mark only as dark as you need to see the line, taking care not to distort the fabric as you draw along the bias grain.
Red pen is used in our example below to make it easier to see, though I prefer to use a mechanical pencil which creates a consistently thin line.

Step 3
With RST(right sides together), layer the squares aligning all four edges. With your 1/4" presser foot installed, stitch 1/4" away from the drawn line on both sides of the line.
The photo below shows the quarter inch quilting foot. If you don't have this specialty presser foot, then mark the two stitching lines 1/4" away from the center (click the link to see how this looks) and then use your standard presser foot. Make sure your markings are exactly 1/4" from the center line.

Step 4
Cut the unit in half along the drawn center line. Press the units flat before opening to set each seam.

Step 5
Finger press the seam allowance towards the darker fabric. This is to prevent a tuck from forming along the seam which would mess up your finished size.
NOTE: There may be times when you'll finger press the seam allowance to the light side or even press it open to reduce the bulk.
Step 6
Open each unit and with your iron press the seam allowance towards the darker of the two fabrics. I press from the front side to make ensure no tuck is pressed into the unit.
Remember, put your units 'dark patch up' on the ironing board. Then when you open it to press, you'll automatically press to the dark side.
Step 7
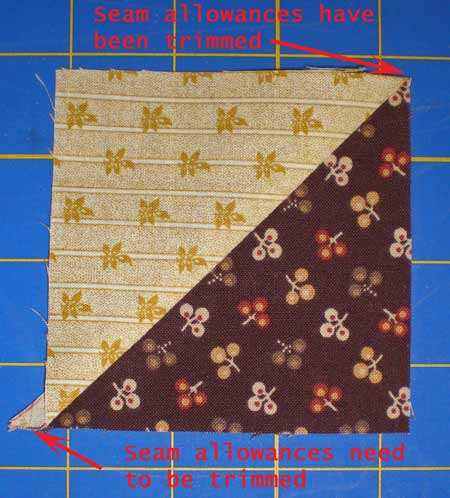
Trim off the 'dog ears' (those little pieces of fabric that stick out past the edges) to make piecing easier.

Step 8
Measure the half square triangle to check it's the right size. Lay the 45 degree line of your ruler along the diagonal seam line.
The resulting half square triangle should measure the size of the finished square plus 1/2" for seam allowances. For our example, that measurement is 3" plus 1/2" or 3-1/2". And it measures up exactly.

What if Your Half Square Triangle
Doesn't Measure Up?
Sometimes, no matter how hard we try, things just don't come out right. If that happens, double check that the original squares were cut the correct size. Then...
If the units are too small:
- Did you press correctly? Sometimes we accidentally press a tuck into the seam line in our excitement to get the project moving.
- Is your quarter inch seam accurate? Your results may be more accurate if you draw in both stitching lines 1/4" from the center diagonal line.
If the units are too big:
- Was your seam allowance too small?
- If you drew stitching lines, were they exactly 1/4" from the center line.
- Did you stitch exactly on the line?
If you have a lot of these shapes to make, it's a good idea to measure the first few to test that everything is set up correctly. Then measure periodically if you've got oodles and oodles to make.
Variation 1 - Cut Over-sized Patches
While pressing many, many triangles it's easy to use just a bit too much gusto and pull too hard on that bias seam, stretching the finished triangle unit out of shape.
Trimming after pressing always results in a perfectly sized half square triangle. When the units are the correct size your quilt blocks go together so much easier.
Pros:
- The units always come out perfect even if you've been a bit casual in your stitching.
Cons:
- It takes extra fabric and time.
The Technique
Simply cut your patches the finished size plus 1-1/8" to 1-1/4". This adds an extra 1/4" to 3/8"—plenty of fabric to trim away. Then follow Steps 2 through 6 above.
Now, to trim your unit you'll need a rotary ruler (with a diagonal line), mat and cutter.
Step 1
Place the pressed unit on your cutting mat, right side up. Position your ruler so its diagonal line matches the bias seam. The edges of this pieced triangle square must extend past the edges of your ruler.
We are trimming to get a perfect shape. To do that you'll need to trim all four sides.
Don't try to line up two edges with the ruler and only trim two sides, you're defeating the purpose of this method.
Step 2
With your rotary cutter, trim the two exposed edges of the triangle square on the top and right hand side of your ruler. (For left-handers, trim the top and left-hand side.)

Step 3
Reposition the unit and ruler so the remaining two untrimmed sides extend past the top and right edges of the ruler (Again, for lefties, past the top and left edges...). The diagonal line on the ruler exactly covers the bias seam of the triangle square.
The cut edges underneath the ruler should align with the unfinished size of the square. For our example, the trimmed edges are aligned with the 3-1/2" lines of our ruler.
Trim.
This HST unit measures exactly the finished size plus 1/2" for seam allowances, 3" plus 1/2" or 3-1/2" . The trimming in Steps 2 and 3 has also removed the dog ears.
These perfect units are ready for use in your piecing.
Variation 2 - Individual HSTs
Sometimes you don't need too many triangle squares, but you want a lot of variety.
Use either method described above--right-sized or over-sized-- but instead of marking the center line, use your rotary cutter and cut the the squares in half diagonally.
Then simply sew two triangles RST with a quarter inch seam allowance.
Press to set the seam. Finger press open to avoid tucks. Press with your iron again, seam allowances to the dark (unless you choose otherwise).
Measure or trim-and-measure (Variation #1) to confirm accuracy.
And Voila!
You're in half square triangle Heaven!


